Sunday, August 21, 2016

Mint Sherbet

As anyone with a garden can attest, this is the time when you get to start picking the many fruits of your watering, weeding, and chasing away squirrels! We at A Book of Cookrye are no exception, and truly, this is the time when we get to enjoy the spearmint we planted! ...Or at least, it would be the time for enjoying the mint had the plants not died.
Truly a bountiful mint harvest.

I can't lie. While the random hodgepodge of plants we try to pass off a garden does look all right, it's nothing compared to what we planned and planted for. Most of the plants we originally set out died in the spring floods. The few survivors of that were dug up and eaten by squirrels. The few survivors of the spring floods and the squirrels flopped over and died in the summer heat. (At least since we started from seeds, we didn't spend a massive fortune on plants that died.)
Among other things, we planned a beautiful little section of all night-blooming flowers, which we'd put a table in the middle of. This is one of five surviving plants of the would-have-been magical moonlight tea garden.

And so, for no reason other than it's pretty, this is the moonflower vine we planted! Actually, we planted literally two entire packets of moonflower seeds, but while most of them sprouted, only four survived and of those only one has bloomed.
Using the ant for scale, you can see this flower is huge.

Anyway, we decided that even if we didn't get the mint ourselves from our own garden, we could nonetheless savor the fruits of the mint we would have gotten from our own garden had it not died.

The Cotton Country Collection, 1972

Monroe, Louisiana's (apparently) famous
Mint Sherbet
6 firmly packed tbsp chopped* mint leaves
6 oranges
2 lemons
2 c sugar
2 c water
Food coloring (optional)
1 egg white
1 c cream

Grate the rind off one lemon. Juice all the fruit. Soak the mint leaves and the lemon rind in the juice for at least 30 minutes.
When the time has passed, put the sugar and water in a saucepan over high heat. Boil without stirring for 5 minutes. Add the mint and juice. Cover to keep out bugs and dust, and leave until it's completely cooled. You may want to do the syrup the day before since it'll take a while.
When the syrup is cooled, strain it and add the cream. If you like, add blue food coloring to make it green. Beat the egg white stiff. Pour a little of the syrup into the egg white and gently fold it in. Add in a little more, until it is no longer so thick it would make impossible-to-beat-in lumps. Then stir it into the rest.
Pack into an ice cream freezer and freeze.

The Cotton Country Collection, 1972 (contributor: Mrs. RC Sparks)

*Or, to save time, put the mint in a small cup and snip with scissors. For the record, I used stems and all since you strain it all out anyway.
While you could refrigerate it or otherwise speed up the cooling, I didn't since it seems like it's supposed to be an extended time for the mint to steep.

 Apparently this recipe is a Monroe, Louisiana specialty, or so the note above the recipe claims. Searches for combinations of words like "Monroe mint sherbet" didn't turn up so much as a late '80s newspaper clipping about the apparently famous mint sherbet to be found in Monroe, Louisiana.

Here we must pause to note that while 6 tablespoons of chopped mint doesn't seem like you will use very much, the entire package of mint leaves yielded barely over three spoons (good thing we're cutting this recipe in half). That includes all the stems since, upon realizing you're supposed to strain everything out anyway, we figured plucking all those tiny leaves would take forever. We just put all the mint in a little cup and had at it with scissors until it appeared sufficiently chopped.

Also, as we found out when we made water ice, any recipe that involves juicing massive amounts of fruit tends to get very messy. Also, if you have to cut your oranges small enough to fit in a lemon squeezer, it will take a long time.


This doesn't look like orange juice and mint, does it? If I couldn't smell it, I'd have thought you're supposed to pour it into a frying pan and get an omelet.


I had severe misgivings about the recipe at this point. This bowl of juice, having been left to its own devices to sit for however long it took to clean the kitchen and wipe off the last sticky deposits of orange juice from the countertop, tasted bitter and nasty. We considered doubling the sugar to make up for it.
This had better be enough sugar to make up for how the rest of this recipe tastes.

However, we weren't too terribly worried about how bitter and awful the orange juice tasted. Coffee tastes like the distilled misery of whatever job one drinks it to stay awake from, and copious amounts of sugar make even that pleasant. Of more pressing concern was the fact that, despite mint being in the recipe name and present in great quantity, the orange juice didn't taste minty.
Looks like I'm trying to eat compost.

To our great surprise here on A Book of Cookrye, the mint didn't add a cute green tinge to this at all. This was such a bright yellow that, despite having absolutely no artificial color in it whatsoever, looked unnatural.

It looked even worse when we added the cream. On its own, the syrupy stuff looked like it might be that weird butter stuff they dump on stale popcorn at movie theaters, but it looked like a pee sample once the cream was in it.

Here, we at A Book of Cookrye made an executive decision. Usually, when we make things that are flavored with actual things and not bottles of extract, we like to leave them whatever color they turn out to be. It makes it easier to be smug about how all-natural our calorie bombs are. However, we had to add some neon blue because mint is not supposed to be such a bright yellow. We were hoping to somehow land on that color called "mint green," but instead got something closer to the walls you stare at while in line at the DMV.
At least it looks like it contains mint now.

Here we get to the instruction that confused me the most. What's the point of this egg white?

Whatever the egg white was supposed to do, it refused to mix in at all. It just bobbed merrily away from the spoon in its little lake of artificially colored mint green. We had to remove the egg white and gradually add enough syrup-cream to make it runny enough to mix in.

It later occurred to me that maybe you were just supposed to plop it in there and it would gradually get mixed in as the ice cream freezer spun.

All right, it's now the color of the computer we had in the '90s. To be fair, that's mostly the egg white foam floating on top- if you stirred it aside, you found a pale green cream under it. The real question- will this stop looking so bad once it's been frozen?

Actually, it looks surprisingly good! And despite requiring artificial color to get there, it's a pleasantly natural-looking shade of minty green! But how does it taste?
Pretty good, actually. Everyone who tried it, independently of each other, said it was "refreshing." It doesn't taste like mint-flavored things at all, but the fresh mint and orange juice combination is indeed very delicious. Also, as a recipe note, it's really good with some gingerbread as long as you don't tell anyone the recipe was supposed to make brownies.

Wednesday, August 17, 2016

The Oldest Known Recipe for Brownies

Today, we at A Book of Cookrye present... the oldest recipe ever for brownies! I'm not kidding. This is the oldest known brownie recipe, period.
The Boston Cooking-School Cook Book, 1896

Yep, the earliest brownies ever were in fact blondies. According to this fascinating history (or at least, it's interesting to people into food history) the first recipes for brownies were for blondies, and chocolate brownies waited another 10ish years.
Brownies
⅓ c butter
⅓ c sugar
⅓ c molasses
1 egg
⅞ c flour

Heat oven to 350°. Grease a 9" round (or smaller) pan.
Using a whisk, mix the first three ingredients. Thoroughly beat in the egg, then add the flour. Whisk out any lumps, then pour into the pan. Bake until the center springs back when lightly pressed. This would also make good mini-muffins, which would also be more faithful to the original.

The Boston Cooking-School Cook Book, 1896 via Food Timeline

I can't lie, I like blondies as much as I like chocolate brownies, when I read that blondies came first I was most delighted. The ridiculously high amount of molasses in this was the final push: I would make this and have chewy molasses-brownie goodness!


Doesn't that look delicious? Or at least, doesn't it look amazing if you like molasses? That's a huge pond of molasses for the butter and sugar to swim in!

As hard as we flogged this with a wooden spoon, the butter refused to stop floating as lumps in the delicious sludge. And so, a whisk was dragged from a drawer to succeed where the wooden spoon failed.

I'm not going to lie, this looked and tasted amazing. It was rich, molasses-like, and despite the absence of spices, spicy. It was also promisingly thick, just like the Betty Feezor brownies we at A Book of Cookrye make so many times. There was uncertainty in the kitchen: should this be baked or should the oven be turned off and a spoon gotten out?

However, baking these yielded something altogether too springy to be called brownies. It was quite a disappointment- we had been hoping for gooey molasses brownies and instead got bread. A thin patty of bread that betrayed the oven's tilt, but bread all the same.

However, the "brownies" turned out to be good molasses bread. Shake a few spices in here, and you would have some delicious and easy gingerbread. We can't begrudge the first ever recorded brownie recipe for failing to actually turn out like brownies- they probably needed some more practice and recipe revising to get the gooey, fudgy wonderfulness that we think of when we make brownies today. However, for gingerbread, this recipe's really good. You might want to use a smaller than 9" pan so they don't end up so thin, though.

Monday, August 8, 2016

The Book of Cookrye guide to Divoon Garlic Bread

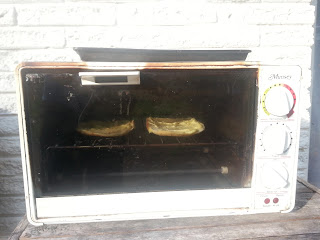
Sometimes you really can buy your way out of conflicts. We at A Book of Cookrye, in our staunch belief in garlic, have made the house perpetually smell like that most blessed of foods. Things got even worse as we realized that we have no impending dates, hob-nobbing social engagements, or any other reason why having sauerkraut-garlic surprise on the breath would hinder any otherwise open possibility of fulfillment in life. In the name of domestic tranquillity, we hit Craigslist and invested in what may be the best thing since gas lighting (why have electricity when you can have FLAMES ON TAP COMING OUT OF THE WALL!): an outdoor garlic oven.

Yes indeed, we got a toaster oven that is not allowed inside the house. It is glorious because our belief in garlic has become ever stronger in the face of an oncoming diet. No more will we thoroughly fumigate the house against vampires and romantic prospects in the name of becoming slimme and trimme!
You see, it turns out the reason people put gobs of cheese and butter on their dinners is that without these, many a dinner would taste hopelessly bland. We have seized upon garlic as the answer to our (failing to) slim-down prayers: for a paltry concession of calories, whatever we put garlic in will taste like garlic! Heck, we could put a whole bulb's worth of garlic cloves into one portion of baked vegetables and not have to worry about whether our clothes will fit if we keep the habit up! (This is an exaggeration; we usually only use a third of a bulb per serving.) With that in mind, we will christen our wonderful garlic oven and banish the cigarette smells that were baked into it with (what else?) garlic bread!
And so, we present the Book of Cookrye Guide to Amazing and Divoon Garlic Bread!  In the name of portion control, we will be illustrating this while making garlic bread for one. Obviously, this can be easily scaled up.
Garlic bread has but three components: garlic, butter, and salt. While dried garlic is delicious in many places, it will not do for garlic bread as we will make it today. Nor will that minced garlic sold in jars. No, for today, we will be using fresh garlic (which is cheap even at the snooty grocery stores). Nothing else will be quite as divoon. And we will be using a lot of garlic.

As you can see, by volume this mixture will be over half garlic. You may be looking at this and thinking this is insane. Don't worry about it, just pulverize the garlic however you like. You can mince it, but if you're like us at A Book of Cookrye, you regularly check the discount bin at your grocery store and one day saw they had 40¢ garlic presses. And truly, a garlic press is miraculous at any price.

As you can see, there is so much garlic, the butter (or margarine, it makes no real difference) is barely gluing it together. I would say that at this point you can add salt to taste, but if you were to taste it now, you likely wouldn't be able to tell if the salt was right. You would probably be thinking that the only person who would eat this is someone who eats raw garlic cloves like bonbons. Rest assured, all will make sense very soon. But for purposes of salting, just use about half a teaspoon for every half cup or so of garlic-butter paste. Now spread it very thickly on the bread.

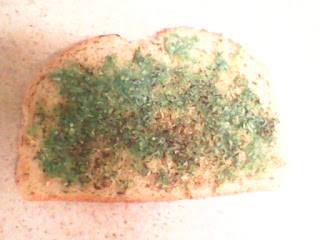
You may be thinking that is a lot of butter to use on bread. However, we at A Book of Cookrye warn you to never try to put straight garlic onto bread without it. We once put pulverized garlic onto bread with nothing else but a little salt, and this happened in the oven.
It tastes fine, but looks worrisome.

Thinking it was a weird fluke, we once again attempted to make garlic bread by simply putting straight pulverized garlic on top of bread. The result was once again a stunning shade of turquoise.
Yes, this is a different piece of bread than the one before.

So, do not omit the butter. And when making the butter-garlic paste, you want enough to really lay it on thick. Garlic bread is not going to be good for you, so you may as well make it into a deliriously buttery, garlicky carbohydrate heaven. You may see the bread with so much garlic it sets your mouth on fire if you try to bite into it and think you've ruined the bread and wasted the butter, but I swear on a plate of spaghetti it will all make sense very soon.
Most people bake garlic bread at a high temperature for a short time- just long enough to melt the butter and toast the bread. This is not what we want to do here. We're going to bake this garlic bread at the low temperature of 300°F.

It will have to bake for a long time- upwards of 40 minutes. You may think that absurdly long for garlic bread, but what's happening in the oven will more than justify the wait. You see, since the bread spends so long in the oven, all that fiery, burn-your-tongue-off garlic paste turns to sweet, almost mellow ROASTED GARLIC which imbues the melting butter with its magic. This marvelous garlic-butter ooze penetrates deep into the bread, which has by now become fantastically crusty on the outside.
However, as a recipe note, if you make this with something as thin as sandwich bread, you will find you didn't make garlic bread so much as garlic croutons.
Your salad won't be as good for you, but at least it will taste bearable.

Let's repeat this wondrous magical process with thicker bread better suited to this divinely ordained purpose. In the name of portion control, we will not use an entire baguette.

Amazing. Divoon. All is right in my world.

Sunday, August 7, 2016

Ice cream! Ice cream! We're making more ice cream!

As was previously mentioned, we at A Book of Cookrye previously braved the hazards of shopping in broad daylight to get an ice cream maker. There were howling children in the distant aisles (No, really. I think they were playing wolves.), dreadful lines, and angry scowling people bitterly trolling the parking lot for up to a quarter hour so they wouldn't have to walk 5 minutes across the parking lot. Our excuse was that without it, we couldn't prevent the waste of the squishy fruit lurking in the refrigerator. And in our defense, we really had been craving water ice since we left Philly, so our excuse wasn't complete fiction. However, we've also been wanting to make delicious things like... this!
Borden's Eagle Brand Magic Recipes, 1964

We at A Book of Cookrye have found promotional recipes to be very hit-or-miss. But condensed milk is so delicious we could just eat the stuff out of the can. (You may think that's exaggeration, but that's because you didn't see me when I was on a post-wisdom-tooth-removal liquid diet.) And so, an entire handout of condensed milk recipes can't possibly muck up an ice cream recipe.
Don't be surprised if the condensed milk cheesecake shows up at some point.


Vanilla Ice Cream
1 can condensed milk
2 c cream
1 c water
1 tbsp vanilla

Stir everything together in the can of an ice cream freezer. Pack the can in ice and salt, then freeze.
When it's done, pack it again in fresh ice and salt, cover it with a blanket or folded towel, and freeze it for a few hours to harden it. If your kitchen freezer is reliable, you can freeze it in there instead. Without this second freezing, it will melt almost instantaneously.
If you're adding things (chocolate chips, crushed Oreos, etc) to the ice cream, refrigerate or freeze them until the ice cream is ready for its second freezing. Quickly stir them in, then freeze the ice cream again.


The original recipe had long, complicated instructions for sanitizing and pre-chilling the ice cream freezer, but we at A Book of Cookrye realized that we could skip all that, dump everything in the can, and stir.
It's like pouring liquid gold, but better because you can eat it.

And so, after some more quick dumping in of stuff and a brief moment of stirring, we had the ice cream in the freezer and everything below photographed to clean.


I'm not kidding. Literally the only thing we measured for the entire recipe was water, and only a damn fool gets out the soap and washes a cup that was only used for water. So, we got out the bowl we were planning to freeze the ice cream in and a lot of Oreos.
Yes. These are non-store-brand. Forgive me, for I have sinned, they weren't even on sale.

However, I must air a grievance at the food industry. You know how a lot of people have pointed out that food manufacturers have been shrinking packaging without also shrinking the prices? The recipe said to use a 15-oz can of condensed milk, but every can in the store was this size instead.
CURSES AND DRAT!

Meanwhile, this is when you feel grateful you bought an ice cream maker. Please, look at this. That runny goop has turned into... this!
This is going to be so good...

As a recipe note, if you're removing it to a bowl instead of refreezing it in the can, you may want to get someone else to hold the can while you scrape out the ice cream. And said person should probably grab a folded-up rag to hold it rather than freeze their hands. You can thank said person for their assistance by doing a deliberately bad job of getting all the ice cream out of the can (besides, every second you spend fussing over the last lingering ice cream you didn't scrape out is a second the whole batch of ice cream is melting) and letting them eat what remains.
Divoon.

Meanwhile, we set about turning this ice cream into cookies and cream. Because... because I need no excuse, so there.

You know how if you don't freeze ice cream a second time once it's done churning it melts just about instantly? You can see that at the edge of the bowl as I stirred in the cookie pieces.
Maybe I should have let it freeze a little before adding stuff.

This ice cream was amazing. Also, it didn't have to sit out and soften when we finally got it out and and served it. It almost feels like cheating since it was such a cinch to make (all we did was stir things together and put it in an ice cream machine), but this really is fantastic. Since the summer heat really does show no sign of granting respite, you should totally spend thirty seconds stirring cream and condensed milk together and then putting it through an ice cream freezer. You'll be glad you did.

Saturday, August 6, 2016

Lemon Cakes: or, Our Family Reunion Strikes Again!

It's that time of year again when my extended family descends upon an unsuspecting state park and overwhelm the people manning the gate! Seriously, the line to get in lasted for fifteen minutes and we at A Book of Cookrye were related to someone in every single car in front of us. That is not hyperbole. And this year was my grandfather's birthday! Which means... cake!
All Electric-Mix Recipes Prepared Specially for your Dormeyer Mixer, 1946

I've made this recipe a few times with orange, but lemon-flavored things tend to disappear the fastest at family gatherings. So, lemon it is!

Fresh Lemon* Cupcakes
2 c flour
1½ c sugar
¼ tsp baking soda
1 tsp salt
½ c butter
Grated rind and juice of 1 lemon
1 c milk
2 eggs

Heat oven to 350°. Line a cupcake pan with papers. Mix the lemon juice with milk to make 1 cup.
Put the lemon rind and the sugar in a bowl. Rub them together with your fingers until the sugar is yellow and smells very lemony. Add the flour, baking soda, salt, butter, and ⅔ cups of the lemon milk (which is probably curdled but will be fine). Beat on slow to medium speed for 2 minutes. Add remaining milk and the eggs. Beat 2 more minutes.
Pour into the pans and bake until golden on top and the center springs back when lightly pressed.

*The original recipe uses orange instead of lemon. Both are good.
The cake batter will be the same color as an ordinary yellow cake. If you want it to be a lemony yellow (or orange if you used that instead), add food coloring.

Adapted from All Electric-Mix Recipes Prepared Specially for your Dormeyer Mixer, 1946

The celebration cake (from the same book as today's recipe) has made me a bit leery of recipes where you flog everything extensively with an electric mixer, but it looked like it would indeed turn into cake and not disappointment.

I briefly considered cutting back on the lemon juice from the original amount in the recipe since lemon is so much more sour than orange juice. That's briefly considered. We're not going for delicate, refined things for delicate, refined people. We want a very lemony lemon cake.
That's not blood, it's yellow food coloring.

And indeed, that's what we got! Also, thanks to our friendly friends in the food coloring industry, it now looks as lemony as it tastes!

Our Mom of Cookrye likes to get these little foofy paper serving things when she espies them with a steep markdown on the price tag. It was perfect for making a birthday cake for one. I mean, what better present can there be (from someone short on budget but long on flour) than a whole birthday cake that's not so big it will sit on the counter going stale for two weeks?

There was also some excess batter, which means we get to taste the cake for ourselves.

As we hoped, the lemony birthday cake came out looking perfect and smelling wonderfully lemony. Also, it appears I got the batter amount exactly right! It rose up exactly to the bottom of the paper pan thing.
I hope nothing in that paper degrades to hazardous chemicals when baked.

Meanwhile, we decided to attempt decorative icing on the cupcakes. We had a one-out-of-three success rate.
We have made two brains and a sundae.

Given a thoroughly unjustified surge of cake-decorating confidence, we decided not to spread icing on our grandfather's birthday cake but to decoratively pipe it on in a sort of filigree design. As evidenced by the subsequent obliteration of the design with a spoon, we failed.
Similar spoon-flattening repaired the cupcake brains.

Also, for the same family reunion, we made brownies! Why? Because everyone likes brownies. We used the Betty Feezor brownie recipe but with one change: using whole-wheat flour instead of white. This isn't some attempt to make diet-friendly desserts (notice that we didn't cut back the butter), but an interesting discovery we found in an old cookbook (Maida Heatter's Book of Great Chocolate Desserts, and yes you should at least interlibrary-loan it). It turns out that whole-wheat flour goes really well with chocolate. Like, it sort of amplifies the chocolate flavor and adds an earthy undertone that makes them a lot better. I don't mean they're better in a sanctimonious "quit complaining, it's better for you" sense; they really are better.
Why no, we didn't bother washing the bowl between batches.

Since we ran out of butter between batches 2 and 3, we ended up using all of the margarine in the refrigerator for the last one. And... honestly, the margarine ones look a lot better. Both of them were really delicious, though.

And besides, no one was going to notice any visible difference since we covered them in gobs of chocolate icing! Also, did you know that squeezing icing out of a bag makes it a lot easier to spread? We found this out since we already had the chocolate icing bagged up from writing FELIZ 80 on the birthday cake, but it works a lot better than gobbing it on with a spoon and trying to smear it flat.
Full disclosure: that wasn't enough icing and we had to squirt on more.

Tada!
As you can see, we at A Book of Cookrye believe in quality control through thorough testing of brownies.

And indeed, everyone liked the brownies. As proof the whole-wheat flour doesn't make them taste weird, the only disappointment was when one of the pans got nearly empty.... and that ended when we got out another one.
As my uncle said, "Looks like refried beans."

One of my cousins now works in wildlife rescue. So, apropos of nothing, please enjoy these pictures of baby raccoons.