Tuesday, May 25, 2021

Chocolate Drops: or, The surrender of counterspace to cookies

 It was the perfect confluence of desires. One person wanted delicious chocolate things, and I wanted to get out a new recipe from an old book.


One person in the house likes exploring cookie recipes as much as I love making different kinds of brownies. My biggest problem with cookie recipes is that unless you have a double oven, you will have to spend a long time baking batches one at a time. But, these are drop cookies. Meaning, you don't have to spend all that time hand-shaping several pans' worth of dough pats into crescents or suchlike.  So is a minor inconvenience, and it's actually not bad at all when you have company in the kitchen.

Chocolate Chip Drop Cookies
½ c butter or other shortening (margarine, vegetable shortening, etc)
⅔ c brown sugar
½ tsp soda
Dash of salt
1 egg
1 tsp vanilla
½ c milk
3 oz unsweetened chocolate, melted*
½ c walnuts, chopped
1 (12-oz) package chocolate chips

Heat oven to 350°. Grease a baking sheet.
Cream butter, soda, salt, and sugar. Add egg and vanilla, beat well. Add the flour alternately with the milk. Fold in the chocolate chips and the nuts.
Drop from a spoon and bake 10 minutes. They don't really spread or change shape much in the oven. So if you want them flatter or rounder, shape them before baking.
Frost with chocolate buttercream.

*If you do not have baking chocolate, increase butter by 3 tablespoons. Add 9 tablespoons (that's ½ cup plus 1 tbsp) of cocoa powder to the butter and sugar when creaming them together.

Elizabeth Dedinsky (Whiting, Indiana), Anniversary Slovak-American Cook Book, First Catholic Slovak Ladies' Union, 1952


And so, we launch today's recipe with a lot of butter! I was very interested in the choice of brown sugar instead of white. Would we be able to taste any difference after the chocolate and the chocolate chips?


Speaking of chocolate, this recipe uses a lot of it. We went from stirring butter and sugar to mixing an intoxicating tar.


The dough lightened in color a bit when we added the flour to it. We also realized that we had the makings of a lot of cookies on our hands. The spoon is totally immersed in future cookies.


The recipe tells us to use "one package chocolate chips." I know a lot of people will carefully make sure they're using the correct package size for the time period, but they have newspaper database subscriptions and therefore can flip through grocery store flyers from any year they like. We at A Book of Cookrye just hoped that they used the same 12-ounce bags in 1952 that you can get off the shelf today. You will notice that this is a lot of chocolate chips for this amount of dough. I'm not sure if we are baking cookies with chocolate chips in them, or if we are baking chocolate chips held together by cookie dough.


Having chosen this recipe for convenience, I dropped these things from a spoon as the recipe said to. The recipe doesn't say anything about flattening them, shaping them, or doing anything else to them. They don't exactly tantalize the eye, do they?


They came out of the oven looking as clump-shaped as before. With that in mind, I tried to flatten batch #2 a bit before getting them into the oven, but the dough was so sticky that I couldn't make it stay flat when I tried to get my fingers off of them.


However, we are directed to frost these, and who am I to argue with recipe writers? Drawing on previous experience, we decided to squirt the icing on rather than spread it. I was hoping for cute swirls that would make these look less like little rocks, but that didn't happen.


Perhaps it was for the aesthetic good that we ran out of icing before we ran out of cookies. (Also, this recipe makes a lot of cookies. Prepare to give up large tracts of counterspace while they cool off.) You can see where we ran out of icing and tried to hastily add extra sugar and chocolate powder to the tiny remaining bowl scrapings to make it cover the many, many cookies that remained.


This feels oddly like we've gotten the recipe from a formidable matriarch in a floral apron. Maybe it's because it makes so many cookies (they will conquer every flat surface in the kitchen before you can let the oven rest), they are so rich, and they seem like they're made to be given away to all the children, nieces, and nephews before taking a big box of extras to the church bake sale.

As a bonus serving suggestion, these go very well with ice cream.

Saturday, May 22, 2021

Second-Stab Saturday: More Divine Brownies!

Today, we are taking a recipe that was so close to perfection, and making it all that we hoped for the first time!

Fudge Frosted Brownies
½ c butter
1 c sugar
2 eggs
2 oz unsweetened chocolate, melted*
1 tsp vanilla
½ c flour
½ c chopped walnuts if desired
       Fudge frosting:
1 c sifted powdered sugar
1 tbsp cocoa
2 tbsp cream
1 tbsp butter

Heat oven to 325°. Grease a 6"x9" pan. (Or, line a 9" square pan with foil, folding up one edge of the foil to make it 6"x9" with some empty space on one side.)
Cream butter and sugar. Add eggs one at a time, stirring well after each. Blend in the chocolate and the vanilla. When all is mixed, add the flour and nuts.
Bake 15-30 minutes. They're done when a toothpick comes out with little clumps of brownie instead of hot batter. Frost when cooled.
These are best left overnight; they fall apart if you try to cut and lift them out of the pan the day you make them.
       To make the frosting:
Mix the ingredients in a saucepan. Cook until the pot boils around the sides. Remove from heat and beat until it is a spreading consistency.

*If you don't have unsweetened chocolate, use 6 tbsp of cocoa powder. Increase the butter by 2 tablespoons. Stir in the cocoa powder with the sugar.

Dominican Sisters (Oxford, Michigan), Anniversary Slovak-American Cook Book, First Catholic Slovak Ladies' Union, 1952

As we noted last time, the recipe seemed really good right until we attempted to bake it. First of all, it spent far too long in the oven. Second, the pan was so big that the batter was spread almost thin enough to make crackers. To solve the latter problem, did you know that some pizza places will sell you garlic knots in the disposable pans they used? Here's one of them with the cookbook for scale.

The matches are there to cover up the other recipe because I kept accidentally consulting the wrong one while baking.

As shown above, this pan is almost the same size as the book. And it originally arrived with garlic knots in it, which is always a delight. But more importantly, it seemed perfect for turning brownie batter into a divinely good time!


Perhaps that is why the Dominican Sisters of Oxford, Michigan decided these brownies were not unacceptably sinful. You're not going to make enough to cross gluttony off of your seven-sins list. If you can restrain yourself from trying to get a lot of brownies out of this (or do penance at the grocery cash register because you doubled the recipe), things can be very wonderful indeed.


Things promised to be delicious after a very short time that seemed all the longer for the chocolate that perfumed the air. The nuns' brownies rose to exactly the top of the pan, meaning we are baking them just as God as intended.

However, I still don't that line at the end of the original recipe to level the brownies with the bottom of a glass. It certainly would work, but has anyone besides nuns ever felt the need to correct their imperfectly-levelled brownies? If you don't feel the need to bake like a yardstick-wielding nun is teaching your home economics class, they're just fine without.


The agony replaced the ecstasy when I attempted the routine operation of cutting and lifting out a brownie. Things very literally fell apart. But if you pushed the broken brownie pieces together, you had a delicious pile of chocolate delight.


However, patience is a virtue! The next day, I tried to cut one because they had been really good even if they lacked integrity. I guess we needed to learn to wait for the Great Reward. Look at now nicely they cut!


These brownies are one of my new favorites, even if you have to wait overnight before you can eat one of them in one piece. They're so rich and full of fudgy, it's almost like eating extra-dark brownie batter with a crispy top. If I decide to purchase cream, I may even make the icing.

Thursday, May 20, 2021

Third-Thrust Thursday: Pumpkin Spice Latte Chip Cookies with success!

 Ever had a recipe that you just could not let go of?

Pumpkin Spice-Coffee Cookies
2 tbsp ground coffee
¼ tsp salt
1½ tsp baking powder
5 oz pumpkin spice (or chocolate) chips
½ c butter or margarine
1 c sugar (set aside 1 tablespoon for coffee grinding)
1 egg
1 tsp vanilla
1¼ c flour

Heat oven to 350°. Grease a sheet pan.
Put the coffee in a coffee grinder with one tablespoon of the sugar and reduce it to as fine a powder as the machine will make.*
Cream together the butter and sugar until light and fluffy. Add the coffee, baking powder, and salt, beating well. Add the egg and vanilla, beat until quite light. Stir in the flour just until mixed. Then stir in the chips.
Drop by the rounded teaspoon (or, if you have one, by the rounded half-tablespoon). Bake 8-9 minutes for soft cookies. Bake until golden around the edges for crisp ones. Let cool before removing from pan.
These are best made the day before. The coffee flavor strengthens overnight.

Note: Even if you don't usually use foil for your cookie sheets, it will make it easy to just slide the pan out from under the cookies right out of the oven rather than waiting for them to cool before baking more cookies on it.

*If you don't have a coffee grinder, you can use instant coffee instead. Put it in a very small bowl and press it into the sides with your thumb until it is a powder.

Adapted from Hershey's

You may remember our previous attempt at making coffee cookies with pumpkin spice chips. While the flavor was right, the cookies could have been better. It seems that removing the cocoa powder threw off a very delicate balance of ingredients.  There was so much excessive butter that they got a little bit greasy. And they didn't just spread while they baked; they melted into one big puddle of cookie dough on the pan. I'm surprised that a back-of-the-packaging promotional recipe was so easy to mess up. I thought most companies tested them to ensure that you could make some pretty severe mistakes without getting an oven full of failure. It is part of making these recipes accessible and forgiving to the many people who are making their own cookies for the first time-- or so I thought.


Anyway, I was feeling like a failure of a culinary student because I could not make this recipe do what I want. I was about to just look up a recipe for soft chocolate chip cookies instead of changing this one, but someone else in the house was like "No. This is a challenge." Besides, this is my idea of a good time. I've realized that I like baking more than eating the results (this does not mean I don't like delicious pastries). Therefore, messing with a recipe can provide hours of entertainment. 


As we found last time, if you just pulverize the coffee to a fine powder it will not be gritty and ruinous. I've always thought that's why we use instant coffee in baked recipes. But after trying the daring experiment of using the same coffee that would go in the percolator to great success, we recommend that anyone who likes gratuitously adding coffee to recipes poke around in thrift shops for previously-wanted coffee grinders. In our previous attempt, Eric C. suggested in the comments that we also add sugar to the coffee grinder to perhaps pulverize the coffee a little bit more finely.

If you ever wanted coffee-flavored caster sugar, now you know how!


It worked really well. The coffee got reduced to an even finer powder than last time, and it didn't stick and clump to the grinder. You do have to periodically pick up the grinder and shake it to dislodge things that are a bit pressed into the sides while the blades whizz. But when you tip the grinder over, the coffee falls out so freely that this is all that remains before you even put a spoon in to dislodge what won't loosen away.


Today's recipe alterations are simple: decreasing the butter and increasing the flour. Unfortunately, I didn't know how much of one to take out and how much of the other to add. I took out two spoons of butter just because it reduced the amount to exactly one stick (and therefore eliminated having partial-sticks of butter in the refrigerator). When it came to the flour, I added as much flour as the cocoa powder we removed because it made arbitrary sense at the time..


We're also using chocolate chips instead of the pumpkin-spice ones because we only have one recipe batch's worth of them left. I wanted to make sure we had the recipe right before using them up because I didn't know when I would find them for sale again.


All right, we have successfully made cookie dough, but can we turn it into cookies?


I had no idea how long to bake these things, so I decided to go with the classic "bake until golden at the edges." I won't say it's impossible to go wrong with that as a guide, but it's very difficult to ruin something to complete un-edibility. The resulting cookies were very crunchy. But not the tooth-breaking kind of crunchy- these were good. It tastes like we accidentally reverse-engineered our way to the recipe on the back of the Toll House bag-- and then added coffee to go with the chocolate chips. The coffee flavor was a lot subtler than I expected- it was only just strong enough to notice.


However, while we were delighted with what we got, we did not get what we sought. We really wanted soft cookies like we got when we actually made the original and unaltered recipe. Make no mistake, these cookies were so good we ate half of them trying to figure out how to get what we wanted. Then someone finished eating his seventh cookie in three minutes and said "Why don't you just bake them less?"

It seems so obvious now that it's been pointed out, doesn't it? Figuring that the worst that could happen was having unbaked hot cookie dough to eat, we put a small test batch on a sheet and baked it for half the time.


It felt silly putting those few lonely dough plops in the big oven by themselves. Now that it's getting warmer out again, I am no longer as blithe about firing up this thing and heating up the kitchen with an extravagance of electricity. On the other hand, this experiment ended exactly where we all hoped!


In great happiness, we baked the remaining cookie dough and finally got what we wanted! You can see how we got all of the cookies nicely spaced out on the pan and then decided that we weren't going to do an entirely separate batch with the teeny bit of extra dough in the mixing bowl, and then just sort of made it all fit whether it should have or not.


Our only disappointment was that you could barely taste the coffee in these- and why add it if you can barely tell it's there? But just like the gingerbread we made one Christmas, they just needed to ripen overnight for the flavor to make itself manifest. The coffee that was almost invisible when we baked them had strengthened marvelously by the next day.

And so, our long recipe road leads to a happy ending! Having perfected the recipe, we could make these with the pumpkin spice chips that inspired this recipe. Furthermore, now that we knew that this recipe needs a night for the coffee flavor to ripen, we could be mindful of that and... well... at least try not to eat them all right out of the oven.


If you like your coffee to be practically a dessert with whipped cream on top, you will love these. They are fantastic. The only tragedy is that we ran out of pumpkin spice chips after this batch and therefore must hope that they reappear this autumn. It's always time for pumpkin spice if you truly believe, but pumpkin spice chips are unfortunately more rigidly seasonal.

With that said, these would be really good with white chips, chocolate chips, and chips of any flavor you think would go well with coffee (they had cinnamon chips the last time I was in the baking aisle, but it was not meant to be this week).

Thursday, May 13, 2021

Waffle Iron Cookies: or, Reader recipes!

Sometimes at A Book of Cookrye, someone will send in a recipe that speaks to them of us. This one comes to us from Lace Maker in the comments under our post about banana cookies.  I love the thoughtful note of why this recipe seemed right for A Book of Cookrye:

I didn't find any interesting banana recipes in my cookbooks, but I did find waffle iron cookies which made me think about cooking banana bread/cake batter in a waffle iron. After all, summer is coming, and I know that you like adventures in cooking things in a waffle iron. 

"Choc Waffle Iron Cookies" Marti Patter (from Police Potpourri, Cedar Rapids Iowa State Policeman's Association Auxiliary" 1977) Cream 1.5 c. sugar with 1 c. butter. Beat in 4 eggs. Add 2 c. flour, 1/2 c. cocoa, 2 tsp. vanilla. Beat well. Drop by spoonful onto waffle iron and bake till done. Frost. The recipe notes they are better on the second day.

Chocolate Waffle Iron Cookies
1½ c sugar
1 c butter
4 eggs
2 c flour
½ c cocoa
2 tsp vanilla

Cream sugar and cocoa with butter, beating until light. Beat in eggs and vanilla, using your electric mixer to keep beating until it's whipped. Add flour, stirring just until mixed.
Drop by spoonful onto a very well-greased waffle iron and bake until done. They will be too fragile to lift out off of the waffle iron. Instead, place a plate under the waffle iron and tip it until they fall out. You may need to give them a starting nudge with a fork to release them after you have the waffle iron tipped upright. Frost (I made a thin glaze and just poured it over).
They are better on the second day.

Source: Marti Patter, Police Potpourri, Cedar Rapids (Iowa) State Policeman's Association Auxiliary, 1977
Vanilla Glaze
2 tbsp butter
4 tsp hot water
2 tsp vanilla or so
1 c powdered sugar

Melt butter, add hot water. Stir in vanilla, then add powdered sugar. Whisk until smooth. If you have one of those glass measuring cups with a pour spout, you can easily mix this in the cup and then pour it out on all the cookies.

We do not have a lot of people in the house, so I hope no one minds if we cut this recipe down to one quarter.

This reminds me of one of my best accidental creations that I have only made once. When a dear cousin got her first apartment and had a housewarming, I got her a cast iron skillet (in case she ever accidentally dated a bastard) and filled it with cake-waffle-cookies for the housewarming party ("The cookies are for the party, the serving dish is your housewarming present!"). I made a batch of 1234 cake batter and dropped spoonfuls of it onto my waffle iron. After they cooled enough to not fall apart, I made the grave mistake of dipping them in glaze (just powdered sugar and water) and thus making a horrendous mess of half the kitchen while they drip-dried. The resulting cake-waffle-cookies (shortened to kwaffle cookies)  were unexpectedly addictive and people kept badgering me to make them again but not offering to clean up the inevitable kitchen disaster that comes from dipping all those waffle cookies in sticky glaze.

Back to today's recipe, I'm not sure if anything makes this recipe particularly waffle iron specific. Maybe Marti Platter tried to bake cookies on a sheet and they melted together into one big dough puddle, so she used the waffle iron to force them to stay as individual cookies. Maybe this was something that they did at home because waffle irons are entertaining for the whole family. Maybe one day there was a dire need for chocolate and no one had the patience to preheat an oven.


Some recipes seem to take forever to get mixed and put together, but this one went so fast that I almost wasn't ready to be finished. We're only a minute or two into this and we've already got most of the ingredients ready to go.


I like using a spoon instead of a mixer most of the time for the same reason some people love hand-sewing instead of using a sewing machine and some people go out of their way to get a stick-shift car. (That and I still have to remind myself that nowadays I can just drop the beaters from an electric mixer in the dishwasher instead of washing them by hand.) However, I double-checked the ingredients list and found no leavener in this whatsoever. So therefore, the only leavening comes from you, the home cook, and how hard you stir and whip. Therefore, we set aside the spoon and got out the power tools.


It's hard to tell since the chocolate gives this a tantalizingly dark color, but we've gotten the ingredients more aerated than we usually bother to. The recipe doesn't mention separating the eggs and beating the white to stiff peaks, which is why I didn't. Perhaps in earlier decades one would have assumed that you're supposed to whip the egg whites, but this is the late 1970s. At this point, even the most tersely-written recipe would have written "four eggs, separated." This one just says "beat in four eggs."


As aforementioned, there's no baking powder or any other leavening in this. Which means that we, the ones with the electric mixer, are the leavener in today's recipe. And so, when this recipe says "beat in four eggs," we decided to look to Fanny Cradock. As Her Not-So-Serene Highness would say, we thought of someone we really don't like but we're too well-bred to say anything, and we took it out on our cooking instead. We got this so whipped that it was several shades lighter.


After scraping that ring of unbeaten mixture into our light and airy cookie dough and beating it a bit more, we got the flour into it and pronounced it iron-ready.


Now, there's a really awesome, vintage, excessively-large waffle iron in this house. You might think it'd be perfect for doing all these cookies at once. However, our every attempt to use it has ended like this:

I used so much cooking spray that the waffle practically got fried in it.

However, this turned up in the cabinets. Note that the waffle grids are screwed on, meaning we can presumably take them out and wash them. This is a tragic shortcoming of that massive vintage one- you can't just shove the dirty parts of it under the faucet or soak them overnight without disassembling the whole appliance.

Without those screws we'd be screwed.

All right, it's time for the magic moment! The oven gets a rest today because we are doing these things with countertop appliances.


Those of you trying this at home should know that if your waffle iron has a ready light, you can't trust it for this recipe. Whatever sensors it uses were apparently designed with the assumption that you will be covering the entire waffle iron with batter. Since you've only put a few scattered spoonfuls of dough on the iron, the ready light will probably turn on while you still have a waffle iron full of hot goo. We gave these four minutes and got successful cookies out of it.


However, we had difficulty removing them at first. You know how you usually just carefully get a fork under your waffles and gently lift them out? These proved too crumbly and fragile. If you got a fork under them and tried to lift, the fork just tore right through them no matter how delicately you tried to move it. But I've been sporadically putting cookies onto a waffle iron for a long time now, and knew exactly how to get them off the iron intact:


 But after they were cooled, we had a plate that looked like this.


You might think that's a tiny recipe yield, but keep in mind that we did not halve this recipe but quarter it. Also, a lot of the cookies mysteriously disappeared while successive batches were baking.

The original recipe says to frost these. I did not know how the heck you are supposed to spread icing on a waffle. To keep things easy, I threw together some glaze for this (which was just our dear favorite cinnamon icing without the cinnamon and with about thrice the vanilla) and just poured it on.


I then realized that we had a lot more glaze on these than I thought because we filled up all those holes. At first I thought this would prove a nasty sugar overload, but someone else passing through tried one and said "No. It's perfect." These cookies are amazing. They're like brownies that came off of a waffle iron. They have that delicate yet fudgy texture plus a marvelous crisp outer crust. 

Purely to make sure we thoroughly tested the recipe, we made sure to set aside a few overnight to see if (as is written) they are better the second day. I think it says plenty that we had to deliberately set some aside. The cookies did get a bit firmer and less crumbly, but there was no drastic transformation. Even though the recipe says they're better the next day, you can safely eat them right after they're made.

Wednesday, May 12, 2021

Hump-Day Quickie: Even the hardest stale bread can become French Toast!

These days, it's easy to forget that French toast is one of those recipes that started off as a way to make past-their-prime foods into something nice. Long before we started just randomly battering sandwich bread because it's delicious that way, French toast was a way to get the most tooth-breakingly hard stale bread to become edible again- that's why so many recipes will tell you to put soak the bread overnight. 

However, what does one do when you just found the petrified heels of a long-eaten bread loaf in the back of the refrigerator but most French toast recipes assume you have the rest of the loaf? Or when you just want to fix something nice for yourself but don't want to make enough to feed four people?

Easy French Toast
Sliced bread (if it has gone stale and very hard, it's still just fine for this)
Pancake mix (the kind where you only need to add water)

Make a batter of the pancake mix, using enough water to make it a little bit too runny for pancakes. Prepare just enough to soak the bread in. Pour it all over the bread, making sure each slice is well coated. If the bread is hard, soak it in the refrigerator overnight to soften.
Cook on a griddle or frying pan over medium heat until both sides are golden. Serve with your favorite syrup.
Because there's no eggs or tiny teaspoons of ingredients to subdivide, you can easily make French toast out of just one or two bread slices if you like.

These bread-stones came from one of those multi-grain, multi-seed loaves that use half the space on the wrapper saying how they're so nutritious that you'll lose 15 pounds and have better eyesight from the superfood onslaught. But by the time I found them, they were hard and brittle. But every time you eat food instead of waste it, you keep money from going into the trash. However, what sort of soaking batter could we make in a small enough quantity to avoid wasting a whole lot of excess? Pancake mix!

Those twist-ties were surprisingly well entangled.

I like the just-add-water pancake mixes a lot because you can make just one or two for yourself. Heck, if you wanted to make just one 2-inch pancake, you can easily reconstitute a tiny smidge of powder without trying to get out a pancake recipe and figure out what one sixteenth of an egg would look like. Or, for today's purposes, you can make just enough of it to immerse two slices of bread.


In the morning, the bread had miraculously reconstituted and seemed as fresh as when it was purchased (albeit a little soggy). It had absorbed so much water that our batter was now paste. 


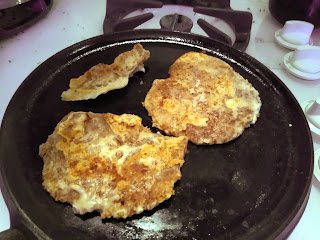
And now, we get to the other reason I wanted to make French toast out of this bread that most people would have thrown away: a cast iron griddle turned up in one of the cabinets! Finding such lovely things makes me want to use them as soon as I can find a recipe that makes a good excuse.


One of the bread pieces tore apart after soaking all night.  That's an encouraging sign that the bread, which earlier was as hard as the plate we set it on, was now soft enough to accidentally tear.


Looks like chicken-fried steak, doesn't it?


And so, we are excited to let you know that if you have just-add-water pancake mix and inedibly stale bread, you can turn it into a lovely first thing to eat in the morning. You might be wondering why we didn't just chuck the bread and make pancakes, but that would mean not getting any French toast.

Saturday, May 8, 2021

Second-Stab Saturday: Pumpkin-Spice Coffee Cookies

We earlier made chocolate cookies with pumpkin-spice chips. In case you don't remember, the chocolate and the pumpkin spice did not go together as well as I had expected. We speculated that, in the delicious tradition of pumpkin spice lattes, we should perhaps make the cookies again with coffee instead of chocolate.

Pumpkin Spice-Coffee Cookies
2 tbsp ground coffee
¼ tsp salt
1½ tsp baking powder
5 oz pumpkin spice chips
½ c + 2 tbsp butter or margarine
1 c sugar
1 egg
1 tsp vanilla
1 c flour

Heat oven to 350°. Grease a sheet pan. Put the coffee in a coffee grinder and reduce it to as fine a powder as the machine will make.*
Cream together the butter and sugar until light and fluffy. Add the coffee, baking powder, and salt, beating well. Add the egg and vanilla, beat until quite light. Stir in the flour just until mixed. Then stir in the chips.
Drop by the rounded teaspoon (or, if you have one, by the rounded half-tablespoon). Bake 8-9 minutes. Let cool before removing from pan.

Note: Even if you don't usually use foil for your cookie sheets, it will make it easy to just slide the pan out from under the cookies right out of the oven rather than waiting for them to cool before baking more cookies on it.

*If you don't have a coffee grinder, you can use instant coffee instead. Put it in a very small bowl and press the granules into the sides with your thumb until it is a powder.

Source: adapted from Hershey's


Today's recipe starts with technical difficulties. The butter had for some reason glued itself to the refrigerator shelf. I've often seen cardboard residue in people's refrigerators, but it always looked like it had been there a long time. This is the first time I have ever left such deposits for myself.


We weren't sure if we wanted to make coffee cookies or non-coffee ones. Therefore, we all agreed that we could divide the dough in half and do both. We decided to go ahead and mix the harder-to-halve ingredients before performing the bifurcation. Everything measured by the tiny spoonful gets put in now. 

And now, for a brief moment of kitchen science! The original recipe tells us to use baking soda. But it also has chocolate in it which is (barely) acidic. We have removed the chocolate from the cookies, so now the baking soda has no acid to fizz with. Therefore, we are using baking powder instead because it already has enough powdered acid to fizz with itself.


And now we get to the hardest ingredient to cut in half: the egg. If you really want to, you could crack the egg into a measuring cup, beat it uniform, and then measure out exactly half. But that means you are wasting half an egg. And while one can just pour the unused half-egg into a hot frying pan for a quick snack, we'd rather have twice the cookies.

At this point, we thought of Her Disapproving Highness, Fanny Cradock. She would have told us to think of someone we really don't like (but we're too well-bred to say anything) then take it out on the bowl. We could use a handmixer if we wanted. But while in isolation, this is my well-whipped idea of a good time.

And so, with the first ingredients excessively well-beaten together, we reached The Great Bifurcation! I should have actually measured out the halves, or maybe put the bowl on a kitchen scale and ensured that we had a perfectly even divide. Instead I just eyeballed it. I will also note that this sort of multi-bowl experimentation is only possible because we now share a kitchen with a dishwasher.


And now we get to our first star ingredient: the coffee! Most of the coffee-flavored recipes will have you use instant coffee (or to make a cup of it and pour it in). Using actual coffee, we are warned, will fill your creation with gritty coffee grounds and ruin it. But the instant coffee in this house is rancid and only kept for emergency caffeination purposes. I'd thought I'd stir in some of the normal coffee, but when I scooped it out it looked like a spoonful of woodchips.


Fortunately, this house has a coffee grinder. It last saw use when I was grinding granulated sugar into caster sugar for the most recent Pieathlon. As far as I know, this is the first time anyone's actually put coffee in it.

Coffee gets unexpectedly sticky when you grind it. I had to keep breaking up clumps that stuck to the sides and avoided the blades. But eventually, we had reduced the coffee from mulch to brown powder. I don't know if it's ground finely enough to prevent grittiness, but the grinder had done the best it could. At this point, it wasn't grinding anymore, just kicking the powder up and throwing it around.


I was a bit worried at the sight of this mound of coffee powder that looked almost as big as the cookie dough we were stirring it into. Had we overdone it? Would these cookies be horribly bitter? I could have just carefully spooned some out before stirring, but then I risked having unacceptably insufficient coffee flavor.


Before I could spend half the night considering acceptable quantities of coffee for cookies, I went ahead and stirred everything together. It turns out that one scoop of coffee is perfect for this amount of cookie dough. It tasted like one of those magical iced creations from a coffee shop that comes out of a blender and has a blob of whipped cream and a shake of cinnamon on top.


The last time I did this kind of assembly-line cooking, it was Thanksgiving and I was making three pies, two cakes, and multiple cookie recipes (it was my idea of a good time). Anyway, it is now time to put flour into these delicious cookies.


And now, we get to the other title ingredient: pumpkin spice chips! You may notice that I made a fatal error with the coffee-free bowl. I forgot to actually mix in the flour before adding the chips. This caused me a brief panic because I've always been warned that dreadful failure will always ensue if you don't actually mix your flour in before adding the chips. But I figured that we already had committed the ingredients. We couldn't put the butter or the egg back in the refrigerator, nor could we separate out the sugar and return it to the bag. So we just stirred everything together and hoped that we would have success anyway.


We baked the vanilla cookies first. Without chocolate, these cookies look anemic.


You know how when we made this recipe according to the actual directions, the dough was so runny that it barely held itself into cookie shapes? Well it was even runnier without the cocoa powder in there. If it wasn't the middle of the night, you could have seen daylight through them.


Well, let's put that pan of baked splatters aside and get to the real reason we're here today. We hoped that the coffee would make them a bit less runny than the vanilla ones, even if we could feel no difference while scooping it out.


Tragically, our featured cookies became what I had feared I'd get the whole time: one big melted-together megacookie. I could have saved a lot of time by just pressing the dough out into a square pan.


Figuring that the cookies may be thin but they are nevertheless edible, we cut them apart. It looks kind of like the underside of a turtle, doesn't it?


The resulting cookies tasted fantastic. Coffee and pumpkin spice go together like chocolate and peanut butter. We could not stop eating these. We had made the vanilla cookies in case the coffee cookies brought disappointment, but they were just so good that ate them all long before polishing off the vanilla ones (though all the cookies got eaten in haste).

However, removing the cocoa powder from the recipe made these cookies too runny and too buttery. You might think that would make them extra decadent, but in reality it made them greasy. We might try these again, cutting back on the butter a little bit and adding a little more flour so they bake into cookies instead of puddles. 

You might be thinking "There are a lot of cookie recipes that would come out exactly like you want! Why not just make one of those and add the coffee and chips to it?" I have three reasons for that. First, I have a lot more quarantine free time than I intended. Second, I try to tell myself I am good at baking (even if my results remain irregular). As someone who self-allegedly is good at baking, surely I can figure out how this recipe works and then alter it to do as I wish. Third, others in the house are enabling my cookie battiness. I suggested cracking open a cookbook and getting out another recipe. Someone else said. "No, no! This is a challenge."


And so, more (hopefully) lovely cookies will be forthcoming! With that said, these weren't bad aside from being far too thin. If you cut back on the butter by a spoon or two and press them into a pan to make bars, you would be delighted.