Sometimes, when one cleans out a pantry, a quasi-pie ensues. This box of powdered sugar turned up in the far back corner of the top shelf, still half-full of powdered sugar.

I thought that this recipe, with the name Butter Finger, predated the candy bar. But Wikipedia tells me that Butterfingers date back to 1923. Also, did you know Butterfingers are Italian? They're from the same company that makes Nutella. I haven't been this surprised about confectionery since I found out that Kit Kats are British.
|
Butter Finger Dessert Bars Crust: 1 c butter or margarine, room temperature 2 c flour ¼ tsp salt 2 tsp sugar Heat oven to 375°. Grease a 9x13 pan. (Even if you normally don't, we recommend lining the pan with foil for this recipe.) Mix butter, flour, salt, and sugar until crumbly. Press into the pan. Bake for 10-15 minutes. Leave the oven on when you remove the pan. Filling: 4 eggs, well-beaten ¼ c flour 2 c brown sugar ¼ c flour 2 tsp baking powder 1 c shredded coconut 2 c chopped pecans Whisk together the eggs, sugar, baking powder, and flour,* beating well. Then stir in the pecans and coconut. Spread over the crust. Bake at 375° for 15 minutes. It should be golden on top. It should also jiggle like gelatin instead of sloshing like a pan of liquid. Cool completely before frosting. Icing: 6 tbsp butter or margarine† 2-3 tbsp milk or cream 2 tsp vanilla 3 c powdered sugar Beat together the butter, milk, vanilla, and about a half cup of the powdered sugar. When it's all well-mixed, beat in the remaining powdered sugar. Spread on the bars. Let sit a few hours before cutting. *I also added a pinch of salt. †If using margarine for the icing, you'll want to use stick margarine. If you use the spreadable margarine from a tub, the icing will be too drippy and runny unless you also add a spoonful of shortening. Source: Imperial powdered sugar box
|
Moving on to today's recipe, this is the first Butter Finger recipe I've seen that neither imitates nor incorporates the candy bar. This recipe is also a lot more, shall we say, involved than the other recipes I've seen. The Butterfinger recipe I have encountered the most is a "Butterfinger cake," which has graced many a potluck I've gone to. The recipe seems to be "Make one box of cake mix according to directions, then put a layer of crushed Butterfingers on top instead of icing."
I don't get why today's perpetration is called "butter finger" at all. The only butter in the recipe (assuming you put oleo in the icing) is in the crust. It doesn't resemble the candy at all, and it doesn't look particularly buttery. It looks like the recipe writers started with a pecan pie. They then replaced the pie crust with one that you finger-press into the pan (which agreeably simplifies things), and put icing on top so they had an excuse to put it on a powdered sugar box.
Before I made the recipe I thought this was going to basically be a
cookie crust. Then, upon actually reading the recipe (as one often does
when making it) it looks more like a pie crust. However, things were not
going according to the instructions. The bowl of (what I thought should be) pie crust didn't look crumbly like the recipe claimed it should be. I did not expect this because back-of-the-box recipes are (theoretically) tested by a passel of kitchen staff before they get printed on any food labels. I checked the ingredient list to see if I had either mismeasured something or made a mathematical error when halving the recipe. I had not.

This allegedly crumbly crust was the stickiest mess I have tried to press into a pan in a long time. I tried spritzing my hands with cooking spray, but it only helped for a few seconds before the dough stuck to my fingers anyway.

When I first examined the recipe closely and saw that we weren't doing a cookie dough crust, I was afraid it would be really bland and a waste of time in this recipe. Then I saw how much sugar we're putting on top of it. So aside from suspecting that this would be a failure of a crust because it didn't look like the recipe claimed it should before baking, I was ready to move on to the pecan-coconut affair that goes on top.

I thought I would whisk the flour in first to really bash out any lumps, but a few little ones persisted until I added the sugar which broke them up. Therefore, I think this separate whisking step was a waste of time. You can probably just dump the flour and sugar into the eggs and beat everything together at once.
Since we're cutting this in half, I was able to measure out the coconut and pecans into one cup which I then set aside until things were ready for them. They reminded me of those cute layered cookie mixes that were a popular gift for a while. You know, the ones where you put sugar, flour, chocolate chips, and whatever else into a jar, making cute-looking stripes of all the ingredients instead of just dumping them in.

Extremely observant people will notice that I accidentally used twice as much coconut as I should have. I am very glad I made this mistake because it only improved this quasi-pie.

See? It looks like we're making a pecan pie except with coconut shreds. Granted, the round pan is definitely adding to the pie-like appearance. However I wouldn't be at all surprised if I could find this exact recipe for pecan pie in a very old cookbook. I wondered if someone at the Imperial Sugar test kitchen added the coconut to make the recipe different enough to avoid plagiarism.
Anyway, this is one of the thickest pie fillings I ever made. They don't often need a spoon to force them to spread.

I had imagined this recipe would produce a thin layer of this candy-nut stuff on a crust, but this is a lot of pie filling. And let's just go with calling this a pie. It looks like a pie, it's acting a pie, the only thing we're missing is a crust that goes up the sides of the pan.
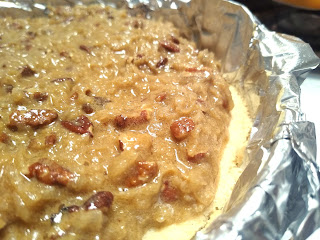
See? After baking, it looks like pecan pie. Or maybe it looks like we replaced the raisins with coconut in an osgood pie.

The recipe instructs us to cool the pie completely before icing it. Fortunately, it is miserable outside.

I put a sheet pan on top to keep further sleet off, and the pie was ready for icing after just 10 minutes in the snow. Using the weather for culinary purposes reminds me of when I visited a dear friend/relation in Olympia (that's in Washington state) during the winter. The way the house was cut into the ground, her bedroom window was right at ground level and tucked under the second-floor patio. We would set cases of (store-brand) Diet Coke outside, and the upper deck hid them from view. It was amusing in its own little way to open the window for a can of Diet Coke as easily as normal people would open the refrigerator.
Moving on with the recipe, I thought I would avoid using the electric mixer for the icing because it always kicks up powdered sugar dust no matter how carefully I try to beat things at slow speed. This was a waste of time. Instead of icing, all I got was a whisk filled with ingredients that lodged themselves in there and would not come out. Therefore, if you have an electric mixer I definitely recommend you use it.

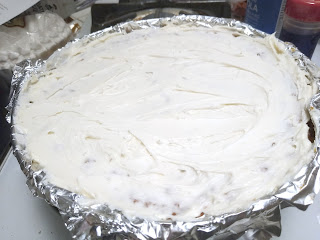
I spooned the icing into little mounds around the pie instead of just plopping it in the middle. It seemed like it would make covering the pie easier. I had even considered putting the icing in a bag and squirting it out, but then decided I didn't feel like it. But even though the pie looked like it would release a lot of crispy golden crumbs into the icing, it didn't.

The top appears interspersed with broken-off pieces of pie, but that's actually where the icing is so thin that the pie shows through. I think the thin icing was for the best. This pie is so sweet that a thick slathering of icing on top would have overwhelmed even the most sugar-happy six-year-old.
All right, let's go back to the illustration on the back of the box and see what these, um, dessert bars should look like.

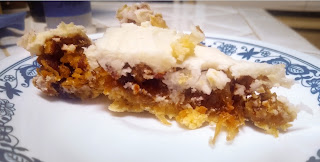
And let's get a look at what we actually got.

This is the best-looking piece we got out of this. I think we can safely say that if you tried to cut this into tiny squares like the recipe claims, they would all crumble to nothing. I will also add that despite our promiscuous use of cooking spray, the crust stuck to the pan. However, I do have to give the recipe writers credit: the crust may not have been crumbly during mixing like the recipe thought it should have been, but it was certainly crumbly after baking. It fell apart and left fragments behind, no matter how skillfully one operated the pie spatula. You don't lift pie slices out of the pan; you scoop this out like cobbler.

With those quibbles aside, I served this out and everyone really liked it. This is not a dessert bar recipe. It is a pecan pie with coconut in it. It's a very good pecan pie with coconut in it. If you try this, you will wonder why no one has ever thought to unite pecans and coconuts in a pie before.
I thought the icing was superfluous, and really only an excuse for using enough powdered sugar to print the recipe on a powdered sugar box. Others disagreed, thinking it improved the pie a lot. The extra layer of concentrated vanilla on top did make the flavor more complete. However, in the future I might use a light drizzle of glaze with extra-concentrated vanilla instead of icing.
So, I highly recommend making this, with a few changes. First, cut the recipe in half and bake it in a pie pan. It's really rich anyway, so a big pan of it is excessive unless you're bringing it to a big party. But don't cut the amount of coconut in half. Second, ditch the crust that came with recipe and use an actual pie crust (bake it before putting the pie in it). You might roll the crust a bit thicker than usual if you make it yourself, so that it really holds together when you lift out a slice. Third, I wouldn't bother with the icing. Put a lot of vanilla into a small batch of glaze- much more than you normally might. Then lightly drizzle it on top.
Instead of putting cooking spray on my hands when trying to spread something very sticky, I've liberally sprayed the top of the sticky stuff with the cooking spray and then spread it out. That way the first few smooshes don't take it all off your hands leaving you stuck in the batter. I admire your happy use of weather. Here in the north, I look for excuses to not leave the house under any circumstances if I don't have to when it is yucky outside. Now if only I could work from home...
ReplyDeleteI also found my grandmother's "quick apple dumpling" recipe that reminded me of your resurrection rolls. She got it out of a magazine, so not a time-honored family recipe. This grandmother was a retired school cook after all (so she hated cooking). Heat oven to 350. Peel, core, and quarter 2 granny smith apples, sprinkle with cinnamon, and wrap with a raw crescent roll from a can. Place in an 8 inch square baking dish. Combine 1/2 cup butter, 1 cup sugar, 1 cup orange juice and boil to dissolve sugar. Remove from heat and add 1 tsp vanilla. Pour over the dumplings, and sprinkle with 1/2 cup finely chopped pecans. Bake 30 minutes.
I never thought to put cooking spray on the dough instead of my hands, and now it seems so obvious! We're taking advantage of the weather as long as the lights stay on. We went from mid-spring weather to winter a few hours after sunset. On my way back to the house, I passed one of those store signs that flashes the temperature every few seconds and said "That can't be right..." when it displayed a reading of 27 degrees.
ReplyDeleteThose apple dumplings look very similar to something my mother used to make on Christmas mornings before she decided she'd rather sleep in! I'll have to try them out.