Showing posts with label Slovak-American Cookbook. Show all posts

Thursday, October 24, 2024

Slovakian Poppyseed Cake: or, We need to buy poppyseeds in bulk

Everyone who saw this recipe said "I hope you're not taking a drug test."

Poppyseed Cake
½ cup poppyseeds
½ cup milk
1 cup flour
6 tbsp butter or oleo
Pinch of salt (if butter is unsalted)
1 cup plus 2 tbsp sugar
½ tsp vanilla
1½ tsp baking powder
2 eggs, separated

Grind the poppyseeds. Add the milk, and soak overnight in the refrigerator. The next day, whisk in the flour, and set aside.
Heat oven to 350°. Grease an 8-inch cake pan.
Cream the butter, sugar, salt, vanilla, and baking powder. Add the egg yolks one at a time, beating well after each. Gradually add the poppyseed mixture, and beat until smooth.
Beat the egg whites until stiff but not dry. (They should hold a point, but the very tip should fall a tiny bit.) Fold them into the batter.
Pour into the pan and bake for 45 minutes. Top with plain or fancy frosting, according to taste.

Florence Ribovich (Hammond, Indiana), Anniversary Slovak-American Cook Book, First Catholic Slovak Ladies Union, 1952

Before I made this recipe, I never thought about how much drug tests have become part of our everyday lives. Even people who have never been inside a police station know that a single poppyseed bagel will make you test positive for heroin. And we are using a lot more than a bagel's worth of poppyseeds today.

Anniversary Slovak-American Cook Book, First Catholic Slovak Ladies Union, 1952

We've made a few recipes out of the Anniversary Slovak-American Cook Book, but until now we've stuck to things like brownies and banana bread. Today we are finally venturing into the eastern European recipes that were only a few pages away from the peanut butter cookies.

I have never seen a poppyseed cake like this before. But while this recipe may be totally new to me, apparently it's very common in eastern Europe. The Slovak-American Ladies' Association Cook Book has three nearly-identical recipes for poppyseed cake spanning two pages. All of them require you to purchase two standard-size spice shakers of poppyseeds.


Florence Ribovich doesn't tell us to grind the seeds, but the other poppyseed cakes do. I therefore figured the instruction to grind the seeds was implied. And so, for our first adventure in eastern European cooking, I pulverized enough poppyseeds to make 7 or 8 non-Eastern European cakes. It looked like I was making a cake with potting soil.


I thought the milk would turn blue after soaking overnight, but it looked white and unchanged the next day. When we poured it out, the poppyseeds at the bottom had turned into a peculiar colored slime.


We are directed to add the flour to our poppyseeds and milk, and so I did. It turned into a grayish purple clay. Usually when your cake batter threatens to break the spoon, you have messed up beyond any attempts at salvaging. But since I know nothing about eastern European cooking, I assumed that things were going as Ms. Ribovich intended.


At this point in the recipe, the spoon proved useless. We had to bring in the power tools. With the indispensable aid of our mixer, we managed to turn this into an actual (if rather bizarrely colored) cake batter. I wasn't using the mixer to stir things together so much as chop up the heroin clay until it gave up.


At this point, our batter tasted like poppyseed kolache filling. Did you know poppyseeds have a taste? I used to think they merely added speckles and textural interest to poppyseed cake. But it turns out they have an nutty, anise-and-pecan-ish flavor. As soon as I tasted a sample, I regretted halving the recipe.


The cake rose a lot in the oven and produced an impressive dome. It would have looked so much better had I baked this in a loaf pan. If you want to bake this cake in layers and stack them, I would reduce the oven to 325°, and also make the batter thinner in the center of the pans and higher on the sides.


Regardless of whether the cake was any good or not, it was a lovely composition of colors. The purple(ish) cake contrasted with the white icing on top. The whole effect gained extra vibrance from the thin band of a surprisingly pretty golden color that separated the cake from the icing.


The cake tasted a lot more normal than I expected. The poppyseeds added an interesting toasty flavor, but their distinctive taste became more muted after baking. I was hoping for poppyseed kolache filling in cake form (especially after tasting the cake batter), but I got a perfectly lovely cake instead.

I must also note that the cake was amazingly soft and fluffy. Any reasonable-sized piece threatened to topple over on the plate. If I cut a slice that didn't threaten to tip over, it was too big for one person. (This is a very good problem to have.) 


So, if you don't mind buying a lot of poppyseeds, I definitely recommend this cake. It's unusual enough to be interesting without being weird. (Well it's unusual where I live, anyway.) But you should probably make sure you don't have an upcoming drug test.

Friday, December 24, 2021

Peanut Butter-White Chocolate Chip Cookies

 Today's recipe begins with something that brought high hopes and disappointment.


I was so excited at the idea of uniting peanut butter and white chocolate. I've never had anything that put these two together, but the combination seems both very obvious and very delicious. But these were just peanut butter in a flavorless white coating. I don't know why I've never thought to put white chocolate chips in peanut butter cookies before these things dashed my hopes, but since inspiration struck here we are:

Peanut Butter Cookies
½ c brown sugar
½ c white sugar
½ c butter
1 c peanut butter
1 egg
1 tsp salt
½ tsp baking soda
1½ c flour
½ tsp vanilla
1 c white chocolate chips (optional)
Additional sugar for coating cookies

Heat oven to 375°. Grease a cookie sheet.
Cream together the butter, sugars, salt, baking soda, and vanilla. Add peanut butter, beat well. Add the egg. Beat until creamy. Mix in the flour, then the chips if desired.
Roll the dough into balls of the desired size, then roll in sugar. Place on the baking sheet and press with a fork. These cookies won't spread very much, so you will need to flatten them well.
Bake for 10-15 minutes, or until a bit darkened at the edges.

Source: Clara S. Matuschak (McConnellsville, Pennsylvania), Anniversary Slovak-American Cook Book, First Catholic Slovak Ladies' Union, 1952

This recipe began as well as cookie recipes do when I wield the spoon. I thought to myself how nice it is that we're using a half cup of all the first ingredients, meaning I could use the same measuring cup to us halfway through the recipe. 


Then, as one tends to do many times in the course of baking, I looked at the recipe to see what I should do next. Then I noticed that we are not supposed to use a half-cup each of white sugar, brown sugar, butter, and peanut butter. It's a half-cup of everything until we get to the peanut butter which is a full cup. This led to a short moment when I asked myself whether I was so enchanted at using the same scoop for all the ingredients that I failed to notice this the first time. This is the tradeoff when one keeps chatting with everyone while cooking instead of shooing people away to better focus. Eventually I decided that I probably had accidentally halved the peanut butter and put more in.

Either this recipe now has the correct amount of peanut butter or I just ruined it.

I think I got the peanut butter right because the dough looked perfect. We'll never know if I owe these cookies to a mistake or not, but I'm almost sure I did exactly what Clara Matuschak intended. The dough was firm enough to shape with your hands but not stiff or crumbly. We gleefully dumped in the special ingredient.


I think that I have differing ideas than Clara Matuschak about cookie size. The recipe claims to make about 60 cookies. I somehow mysteriously only got twenty. Keep in mind that this is with a generous scoop of white chocolate chips adding volume to the cookie dough, so I maybe got two dozen cookies out of this dough that purports to make sixty of them. I'm sure this has nothing to do with my choice to use the eighth-cup measure as a cookie scoop.


In all seriousness, I know that I am making much larger cookies than the recipe intended. But since we're getting exactly one third the cookies the recipe promised us, I think we can safely assume that the definition of "medium-sized cookie" has shifted between 1952 and today.


I still can't look at a cookie recipe and tell how much they would spread. Most of the peanut butter cookies I've made spread quite a bit, so I didn't want to flatten these too much before they had a chance to get hot and oozy. It turns out these cookies don't merely need a gentle denting with the fork to give them those signature gridlines that all peanut butter cookies should have. You need to squash them flat. Although the peanut butter poufs were rather cute if a bit oversized.

My cookies shown with the cookbook for scale.


After smashing the second batch much harder, we got much better cookies. So if you make these cookies, you'll want to be forceful with the fork. These cookies expanded a bit while baking, but otherwise held the same shape as they had before entering the oven. However, it seems that the clubwomen of the Slovak-American Ladies' Association liked their peanut butter cookies a bit overbaked. These cookies, despite being much larger than the recipe intended, were done in about two thirds of the baking time. We have seen this before in a peanut butter cookie recipe from the same book. You may think I need to get the oven checked, but only peanut butter cookies from the Slovak-American Ladies' Association cookbook ge burnt if baked for as long as the recipe directs.


With that said, this is a dangerous recipe if you still want to fit in your clothes. White chocolate chips or not, these cookies seem hard but they're delightfully crumbly once you bite into them. They're surprisingly airy inside but still wonderfully filling. We will be revisiting this recipe.... but sparingly because we don't have elastic in our clothes.

Thursday, November 4, 2021

The crispiest (attempted slice-and-bake) oatmeal cookies I have ever made

An interest was expressed in oatmeal cookies. I could have used the recipe in the big Better Homes and Gardens binder cookbook, but it uses only one egg in a recipe that makes like five dozen cookies. We do not have enough people to eat five dozen cookies in this house, (Well, we would definitely eat them all but I would have to start letting out everyone's clothes. If you do any sewing, you will know that letting out modern store-bought clothes usually involves coming up with a lot of extra fabric to insert into your to-be-expanded garment, which is a lot more work than making fewer cookies.)


Oatmeal Cookies
½ c shortening or schmaltz
½ tsp baking soda
¼ tsp salt
½ c brown sugar
½ c white sugar
1 egg
1 tsp vanilla
1½ c quick-cooking oatmeal
½ c nuts*
¾ c flour

Cream shortening, sugar, baking soda, and salt. Add eggs and vanilla. Alternately add the flour and oatmeal, then stir in the nuts.
The recipe then tells you to shape the dough into logs, wrap them, and refrigerate overnight before slicing and baking the next day. I tried it and most of my cookie slices crumbled. If yours do the same, or if you want to save time, roll the dough into small balls and then flatten them between your hands.
Bake at 350° until just barely darkened around the edges, 8-10 minutes. Put in a tightly sealed container after they cool.

*I used raisins instead.
I added a few shakes of cinnamon as well.

Source: Mary Fedor (Streator, Illinois), Anniversary Slovak-American Cook Book, First Catholic Slovak Ladies' Union, 1952

Now, a word about ingedients. The recipe tells us to use either shortening or schmaltz (viz. chicken fat). We decided to almost use schmaltz, except with a change of species.


Back in the Before Times, we used to get the extra-lean hamburger and skip draining it. Now we have this big tub of economization in the refrigerator. 

We've already found that beef fat doesn't add any meat flavor to anything (if it did, we wouldn't have put it in shortbread twice). The recipe says we should use chicken fat (or shortening). I don't think Mary Fedor would mind too much if we used cow fat instead. 


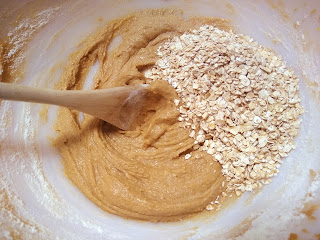
And here we have the proto-cookie sludge! After this point, I looked at how much flour this sugary gravy is supposed to receive and decided the hand mixer couldn't handle it. Also, at this point I added some cinnamon because I like that extra flavor in oatmeal cookies.


At this point, I reached into the pantry for the oatmeal and found that-- horrors-- we only had the instant kind! Surely this meant the end of our oatmeal cookie endeavors until the next grocery trip. A lot of recipe guides will tell you to use the quick-cooking oats in cookies but never the instant kind lest your oatmeal cookies die a horrible death. In my baking class, when we made a massive batch of oatmeal cookies for some faculty lunch, we were given dire warnings about how using the instant oats would ruin everything. 

Oddly enough, no one ever says why. Since we weren't going to put this half-finished cookie dough in the refrigerator until we could get the proper, Fornax-approved oatmeal for the cookies, we decided to bear the risk of oven explosions and whatever other kitchen disasters might ensue from the use of incorrect oats. (Fornax, as you either already know or are about to, is the Roman goddess of the oven.)

This may be the picture of culinary ruin.

Usually, recipes tell you to get the cookie dough completely mixed before adding the oatmeal, raisins, or whatever else. I always figured it was so you could tell whether you had any unmixed flour clumps before they hid themselves amongst the oatmeal. But this recipe tells us to add them alternately, and I'm not going to argue with someone whose recipe got accepted by the Cookbook Committee (always capitalized). 


With the last of the oatmeal, I added the raisins. I like raisins as much as those children who get them while trick-or-treating. I was especially disappointed after one of those how-to-eat-healthy talks I went to for the free food. The registered dietician told us that raisins are basically candy as far as nutrition is concerned, leaving me to think about how many times I could have just eaten chocolate instead. But I like raisins in oatmeal cookies. They add little concentrated spots of tartness that makes the cookies so much nicer. 


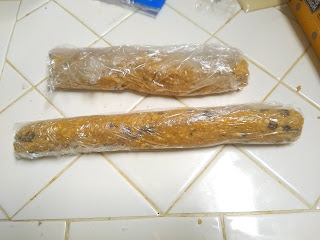
The recipe tells us that these are icebox cookies. I want to warn anyone following along at home that there is no dignified way to make a log of oatmeal cookie dough.


Making a slice-and-bake log of oatmeal cookies is about as embarrassing as baking brownies in a cornstick pan. I thought it was bad enough making brown logs of chocolate icebox cookie dough, but these are worse. If you make these, be sure to have a frying pan ready to swing at any attempters of scatological humor. Otherwise the jokes will get too repetitive for the unarmed.

I could more easily keep a straight face while making novelty bachelorette party dingledongle cupcakes than making these.


Depending on your perspective, these lovely logs were either worse or better when frozen enough to, er, stand on their own.


All this business of refrigerated cookies to slice and bake proved a waste of time. This is what happened when I tried to cut them.


A few cookies came out intact, but I shouldn't have bothered. You may be thinking I should have used a sharper knife, or a different shaped blade, or suchlike. I tried half the knives in the kitchen, from chef's knife to cleaver. None of them were any better. Perhaps this is the dire fate that befalls those who try to bake instant oatmeal. 

I cut up half the log before giving up and got a few intact-ish cookies that I had to very carefully lift onto the pan. I then rolled all the crumbled cookie dough into balls and flattened them between my hands. Because the dough was still hard from refrigeration, the oat flakes scratched at my hands a lot.


If we look at the only intact slices I got out of this, we can see fissure lines showing how they may not have broken apart but they really wanted to.


While the first batch baked, I got out the other dough log and cut it up to see if it would do any better than log no. 1-- it didn't. But at least cutting the dough up helped it soften enough to shape into actual cookies.


Honestly I think the rolled-and-flattened cookies came out better than the sliced and baked ones. They looked just a little bit nicer.

When we bit into one of these, they were the crispest cookies I've ever made. If you've ever stacked three Pringles at once and ate them, you can get a good idea of what we had made.


We could have used these cookies to record the sound effects for those aggressively perky commercials where Florence Henderson sang about frying chicken in Wesson oil. Seriously, when you bit into one of these it sounded like a Doritos ad. Because one of the other people in the house found this even funnier than I did, we have audio.


The Sound of Cookie Snarfing

 You might think they were tooth-breakingly crunchy, but if we crack one open you can see they rose into thin flakes and layers. It was about one fourth of the way between cookie and something with phyllo dough.


I don't know if it was the beef fat or Mary Fedor's recipe, but these cookies are crispier than multiple fistfuls of potato chips. If you skip the refrigerate-slice-and-bake business and just shape them in your hands, you will love these cookies.

Friday, October 22, 2021

Orange-Peanut Butter Cookies

 I knew I would make this recipe the moment I saw it.

Orange Peanut Butter Cookies
½ c butter
½ c peanut butter
½ c brown sugar
½ c white sugar
1 egg
2 tbsp orange juice
1 tbsp grated orange rind
2¼ c flour
½ tsp baking soda
¼ tsp salt
1 c chopped nuts if desired

Mix butters, sugars, egg, orange juice, and rind. Beat well until smooth, light, and fluffy. Stir in the soda and salt. Then add the flour, a small portion at a time. Add the nuts if desired.
Knead dough with your hands until smooth, then divide in half. Shape each half into a log, then wrap in waxed paper. Refrigerate until firm.
When ready to bake, heat oven to 400°.
Cut the dough into eighth-inch slices. Place on a greased baking sheet and bake 8-10 minutes.

Florence Hovanec, (Whiting, Indiana), Anniversary Slovak-American Cook Book, First Catholic Slovak Ladies' Union, 1952

Peanut butter and orange are an unusual pair to put in the same cookie recipe (or at least I've never seen this anywhere else). But like the orange pie I did one Christmas, this recipe seemed more like an interesting novelty than a recipe that time thankfully forgot. We're making something just a bit outside the commonplace flavor choices, not something so unfortunate that Mrs. Cropley would have made it on The Vicar of Dibley.

I am enabled by other people in the house who just really like cookies and therefore encourage (or at least step back and tolerate) anything that involves multiple baking sheets and a hot oven. As previously mentioned, our new favorite beat-up old cookbook has a lot of recipes for things that are common today but have gotten a lot more codified and uniform in the intervening decades. You know how just about every latter-day peanut butter cookie recipe (unless you do some very deliberate recipe searching) is basically "make dough, roll into balls, dip/sprinkle with sugar, press grid lines with fork"? 

Equal amounts cow and peanut butter.


This book has multiple peanut butter cookie recipes, which is not surprising. You see duplicate recipes in a lot of community cookbooks. After all, you don't want to elevate one lady (you never see men sending recipes into these) over another by excluding Ida Felton from the book and letting Loretta McAdams get all the credit in print for devil's food cake. But to my mild surprise, all of the peanut butter cookies in the Anniversary Slovak-American Cook Book are different recipes. We've got one recipe like the peanut butter cookies you see in cookbooks today, one recipe for drop cookies, and the citrus-infused delight (well hopefully it's a delight) we are making today.


At first I was hesitant to make these because I feared people might be just as picky about peanut butter cookies as they can get about grilled cheese: add one shake of paprika and you've ruined the sandwich. I thought orange might be something people can't accept in peanut butter cookies. Then I decided to just make them anyway so I can stop wondering how they'd come out.

Our starring juice has been added!

As a recipe note, the directions tell us to use the juice of fresh oranges along with the rind we grated off first. But we still have a partial can of orange juice concentrate in the freezer that we periodically thaw out and add by the spoonful to various things.


I was a bit surprised that the recipe instructs us to dump everything besides into a bowl all at once. It really shows how ubiquitous electric kitchen power tools had become in the kitchens of people who couldn't hire domestic staff. You can try to do this with a wooden spoon, but you will really wish you had done like so many recipes tell you to: beat the butter and sugar separately, then add your eggs and other runny ingredients. I suspect that when Florence Hovanec wrote that we should dump everything in the bowl all at once, I she used those one of those marvelous kitchen appliances that almost everyone could finally afford. I only got this well-beaten result after following the wisdom of Our Patron Saint of Cookrye, Fanny Cradock: think of someone you've never really liked but you're too well-bred to say anything so you take it out on your dessert.

After adding the flour, this went from one of the runniest to  one of the stiffest peanut butter cookie doughs I have made.


With a bit more Fanny Cradock-inspired spoon thrashing, we got this citrus-touched mess to coalesce into something that was, if not malleable, could at least be forced into whatever shape one may desire. At this point, I checked the recipe and found that we are shaping these into logs. But more importantly, we're probably not having cookies tonight. The recipe tells us to "Wrap in waxed paper, place in refrigerator. Chill until firm." Meaning, if we want cookies tonight, we are either making something else or buying them.


I tried to hurry these up by freezing them, but as you can see by the rough surfaces, the dough wasn't really firm enough to cut very well. Had I attempted the eighth-inch slices the recipe tells us to make, the dough would have just turned into mush on the knife. Not that I mind thicker cookies; thin wafers are rarely something I wish I had in my life. I do wish I could get my icebox cookies to come out in a cuter shape than "random splotch of misshapen cookie dough."

Given how hard this dough was before it saw the inside of a freezer, I did not expect these to rise as much as they did. I didn't the dough was flexible enough to allow any leavening. But instead of getting hardened dough bricks, we got some delightfully puffy cookies.


As the remaining cookie dough remained in the freezer while the first batch baked, it sliced more smoothly. Had I waited overnight I could have easily cut these as thinly as the recipe tells us to. But if I had patience, I would have had to wait longer for cookies.


And here we have our orange-perfumed plate! I put the second batch that got frozen longer and therefore cut more smoothly on the top of the pile for presentation purposes.

Peanut butter and orange go together so well that I'm surprised I've only seen them put together in this one recipe from 1952. The orange flavor kind of hung in the background of these, though I had expected it to be a lot stronger. Maybe it would have been had I used fresh oranges and also grated off the rind.  But they're like if shortbread was just a bit softer, and they taste wonderful.

Thursday, September 16, 2021

Fun with Fudge Frosting

 When last we saw the nun brownies, we had made the brownies themselves twice but never tried the fudge frosting that came with the recipe. We at A Book of Cookrye were nevertheless curious about whether this boiled concoction would be any good. Furthermore, we wondered if it would actually improve the brownies. I've found that brownies, being very rich and sweet already, usually don't need any post-oven improvement. But this brownie recipe came with an icing recipe, so in theory they would perfectly complement each other.

Fudge Frosting for Brownies
1 c sifted powdered sugar
1 tbsp cocoa powder
2 tbsp cream (or half-and-half)
1 tbsp butter

Combine in a saucepan and cook until it boils around the side of the pan. Remove from heat and beat until it is thick enough to spread. It sets quickly when it's ready, so wait until you're ready to spread it on your brownies before making it. Covers one small batch.

Dominican Sisters (Oxford, Michigan), Anniversary Slovak-American Cook Book, First Catholic Slovak Ladies' Union, 1952


I usually don't bother sifting powdered sugar that is going to be boiled because any lumps always disappear in the bubbling heat, but I didn't want to argue with a convent's worth of nuns. 


As an recipe note, we don't have cream in the house, and I wasn't about to get a carton just to use a single spoon of it. However, someone else in the house has taken to using half-and-half in coffee, which seemed close enough for today's endeavor.

I don't think those nuns were kidding when they said to boil it only until it bubbles up around the edge of the pot. The overcooked fudge icing turned a bit crumbly when we tried to get it onto the brownies. 

Also, this recipe makes exactly enough to cover this one small pan. It's like God meant for this icing to go with only this brownie recipe.


We all tried the frosting-crowned brownies and were delighted. It's basically a brownie with boiled fudge on top. As aforesaid, I usually don't think brownies need icing on top, but this really did improve on perfection.We all ate the entire pan with embarrassing speed.

I know that a lot of boiled icings exist in the homemade world, but I've never done one until now. I began to think about how we might vary and play with the recipe. My first thought was this: when you first take the icing off the stove it's still very runny, and you stir it hard to pass the time while it cools and thickens. We thought to ourselves, what if we poured it out as soon as we took it off the stove? Would we get a lovely thin layer of glaze that turned into a delicate shell of fudge?


For those of you cooking along with us at home, this is the cookie recipe from the back of the Reese's chips bag-- except this time we used white chocolate chips instead. As you can see, we did not get the thin glaze we hoped for when we dumped the still boiling-hot icing on top of them. The icing separated out and just wasn't as nice as it could have been if I'd waited until it had cooled (stirring the whole time of course). However, the icing did cool off enough to keep itself together by the time we got to the last cookies in the batch.

Both the cookies we iced in premature haste and the ones that we iced properly tasted just fine, even though the first ones didn't look right. But we started to wonder... if we separated the icing recipe from the brownies it came with, did we have a quick in-a-pinch recipe for fudge? We gave the icing yet another go (we've made it thrice so far,for those of you who are counting), with a new ingredient:


I thought we'd get delicious fudge-coconut clusters, but this really is a frosting recipe. They look cute, but they tasted like coconut and icing. The chocolate part did have a nice praline-ish texture, though. They weren't bad, but they weren't what I hoped for either.

We ate all of these, but they weren't worth making again. But chocolate and coconut swirled in my mind after my previous attempt to unite them until I had a vision. I imagined the brownies filled with a generous amount of coconut because I like coconut a lot. I even had the perfect recipe which I had saved from Mid-Century menu a long time ago and periodically made when I thought my then-significant other deserved it. (Seriously, it's really good.)

Source: Mid-Century Menu (read about her adventures making this recipe!)


This would be the perfect coconut filling for the brownie delight of my dreams- it tastes amazing, but it has never (no matter how many times I made it) set enough to serve as candy. This shortcoming never mattered since we always just ate it out of the pan with one spatula per person.

Here is a cross-section of what I imagined:

And here is what happened when the brownies fell apart when I attempted to stack them.


I should have known that such decadence would have been forbidden by nuns. But since I am not in a convent, I tried to cut the edges even (it didn't work) and make something semi-pretty. The icing certainly looked tempting as I poured it on. Take a good look at the photo below, because that's the last time this looks at all promising.

It's hard to pour out this icing without salivating.


And here we see the tragic results. There was an attempt.

You may be surprised about this, but it fell apart into a sad chocolate coconut mess when you tried to cut yourself a piece.


With that said, while my dream fell apart, all the components of my vision added up really well when you ate it--- except the icing that inspired the whole mess. It was too sweet on top of all the coconut and brownies. The coconut recipe uses unsweetened chocolate, and you should too. Sugary icing on top candy is a bit too much. I should not have defied God's yardstick-wielding enforcement squad by putting the fudge frosting on anything but otherwise-unadorned brownies.

However, the brownies and the coconut were absolutely perfect together. Also, putting the coconut candy on top of brownies solved the problem I always had that I could never serve it up. The coconut candy, no matter how many times I made it, always remained a sticky mess that clung to the spatula until you thwacked it onto your plate like a cafeteria lady slinging mashed potatoes. Treating it like a decadent brownie topping instead of a standalone delight seemed more right. But I definitely overdid it in making a not-majestic tower of chocolate. A single, non-stacked layer of brownies with the coconut on top would have all the deliciousness I envisioned without the structural instability.

In sum, this tower of cocoa and coconut was really good and also so rich that after a very small portion you were done eating it. Everyone will only want a little bit, so you can make dessert for like twenty soon-to-be-sated people without having to get out a second 9x13 pan. To give my attempted artistry some dignity, I want to show you that we did indeed have the layers we dreamed of in the part that remained on the platter after a few days of everyone hacking off a little bit when we needed just a chocolate lift.


Also, the icing is very good and worth making again. If you're making a small batch of brownies, definitely consider pouring it on top.