Wednesday, July 20, 2022

Chocolate Chiffon Pie: or, Payment for Services Rendered

We at A Book of Cookrye are no strangers to paying for services with the fruits of the oven. Heck, I may have only graduated high school because I kept bringing in pastries when teachers were finalizing grades. When one of the people in the house gave us an automotive assist, I asked what his favorite pie was. The answer was "something with chocolate." 

I thought to myself that I own a whole book of chocolate recipes in which the perfect pie waited to be made, even if I don't have the book at hand. But with great pleasure, I can tell you that my dearly beloved chocolate book, Maida Heatter's Book of Great Chocolate Desserts, is available for free on the Internet Archive! Granted, you have to "borrow" their copy for one hour at a time instead of just opening the book page you want and propping your laptop up in the kitchen while you cook. But one hour is plenty of time to do some recreational recipe browsing and write down the one you have in mind.

It may be daunting to see a recipe that runs for three pages, but that's because Maida Heatter writes out her instructions in very fine detail. Her recipes read like she's patiently explaining everything to someone who's nervously making their first ever batch of cookies. You get the idea that even if your most ambitious baking attempt so far was a birthday cake made from a box of mix, you could easily follow her thorough instructions and make the seven-layer Hungarian torte regardless of whether you've seen the word torte before.

Chocolate Chiffon Pie
1 baked 9-inch pie shell
7 oz semisweet chocolate
1 c milk
1 tbsp (1 envelope) unflavored gelatin
⅔ c sugar
2 eggs, separated
1 tsp dry instant coffee (optional)
1½ c heavy cream
Pinch of salt

If you do not have an ice maker or a lot of ice in your freezer, refrigerate a large bowl of water the night before (or at least a few hours ahead).
Finely chop or grind the chocolate, and set it aside.
Place the milk in the top of a large double boiler. Sprinkle the gelatin on it and leave for 2 or 3 minutes. Add ⅓ cup of the sugar (reserve remaining ⅓ cup), the yolks, and the chocolate. Stir to mix thoroughly. Place over hot water over medium heat and stir constantly until the chocolate, sugar, and gelatin are dissolved. Do not overcook or the yolks will curdle. Add the instant coffee and stir to dissolve. Remove from the hot water.
Place the top of the double boiler in a large bowl of ice water (or the water you refrigerated earlier). Stir it until it reaches room temperature. Remove from the water (but don't pour the water down the sink yet) and set aside.
In a small mixing bowl, beat the egg whites until they have increased in size and started to thicken. On medium speed, while beating, add the remaining ⅓ cup sugar gradually. Then increase speed to high and beat until they barely hold a peak when the beaters are raised, or when the whites are lifted with a rubber spatula. (Do not beat the whites too stiff and dry or it will be difficult to fold them in.) Set them aside. Whip the cream until it barely holds a shape (if it is too stiff it will make the filling heavy). If you beat the egg whites first and the cream after, you can just use the same mixer without even rinsing the beaters. Set aside.
Fold about one third of the chocolate into the egg whites, then fold another third of it into the whipped cream. Then fold the whites and cream into the remaining chocolate. Do not handle the mixture any more Put the chocolate back into the ice water and stir constantly with a rubber spatula, scraping around the bottom and sides of the bowl, until the mixture barely starts to thicken. You want to have the chocolate, egg whites, and cream all at the same consistency. If the chocolate overthickens and begins to set and congeal on you, you can put it in the microwave for 10 seconds at a time, stirring well after every interval.
Pour the pie filling into the crust. Put the pie extra pie filling in the refrigerator until set. Any extra pie filling is very nice poured into cute little glasses or bowls and then refrigerated along with the pie.
Serve with whipped cream on top.

Source: Maida Heatter's Book of Great Chocolate Desserts, Maida Heatter, 1974

Maida Heatter sold me on the recipe with the first sentence: "This is a beautiful and important pie." That makes the pie sound perfect as compensation for services rendered, don't you think? The last time we made a gelatin pie that involved folding whipped things into the filling, it was unnervingly bulletproof. But this recipe is from the most sacred book of chocolate, and therefore more likely to be edible. I've previously mentioned that I asked a friend of mine who makes duct tape art to make a cover for this that says THE HOLY BIBLE.

The brown textured tape is meant to remind one of swirls of delicious brownie batter.

I've never had a recipe from this book go wrong. So I wasn't unnerved when the gelatin turned into this wrinkled skin on top of the milk when I scattered it as directed.


We don't have a double boiler, though I've been meaning to check the thrift shops for some decent stainless steel bowls you can just set on a pot. But we do have this diffusion thing, which I've often used under vats of spaghetti sauce.

 I actually think this part of the recipe would be perfect for doing in a microwave, but I wasn't going to risk all these ingredients for that kind of experimentation. But I think the microwave is ideal for a lot of delicate saucepan operations that would easily burn. For example, these days I always scald milk in the microwave because it simply cannot scorch onto the sides of the bowl like it would in a pot. (It does boil up a bit high though, so one needs a large bowl to prevent a mess.) 

But for now, the stovetop diffuser would have to suffice.


I haven't read Maida Heatter's recipes in a while, and sometimes her writing style sometimes seems a bit persnickety. She begins with "The chocolate must be finely ground." Like, she's not telling you, the cook, to grind up the chocolate. She just imperiously decrees in the first sentence that someone had better come up with a grinder before proceeding with the recipe. I did not do that. Yes, we have a food processor, but it's a bit of a dishwasher primadonna. All the pieces of it demand a lot of rack space. I just used chocolate chips instead.


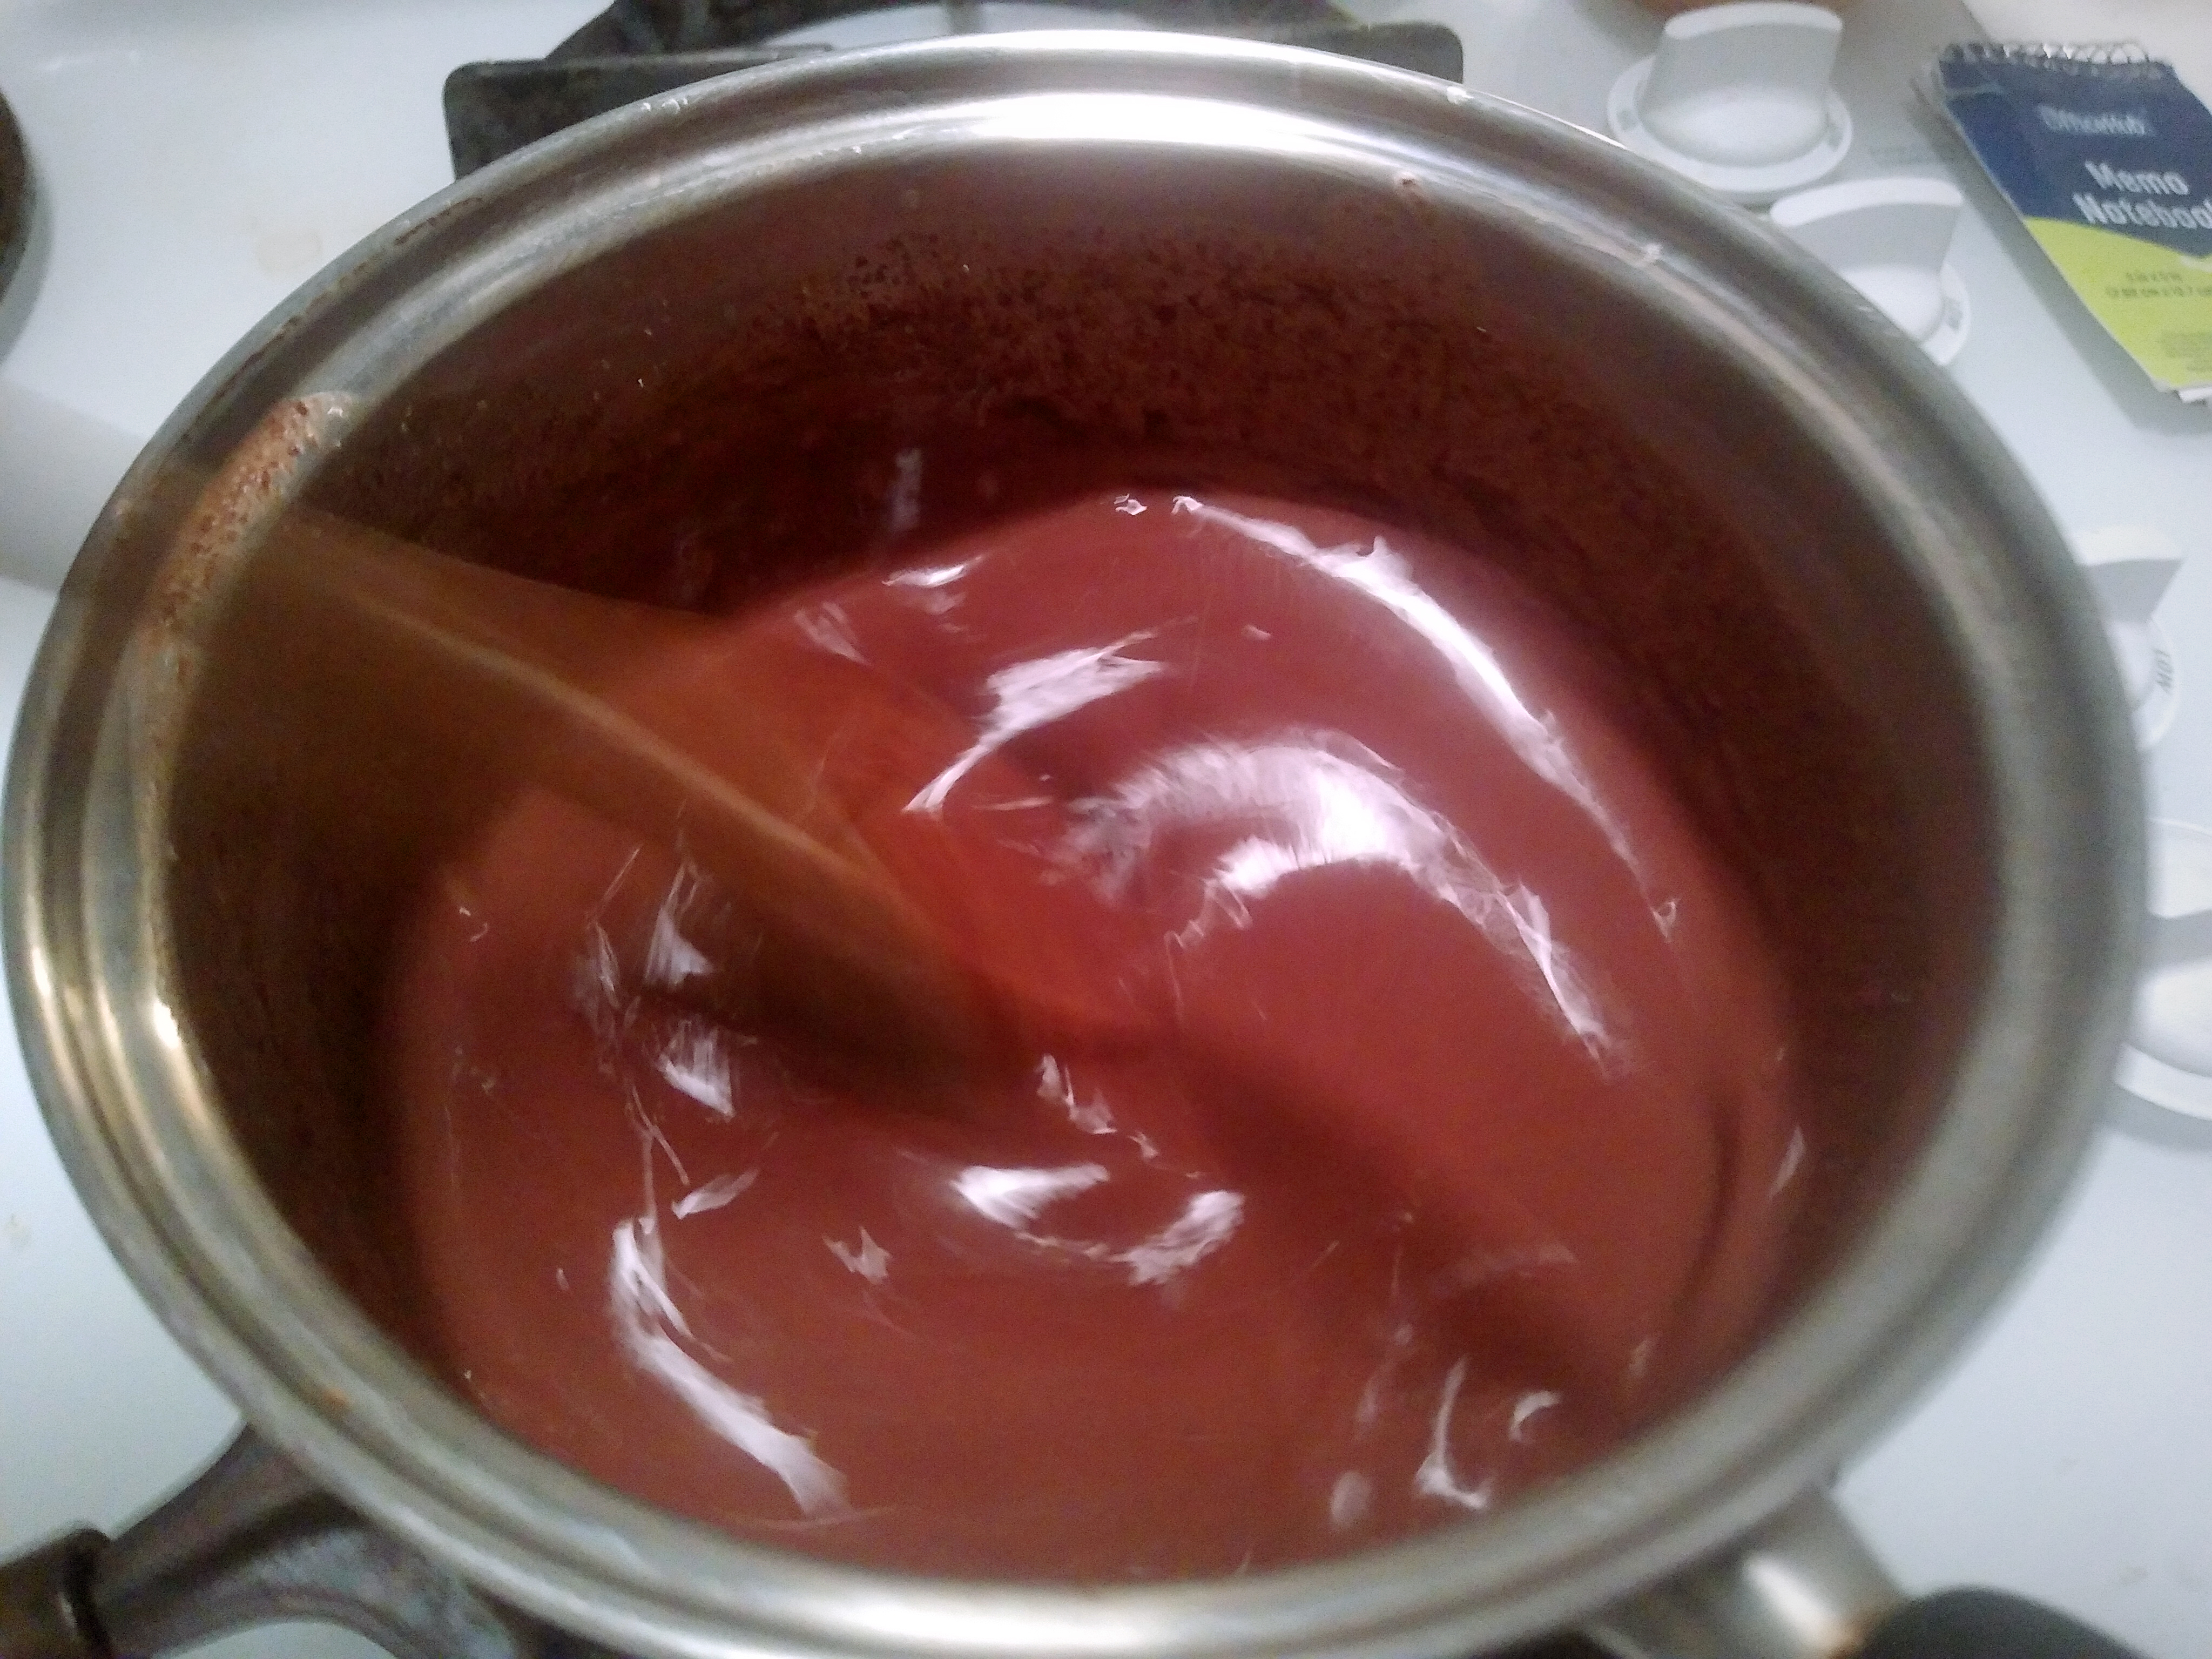
I thought the chocolate chips were small enough to easily melt, but maybe I should have listened when Maida Heatter said I should grind them. They soon coalesced into one chocolate wad. I feared that the egg yolks would be long scrambled before the big blobs of chocolate melted.


But fortunately, with a lot of patience (and while turning the burner as low as it gets) we got the chocolate to melt. This yielded us a big pot of something about halfway between a really rich hot chocolate and hot fudge sauce.


Sometimes I read recipes like this and realize that perhaps I don't have the kitchen that the recipe writer thought I would. The book tells us to put the pot of chocolate into ice water. We do not have an ice maker in this house (it seems that wherever I go, the water line that's supposed to go to the refrigerator has problems that would involve tearing out the kitchen floor to fix), and I did not want to purchase ice just to deliberately melt it. The best I could come up was a basin of tap water. Had I planned ahead, I could have set the basin in the refrigerator a few hours before beginning the recipe. Unfortunately for my iced or chilled water needs, I had only given the recipe a quick skim when I was writing out this week's grocery list. 


As we set the filling aside to cool, we proceed to the beating of the cream and the egg whites. At this point, I have to point out a delightfully blunt turn of phrase on the cream carton. In English, it says "heavy whipping cream." In Spanish, it says "extra-fat whipping cream."

I spent a bit too long trying to get the egg whites to beat up into at least semi-peaks. I know the recipe says you want them to barely stand up at all, but these were barely thicker than gravy. An extended beating changed nothing. On the bright side, we discovered that the stand mixer at top speed is so loud you can't talk over it. In other words, if someone else is in the kitchen being inconvenient, you can turn the mixer up to its fastest speed and drown them out.


The recipe confused me at this point, mostly because I thought the whipped cream was supposed to go on top of the pie rather than in it. I had to reread it several times before I figured out where this was going. During that time, the gelatin in the chocolate had turned transformed it from a rich pudding to a slithery chocolate Jello mold.


Apparently one should neither dilly nor dally after getting the chocolate off of the stove. I didn't think we had enough gelatin in this to set it at room temperature, but I already knew how to fix it. As we have discovered when making all our lovely fruit "salads," you can microwave the gelatin for ten seconds at a time, stirring well every time. Eventually, it will be un-set but not melted, and your chocolate chiffon pie can proceed. Just don't tell anyone that you had to use the microwave to undo your gelatin failures. Or, if you're like me, proudly tell everyone how you averted disaster with the same machine you used to reheat last night's spaghetti. Every good dish benefits from an unsolicited speech about how you nearly ruined it.


Anyway, I hope everyone has all their bowls of mixtures at the same consistency because it's time to mix everything together! First, we dump about a third of our re-melted chocolate stuff into the bowl with the egg whites and try not to swoon over the chocolate stripes that swirl artistically about it.


Second, we put another third the chocolate into the whipped  cream and try not to deflate it too much while folding. Remember, we are not stirring, we are folding. Stirring would deflate the whipped cream. At this point, the intended recipient of the pie came in and tried some of the chocolate that remained in the main bowl. His eyes widened a bit and he simply said ".....whoa." We gave him a heavily loaded spoon to wander off with.


As we got this pie together, we once again faced something that Maida Heatter recipes do a lot: use every bowl in the kitchen. She must have had a commercial dishwasher in her kitchen, perhaps even two of them. As much as I've loved every single one of her recipes that I've tried, the sink fills up quickly when you're cooking from Maida Heatter's Book of Great Chocolate Desserts. Therefore, I suggest you pick a recipe very carefully unless you either have a dishwasher or someone who volunteered to do the dishes for you.


If you follow Maida Heatter's instructions to have the chocolate and both bowls of fluff at the same consistency, you can indeed achieve great heights. The pie filling threatened to overtop the crust, and we still had a smidge extra.

So that we could sample the pie without waiting for the entire massive pie-load of chocolate to firm up, we poured the little bit of extra pie filling into the nearest convenient cup and put it in the refrigerator alongside the main attraction.

And... this pie is exactly as beautiful and important as Maida Heatter promised. It is delicious, chocolatey, and magnificently rich. If you're just making this for the house, you might cut the recipe back and make a smaller pie though. I tried to delicately hint that we should give some away, because this is a lot of chocolate. However, my gentle suggestions to get at least part of this pie out of the house were met with a possessive glare while someone grabbed the pie pan in one hand and a fork in the other.

Wednesday, July 13, 2022

Jello 1-2-3: The actual original still-in-the-box powder!

Today's adventure begins with something innocuous:

Let's talk about brand dilution...

Yes, jello! Someone else in the house randomly craved a box of the stuff, and it was both easy and cheap to make. This soon led to encasing canned fruit in gelatin, which is benign creation but also the gateway to terrible and jiggly times. 

It turns out that making the fruit properly float in the gelatin is a matter of careful timing. If you put the fruit in too early, it will just sink to the bottom of the bowl. If you wait too long, the gelatin will completely set and you can't get the fruit in it. You have to keep checking it every quarter hour or so, hoping it has reached that perfect "egg white consistency."

If you're like me, you will forget all about your congealing salad until it is too firm to accept the fruit, but there is a way to fix it. You can just microwave it, stirring after every ten seconds, until partially melts. It'll look kind of chunky on top, but who cares? 

Here is the innocent beginning of our gelatin voyage. Don't the suspended fruit slices look like they're swimming in a strange aquarium? 


As much as I remain dumbfounded at serving gelatin as a "salad," I had to admit that the gelatin-suspended fruit was an unexpectedly perfect side dish for the pot roast we had that night. I highly recommend fruit suspended in Jello when when you're serving pot roasts- the light, cooling dessert (or salad, if you prefer to call it that) is a perfect counterpoint to the rich, heavy main dish. 

Also, and I am not the first to note this, gelatin extends the life of nearly-expired fruit by at least a few days. If those last uneaten strawberries are starting to look a little wrinkly, they will remain fresh for another week if you put them in gelatin.

Perhaps detecting future jiggly schemes, others in the house said "This is so good, it's the only gelatin you should ever make!" Despite the hopeful tone in their voices, we were just beginning our congealed journey. Other dear acquaintances who don't even live in the same state saw the ill-advised future already firming up in the refrigerator.


They were right to be worried. Scavenging the back of the pantry, we found some forgotten crushed pineapple. The can had no rust, so we decided it must be safe for human consumption. This led to the creation of a Hawaiian Fruit Salad. As you know, in the world of processed foods, "Hawaiian" means "contains canned pineapple." 


The fibrous canned pineapple embedded in the gelatin made it feel like you were cutting into a steak. The shreds of pineapple itself had no flavor in them (I may have over-enthusiastically squeezed the excess juice out of them), so they did nothing but get stuck in one's teeth. No one wanted to eat the Hawaiian Fruit Salad. It was discreetly given to the raccoons. 

But all of that is a warmup for what turned up in a recent pantry excavation:


Yes, we found an inexplicable box of Jello 1-2-3, a product that has a small yet devout nostalgic following long after it was discontinued. It seems a lot of people remember Jello 1-2-3 as the first thing they ever made and served to their family. A lot of people online reminisce about how they felt so grown up when they ritualistically poured the mixture into wineglasses and later brought them out of the refrigerator for dessert. 


Jello stopped making 1-2-3 in the previous millennium, so this is definitely one of the less well-advised things we have reconstituted. I didn't expect it to be any good after who knows how many years (although the box had no expiration date), but I wanted to see if it really did that magical layer separation promised on the box photo.

The camera really doesn't show the bright pink that appeared when we reconstituted the powder. It was the same color as the plastic they use in Barbie accessories. 

I'm not going to dwell on the foul stench that conquered the kitchen. There's nothing surprising about a box of 30-year-old gelatin product expiring and lightly decaying in the many decades in which it was ignored in the pantry. But I would be remiss not to mention the olfactory attack at least once. Also, despite smelling distinctly like long-expired milk, this product is dairy-free.

And so, with the kitchen timer counting down the two minutes specified on the back of the box, we inserted the electric mixer. The directions say we should use a blender if possible, but I didn't feel like gathering all the blender parts from the various drawers in which they reside.


From here, the instructions are quite straightforward. First, your about half of the mixture amongst the random transparent glasses you have chosen from the cabinet. Then, you go back pour the rest of it, filling each glass in the same order as the first time. I didn't know why we're supposed to do incrementally pour it instead of just dump it out. But I figured that unless I go out and deliberately pay for another box of expired gelatin, this will be the only chance I get to make this fabled discontinued product.


The Jello 1-2-3 didn't really have three layers immediately after pouring. If you count the beer-like foam on top as a layer, you could say it had two. I thought that perhaps it separates into three layers as it sits, but it did not. I guess it sort of had a middle layer if you looked closely enough. 

Here they are, all firmly set and ready to throw out! The camera's autofocus actively sabotaged my attempt to document this historic culinary event. Also, I don't know why this stuff looks like it is a tasteful salmon color in all the pictures. I promise, it was the same color as the girl's section of a toy store.


The middle layer is really the foam on top as it partially sank into the gelatin beneath. You will notice that unlike the three-tiered confection pictured on the box, we really have two stripes on top of a translucent pink mass. Since it's a bit hard to see in the photographs, here it is in MS-Paint:

If we peep into this from the top, it looks like dense pink cobwebs.


If we pretend this is edible and scoop some of it out (and after it spent who knows how many years of putrefying in the pantry, you'd be foolish to try), it looks like you made a normal box of Jello with milk instead of water. As aforementioned, smelled exactly like extremely putrid milk. I double-checked the ingredient label, and this product contains no dairy derivatives. I wonder what non-dairy substances smell just like expired milk after spending at least 20 years in the pantry.


Lastly, here's what it looked like in motion! This may be the only video of Jello 1-2-3 in existence. A lot of people have made homemade-ish reconstructions (often involving a box of modern-day Jello and a tub of Cool Whip) and filmed it, but this is the actual prefabricated original in all its jiggliness! Apparently gelatin retains its power long after the natural and artificial flavors have decomposed. Anyway, this is both the rarest food-related event yet documented on A Book of Cookrye, and proof that I should not be the one documenting it.


As a final note, I compared the ingredient labels of both the Jello 1-2-3 and a box of normal, non-expired Jello that we had. The only major difference is that 1-2-3 had maltodextrin in it. So if anyone reeeeally wants to recapture what has long ceased production, and the new recipes just don't do it for you, try obtaining some maltodextrin and adding a spoonful to an otherwise factory-standard box of Jello.

I have to reiterate two things in closing. First, none of the previous photos capture how synthetically pink this stuff was--- but you can finally see an honest show of the aggressively pink color in this photo of the splats that dripped from the bowls into the dishwasher.


Second, this really did smell like thirty year old expired food. When I heard the dishwasher start draining, I hastily turned on the kitchen faucet to flush the drain in the sink and make very sure that the foul steam coming from the dishwasher didn't have a chance to re-stink the kitchen. 

In closing, we at A Book of Cookrye do not recommend attempting to reconstitute food products from the last millennium.

Tuesday, July 12, 2022

Raisin-Coffee Cupcakes or, Finding recipes instead of repairs

Not to get into a typewriter detour again, but they are why I found today's recipe. I was flipping through this person's typewriter repair blog admiring all the pretty pictures of antique machines getting rescued from rust and grime. It's so satisfying to see these derelict machines get taken apart, cleaned for the possibly the first time in this millennium, and then brought back to life. 

On a recent post, she said that her mother had typed the family cookbook on a typewriter just like the one she was currently fixing. She then provided a sample with the note "Midcentury recipes are a window into a mysterious time." With that introduction, I expected something a lot more strange than this:

Source: My Old Typewriter

Raisin Cupcakes
1 c raisins
⅔ c hot coffee
½ tsp cinnamon
1 c sugar
⅔ c shortening
½ tsp baking powder
½ tsp baking soda
½ tsp salt
2 eggs
1½ c flour
   Glaze:
1 c powdered sugar
¼ c coffee

Heat oven to 350°. Put paper liners in a cupcake pan.
Combine raisins, cinnamon, and coffee. Set aside and let stand.
Cream shortening, sugar,baking powder, baking soda, and salt, beating until light and fluffy. Add eggs one at a time, beating well after each. Then add the flour and undrained raisins all at once. Mix just until combined.
Fill each cupcake paper about ⅔ full. Bake 20 minutes, or until a toothpick in the center comes out clean. Mine took 40 minutes instead of 20, so be sure to test for doneness before removing from the oven.
When they are done, whisk together the glaze ingredients and pour onto the hot cupcakes. It will soak right into them. Let the cupcakes cool, then ice as desired.

Note: The recipe claims to yield 2 dozen cupcakes. I got only half that.

Before beginning, we had to type out the recipe. Other people can cook with a laptop in the kitchen, but I am too splatter-prone to risk it. I thought it would be cute and rustic to type the recipe in White-Out on a scrap brown paper that was used as padding in a recent delivery. This method of typing may yield photogenic results, but it doesn't work very well and is hard to read. 

My friend has taken to purchasing broken typewriters and reviving them as a meditative hobby. This is his latest.

This recipe is a window into a mysterious time? Not a gelatin mold with whipped cream, fruit, and olives? Not something from the brightly-illustrated pamphlet of exciting ways to serve American cheese and mayonnaise? The only possibly mysterious thing about this cake is the inclusion of coffee-soaked raisins. Granted, the use of shortening instead of butter in cakes has declined a little in recent years, but it's not a mysterious ingredient from bygone days. If no one was using shortening at home, grocery stores wouldn't give it so much shelf space.

And so, we commence with soaking raisins in coffee. The coffeepot contained a surplus from earlier today, and I didn't think stale coffee would break the recipe. But in case hot coffee would help soften the raisins faster, I popped it in the microwave for a bit.


While the raisins got a spa-grade caffeine immersion, we moved on to the mixing bowl where everything was white. I thought about using butter, but we still have shortening leftover from the green velvet cake that crowned the Saint Patcaken.


That white is so unnaturally perfect we could advertise it as "scientifically pure." Before adding the egg, I tasted the synthetically white contents of the bowl. It tasted like knockoff Oreo filling with added grit from the sugar.


At least the egg made it look less preternatural. Heck, the resulting yellow looked downright cheery.


At this point, I couldn't decide whether to separately add the flour and raisins or to just dump everything in. On the one hand, the recipe seems to say that everything goes in all at once. On the other hand, you usually add the flour separately when making cakes. Was separately adding the flour considered too obvious to bother writing down?

Unfortunately, I can't go around to some random stranger's house and ask what their mother meant when writing out a recipe. So, I went with the easiest option. 


After a short time in the unstoppable stand mixer, we had a competent-looking cake batter. It tasted like we had added a lot more complex multilayered flavors than raisins, coffee, and a tiny allowance of cinnamon. We didn't even add vanilla. Also, this cake batter tasted decidedly old-fashioned. It also tasted like it should be in a bundt pan instead of cupcake papers.


Speaking of old-fashioned things, we have previously mentioned that older cupcake pans seem a lot smaller than new ones. We halved this recipe, so we should have gotten one dozen. Instead we got five.


After getting half as many cupcakes as the recipe promised, I thought the recipe typist didn't know how to measure a cupcake. I revised that theory after these needed a lot longer than the 20 minutes claimed in the instructions. Meaning, the oven heat had to penetrate a lot more cake batter per cupcake than the recipe writer allowed for when giving the baking time. Our cupcakes baked for twice as long as originally intended.


I mixed the glaze as originally written, and it was, shall we say, a bit runnier than I expected. The recipe says to moisten the powdered sugar with coffee, not dissolve it.  But using the ingredient amounts specified in the recipe, this happened.


The syrup completely soaked in after a surprisingly short time, leaving only a suggestive glisten on top.


We wanted to fix the erroneous icing and put a lovely-looking topping on the cupcakes. Drawing on previous strawberry cake experience, we did not attempt to add powdered sugar to the icing until it thickened. As we have learned, you have to dump half the bag of the stuff into the icing before you see a difference. Instead, we dribbled the icing very slowly into a fresh bowl of sugar. 

We very easily got a lovely glaze, but in retrospect we should have made just a little bit more of it. Also, as we later learned, some people dip cupcakes in glaze instead of trying to drizzle it on. That probably would have looked better than, um, this.

Be very careful where you serve anything dribbled with white glaze.

If we look at a cross section, these cupcakes came out perfectly. You'd think baking cupcakes for forty minutes would ruinously dry them, but you need to trust that toothpick when you jab it into the cake. If it comes out wet, regardless of how long they've been baking, just let them remain in the oven until they are officially done.

At this point I kind of want to tentatively retract my misgivings about the uselessly runny "glaze." The ingredient amounts seemed even more incorrect after it completely soaked into the cake. But that meant the entire cupcake was infused with coffee-flavored syrup. Some of it soaked right into the tops of the cupcakes. The excess syrup ran down the sides and puddled at the bottom of the paper lining, where the cake absorbed it and  took on a lovely coffee flavor on top of everything already in it. 

Apparently a lot of bakeries nowadays squirt syrup on their bare cakes before icing them, so maybe this recipe is ahead of its time. Also, the runny "glaze" that soaked into the cupcakes made it easier to ice them without (gasp!) crumbs. Or at least, it would have been easier to ice them had I bothered to get out a piping bag and do this properly.


Despite the short ingredient list, these cupcakes have a really interesting, complex flavor that suggests that you spent a long time delicately balancing the spices that went into them.  I thought they would taste strongly of coffee, but you can barely recognize it- and that's if you already know it's there. We have already typed up this recipe (this time with actual ink) to keep it.