Thursday, June 23, 2022

Sour Cream Spice Cake: or, The innocuous beginning of a stack of old recipes

Free newspaper trials can be dangerous. Some people uncover surprise family skeletons in the marriage and divorce records. I on the other hand spent those three precious days of free access frantically snipping assorted recipes to foist on friends. Today, we're going to make something that passes for normal. We have to gently ease everyone else in the house into the wonderful world of outdated food, so we are making a spice cake.

Sour Cream Spice Cake
⅓ c butter, margarine, or shortening
1 c dark brown sugar
1 egg
⅔ c sour cream
⅓ c water
1 tsp vanilla
1 tsp baking soda
1 tsp cloves
½ tsp nutmeg
2 tsp cinnamon
⅛ tsp salt
2 c flour

Heat oven to 350°. Cut a piece of parchment paper to fit a 9" square pan. Grease the pan, press down the paper, and grease it again.
Cream the butter and sugar until light and fluffy in a large bowl. Add the rest of the ingredients and beat well for two minutes.
Pour into the prepared pan and bake 25 minutes.

Caramel Frosting:
1 c dark brown sugar
⅔ c white sugar
2 tbsp butter
1 c water
½ tsp vanilla

Combine everything except the vanilla in a large saucepan (it needs plenty of room to boil up). Cook over high heat to soft ball stage (235° F), stirring constantly. Set aside to cool for 20 minutes.
After 20 minutes, beat well until thick and creamy, but still runny enough to easily pour. Quickly pour over and spread on the cake. If the icing has thickened too much to spread, put it back on the stove and stir until it thins again.

Source: "Helping the Homemaker" by Louise Bennett Weaver, Fort Worth (Texas) Star-Telegram morning edition, Fort Worth TX, May 3 1933, page 5


This is our first venture into the Louise Bennett Weaver-written "Helping the Homemakers." Unlike Laura Kirkman of Efficient Housekeeping fame, Louise seems to have branched out from newspaper columns and written a substantial number of recipe books. All of her books have a story to tie the recipes together, starring a woman named Bettina. Usually, such story-cookbooks have cute little plots like "Little Clara is visiting her quaint country relatives who show her how to do rustic things and also how to cook the old-fashioned way" or "Eleanor just got married and is hopeless in the kitchen until the friendly women in her neighborhood come to her aid." But Louise Bennett Weaver chose to write all her story-cookbooks about Bettina, a know-it-all housewife who's irritatingly perfect but also too nice to hate. 

Apparently I'm not the only one looking up these books almost a century later; they appear not just on archive websites but on the Kindle store. On a last note, A Thousand Ways to Please the Family (book 2 in the Bettina series) is the only book I have ever seen where they make the copyright notice into a picture.

A Thousand Ways to Please a Family with Bettina's Best Recipes, Louise Bennett Weaver (you can read it online for free here)

Back to today's recipe. I do love how the recipe just calls for "⅓ cup fat." First of all, it's the Depression. If we can't afford butter or lard this week, we can just scrape together a third cup of the drippings from last night's dinner and thus avoid cake deprivation. Second, fat may have been acceptable in the 1930s, but it has since become the dietary demon of the west. No one today is going to brazenly use the word "fat" in an ingredient list.


As you can see, we are opting for shortening instead of butter. We still had a bit of it left from the green velvet cake that crowned the Saint Patcaken, and I hate to permit groceries to go rancid. After scraping the shortening can very well with a rubber spatula, we had exactly one third cup of fat like the recipe calls for. The brown sugar completely camouflaged it after creaming the two together as directed. Can you tell there's any shortening in this bowl?

At this point, the recipe tells us to just dump everything in the bowl and beat it really hard for two minutes. I was going to use the mixer for this, but I saw an ad from the same year as this recipe advertising a stand mixer for $19.95. That's like $425 in the year 2022. I'm going to assume that most housewives couldn't convince their husbands to pay that much for a mixer, especially since they were probably still paying off the sewing machine. 

It's true that a lot of newspaper recipes from this time leave out a lot of instructions in the interest of cramming as much as possible into the limited space. One might think that the housewife of 1933 would be expected to infer that you're not supposed to literally put everything into the bowl all at once. But this one expressly tells us to dump every thing else in and start stirring. I wanted to try this new method that's probably meant to be thoroughly foolproof if you have the arm strength.

As we started piling all the ingredients in, we noted that this recipe uses a lot of spices. People often complain that food from this time is underseasoned and bland (and often they are correct), but look at how much spice is going into this thing! You should know that despite my usual inclination to dump in spices with a generous hand, I carefully measured these so I could make this recipe as originally intended.


I found it amusing how the blob of sour cream dislodged all the spices and landed with an almost-audible WHOMPH! on the other ingredients.

We proceeded to turn this promising mess into a cake batter because the newspaper told us this would work. With my eye on the second hand of the nearest clock, I proceeded to give the ingredients the cement-mixer treatment for the specified two minutes. The batter fought back a lot harder than I expected. Those of you trying this at home will want to use a bigger bowl than I did.

The recipe just says to "pour into a shallow pan" without specifying a size. I wanted to make a square sized cake instead of a huge 9"x13" one, but had some misgivings about possible overflow since I wasn't halving the recipe. Then, I figured that any extra batter could become a cupcake or two. Upon pouring, it appeared I had placed the cake batter in the correct-sized pan. But seeing how thick it was made me wonder if I had mismeasured something somewhere.

I decided to make the icing right after getting the cake into the oven rather than waiting until it was ready to be bedecked. Usually I don't mix the icing until it's time to apply it so that it doesn't have any time to dry or harden-- and also because I usually spend the entire baking time cleaning away cake-related splatters and smears from the countertops. But this recipe specifically tells us we must cool the icing for 25 minutes before getting it onto the cake. With that in mind, I figured that both icing and cake would be ready at the same time. And if the cake was still a little warm come cake-dressing time, maybe that would help the icing spread over it.

For those keeping track, this recipe puts more sugar on the cake than in it. This icing looks similar to the salted caramel icing from our Patcaken adventure that turned out to be a faulty recipe. You may remember that it turned out unpleasantly greasy from an excess of butter. This recipe only uses a tiny little blob of the stuff.


As I stirred the the pot, I wondered how many people in the 1930s clipped this out of the newspaper and made it at least once. Did anyone save it? How many people spent a (surprisingly) long time stirring a pot of brown sugar water while it boiled into candy so they could put it on this very cake? 

An article tracing the history of various people's family recipes found that most of these edible treasures come from forgotten ads, clippings, and cookbooks. Some people out there may still make this very recipe, not knowing that their mother got it from her mother got it from her grandmother who cut it out of the morning paper. 

After a while, the kitchen smelled a little bit like we were making a war cake.  The pot also looked very similar to the beginnings of a war cake, aside from the absence of raisins.

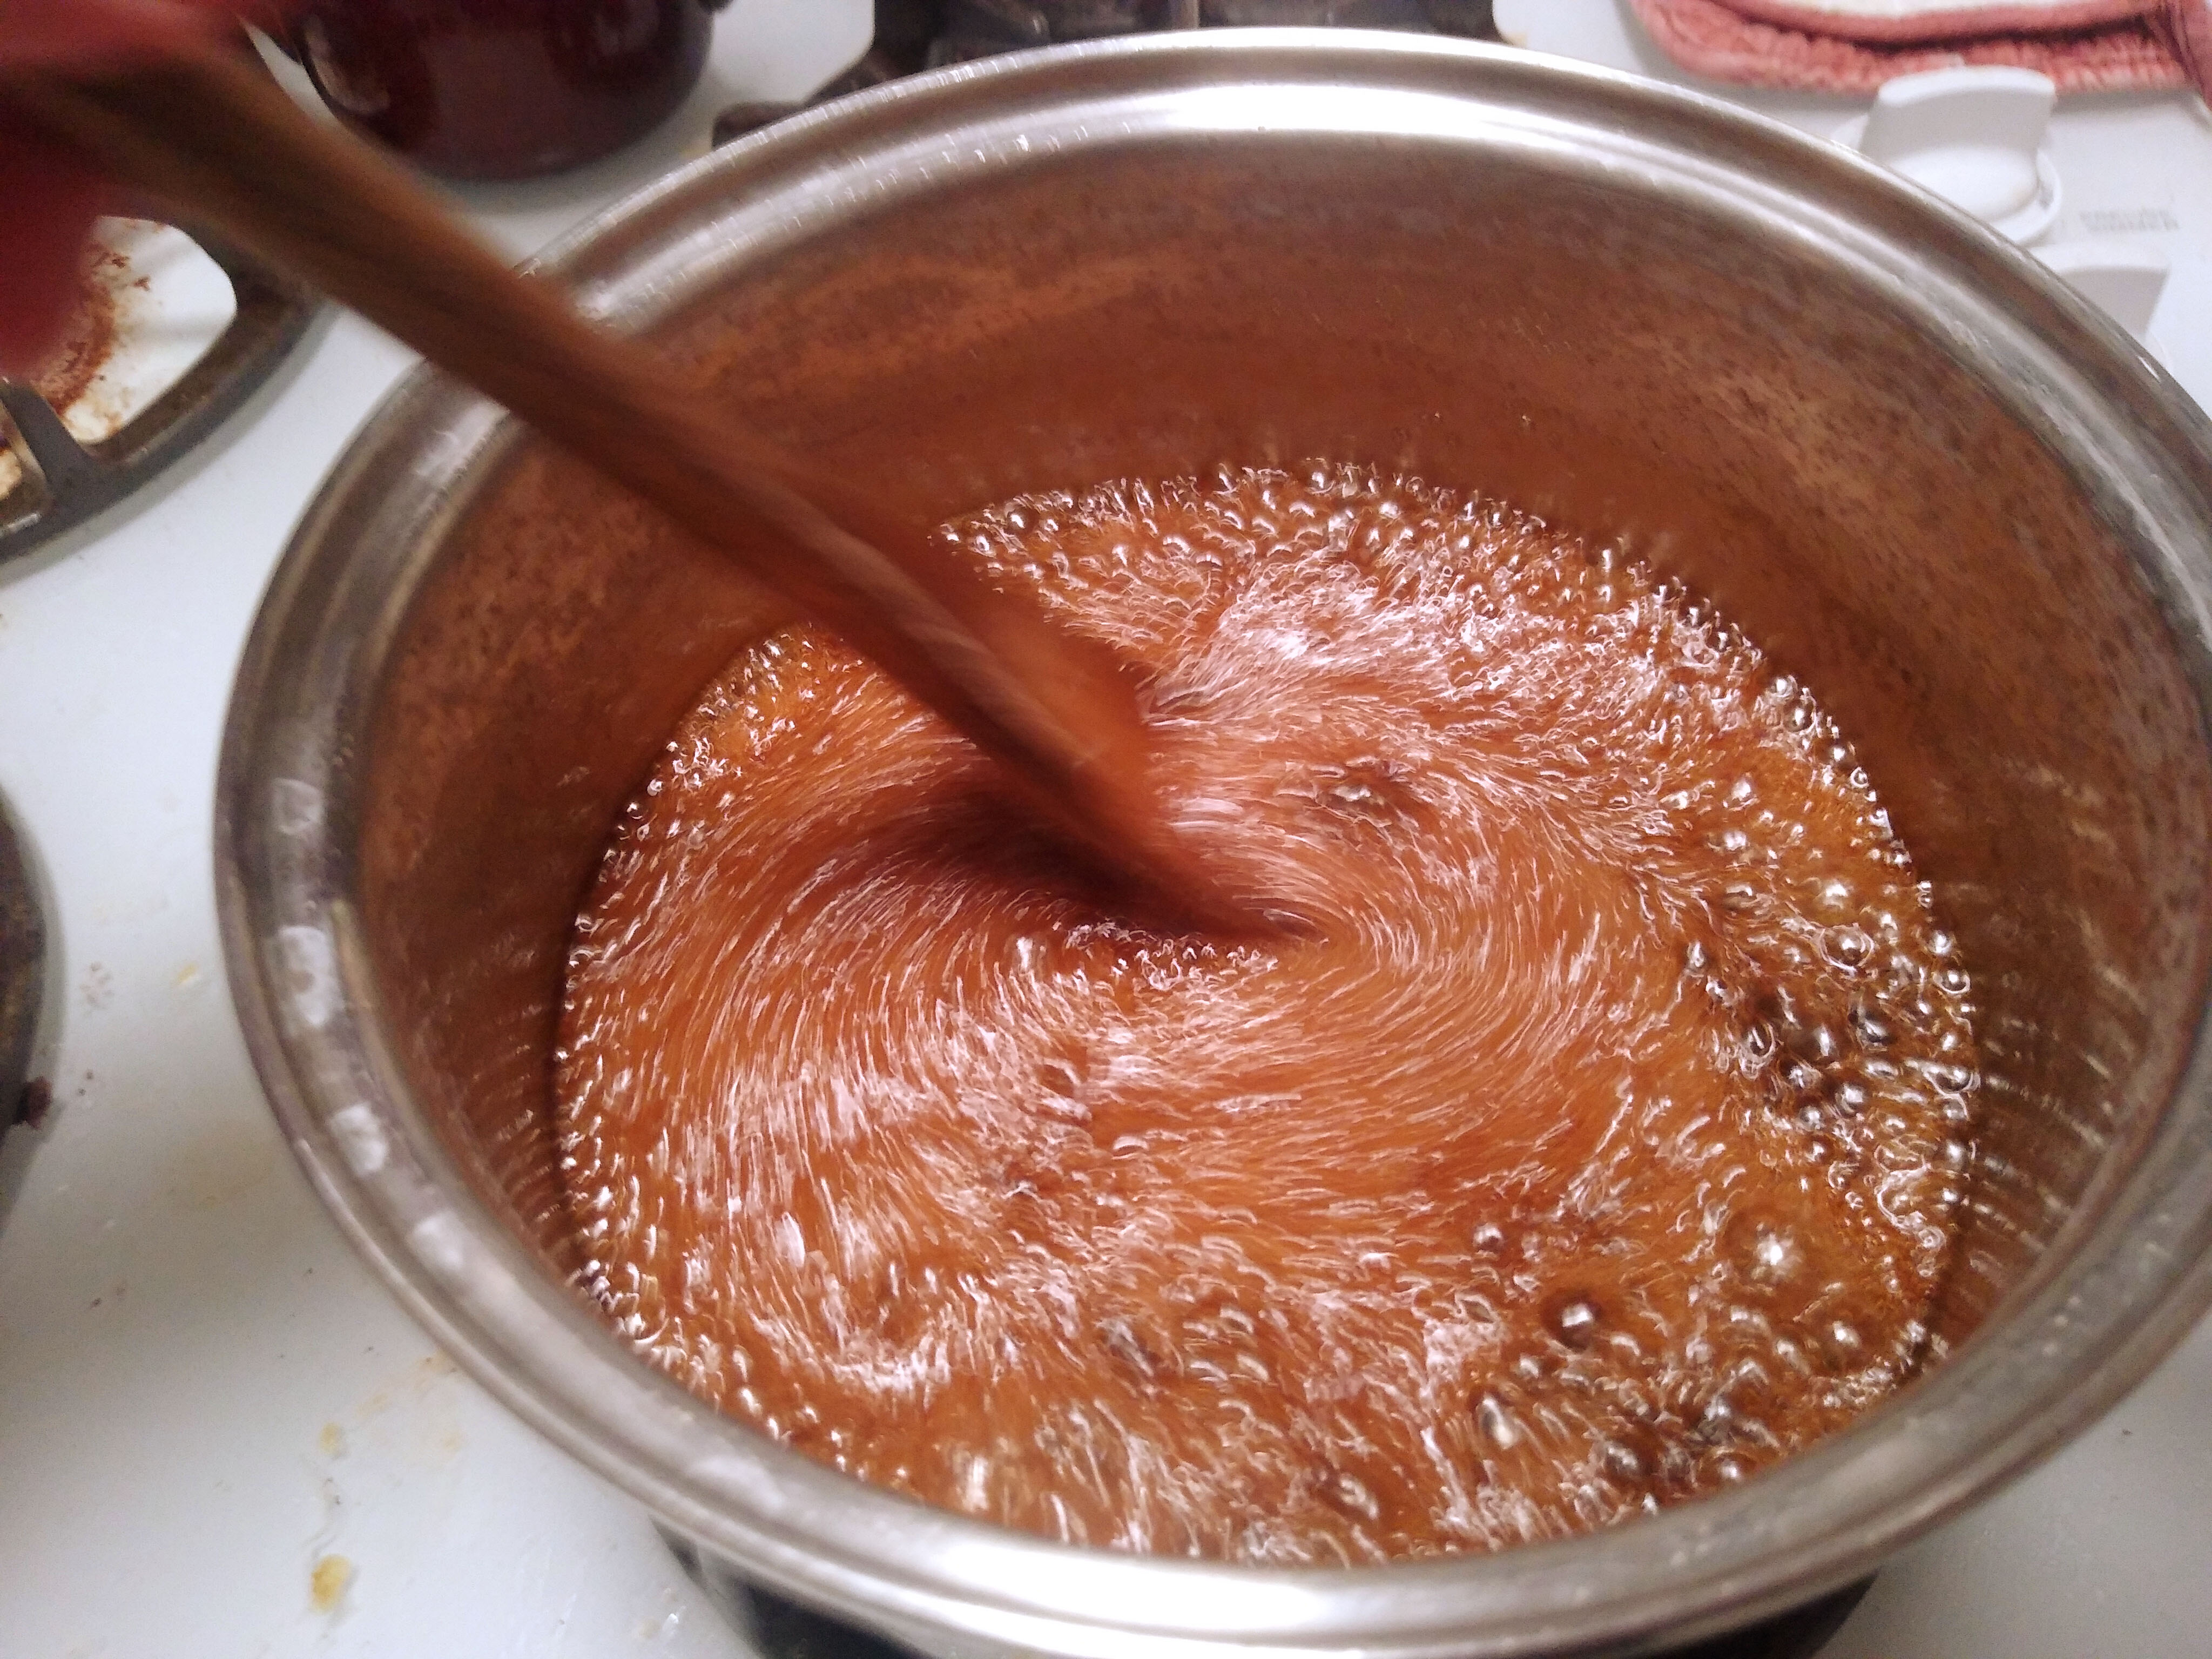
After cooking the icing to the named temperature, the contents of the pot had turned from sugary water to a syrup that looked about right to pour on one's pancakes. The kitchen also smelled like brown sugar, with an odd and distinctive antique-recipe overtone to it. You could see how thick the syrup was if you gave the pot a quick spoon-swipe.


After the icing has cooled for 20 minutes, the recipe tells us to add vanilla and then beat the icing "until creamy." It seemed pretty thick and creamy before we even started stirring it, but who am I to dispute Louise Bennett Weaver? I'm not the one with an entire book series and a syndicated newspaper column.

Besides, by following the recipe instructions I can be sure that whatever failure I get is absolutely in no way my fault. That's what I often tell myself when things seem a bit odd in a recipe: I can blame the writer if I end up throwing away a big pan of failure after carefully following someone else's instructions. And that's exactly what I expected to do as I kept stirring my pot of brown sludge with no visible change. Then, all of a sudden it started to get lighter in color at a rapid rate.


Soon, it was the color of peanut butter and only barely runnier. This is the first time I have ever made a boiled icing before, and it was looking absolutely divine. If you have never made a boiled icing, you should. Also, you should know that you have about thirty seconds between when it's just creamy enough to spread and when it sets into heartbreakingly perfect fudge.


At least it was a the same color as the cake. That made this whole production look slightly less inept if you gazed upon the vintage magnificence from afar. I scraped a lot of the icing off the top, microwaved it until it melted again, and tried to pour it around the edges. I can't decide if that made the cake look worse, but at least everyone got icing on their piece of cake.


We may have flunked presentation, but this is a really good cake! There's nothing particularly antiquated in the ingredients, but it tasted like a recipe one would get handed down on a brittle paper scrap after everyone else in the family has gotten to make it. It's also very wonderfully effort-free to make--- well, the cake itself is, anyway. The icing clearly will require a few attempts to get right. With that said, the two are made for each other. The cake is really good uniced, but the icing just goes so perfectly with it. 

But I was very disappointed that I failed to ice the cake properly. This seems like one of those techniques that nearly everyone knew until it just sort of fell out of the kitchen. So, I decided to give the icing another go, being very aware that you have about 30 seconds to get it on top of the cake before it hardens. This time, we put it on top of the nun brownies

Unfortunately, I got too overenthusiastic about leavening the brownies with the new stand mixer. This brownie recipe has no added leavener, so the only thing that leavens it is your effort as you beat the batter (before adding the flour, of course). Rather than getting out a wooden spoon and treating the batter like it just said a naughty word, I let the mixer run for an extremely long time while I tidied up. The mixture got aerated until it looked (and tasted) like the best chocolate mousse I have ever eaten. I may get pasteurized eggs and do it on purpose. But the point is, the sin of pride struck my well-aerated nun brownies, and they overflowed the pan.

This is what happens when you contravene the instructions of nuns.

But after (badly) trimming away the spillover, we could get it iced. If you don't want to wait 25 minutes for the icing to cool like the recipe says, you can set the whole pot in a pan of cold water and lightly stir it ever few seconds. The water sucks the heat right out of your impending icing.


We poured the icing onto the brownies perhaps a bit early. It puddled right into the center of them. We had to spend a minute or so pushing the icing back onto the edges with a spoon before it suddenly set. And once this icing sets, it shall not be moved. We tried to pour a bit of excess from the pot onto the brownies, and it refused to spread from where it landed.

This icing may require a few practice attempts to get it right. But when you do, it's like you coated the cake in caramel fudge. We definitely recommend both the icing and the cake, either separately or together. In closing, I have to share this short article from the same newspaper page.

SMOKE FILLS HOUSE BUT ONLY HAT BURNS. A house full of smoke and the smouldering remains of a hat were found by firemen when they arrived at the home of H. C. Kennedy, 4518 Washburn Avenue, yesterday afternoon. The hat, they were told, had been washed in gasoline and placed in an oven to dry. Heat from the oven ignited the headgear. The only loss was the hat.

Saturday, June 18, 2022

Radish Relish: or, Raw vegetables in 30 seconds or less

As soon as I dumped these onto a plate, someone said "Ooo, dirt apples!"


Radish Relish
8 oz radishes
4½ tsp sugar
2 tbsp vinegar
¼ tsp salt

Wash radishes, then cut off tops and ends. Put radishes, two or three at a time, through food processor. Process until coarsely chopped. Empty the food processor between batches so they don't get too finely ground. Mix with other ingredients.
It's ready to eat as soon as it's made. Keep refrigerated.
This relish has the short shelf life of chopped fresh vegetables. If you won't be using all the radish relish in only a few days, reduce how much you make.

Source: Mrs. William H Ridgway, West Bay Street box 196, Barnegat, New Jersey, Philadelphia Inquirer Recipe Exchange, 21 June 1935 morning edition, p. 12

I had to find out if "radish relish" is as fun to make as it is to say. This recipe comes to us from Mrs. William H Ridgeway of Barnegat, New Jersey. During our thrilling weekend of binge-clipping recipes while Newspapers.com was free, I was a little annoyed that most of the ones I found were from syndicated columns. Sure, test kitchens put out some lovely things that make their way onto many tables, but what if I want actual recipes from nonprofessional people's houses? 

It turns out the Philadelphia Inquirer has all the amateur-derived recipes I could want! The newspaper had a weekly recipe exchange, and printed two full pages (minus the ads) of recipes every week. You want recipes from ordinary people? The Philadelphia Inquirer will give you so many you choke on them! If your submission was good enough to get printed in the weekly Recipe Exchange, you got a $2.00 basket of groceries. That's about $50 of groceries in the Year of Our Pandemic 2022. 

Philadelphia Inquirer morning edition, November 3 1935, p. 42

Radish relish looked like a nice introduction to making your own pickles because you don't actually do any home pickling. You simply grind and mix ingredients. I should note that we at A Book of Cookrye rarely eat radishes. I would say that we're like most people in that respect, but radishes wouldn't have so much shelf space in the supermarket if no one eats them.

As much as I like shoving things through the meat grinder, I unfortunately do not have it in my possession. But I do have access to its motorized equivalent:


I was ready to say that I had reduced the radishes to confetti in less than a minute, but a lot of large chunks revealed themselves among the magenta radish granules.


I should have just let the big radish bits be. By the time they were pulverized, everything else was almost a paste.


We finished the rest of this recipe finished in thirty seconds. One merely stirs in the vinegar, and--- Did you know that radishes change color on contact with vinegar? You can see the radishes at the bottom of the jar changing color while the vinegar puddles around them.


Is it hard to see in that picture? Well, here are a spoonful scraped off the sides of the food processor and one that had gotten acidulated when I dumped in the vinegar.

But enough about the chemistry of radishes, because Mrs. William Ridgway now directs us to add a small amount of sugar. I didn't think three tablespoons was a lot until I saw it mounded on top of the radishes.

The refrigerator smelled like radishes only two hours after I put this jar in it, and I had to transfer the radish relish to something more airtight.


Our finished radish relish tasted like bread-and-butter pickles, but with the flavor of radishes instead of cucumbers. I did think it was a bit bland, though. Radish relish will lubricate your sandwich, but it won't add a lot of flavor to it. I'm surprised we didn't have some dill in this-- or any other spices.

But let's get to the real problem of this recipe--- it makes a lot of radish relish. Two cups may not be a lot of chocolate chips, but it is an unbelievable amount of pulverized radishes. (You will notice that I cut the recipe in half when I typed it out.) Unless you have a lot of radish lovers in your house, you will find yourself trying to shove radish relish into every ill-advised food you can spoon it into before it expires. You will decide that peanut butter and pickle sandwiches were good enough that peanut butter and radish relish sounds like a good lateral substitution (don't do this). You will dump radish relish on every plate of hot vegetables in the hope that it will substitute for other seasonings.

I really wanted to like radish relish. It has a stunning magenta color you almost never get without artificial coloring. It's easy to make. Even at pandemic prices, it's very cheap. I've been trying to eat more vegetables, and radish relish seemed like a nice low-effort way to add variety to them. Plus, since you don't cook the radish relish, all those precious water-soluble vitamins don't dissipate in steam.

But, this relish does not have enough vinegar to preserve it. We opened the jar about a week after making it, and thirty seconds later someone across the house shouted "What's that smell?"

Short shelf life aside, I think the real fault lies not with the recipe, but with the radishes we tried to relish. I've gotten radishes from farmer's markets that were almost spicy enough to burn- like biting into fresh ginger. I think that pepperiness would have made this radish relish perfect. I don't think Mrs. Ridgway left out the seasonings to keep the radish relish politely bland. I think it was because the radishes one would purchase in 1935 would be flavorful enough on their own. The watery modern radishes we naively bought for relish-making were just too bland to live up to the recipe's intentions. 

With all that said, I tried a big smear of it on a ham sandwich. It does add a bit of extra flavor, but it tasted less like pickle relish and more like sweet hummus-- which is better than I expected after eating a spoonful of the radish relish on its own.

I wish the radish relish was as flavorful as it was pretty. It even made the jar look like shower gel when I emptied and rinsed it.


We will be revisiting this recipe if we get properly peppery radishes.

Friday, June 17, 2022

Chicken-Artichoke Soup: or, It's not a casserole if you can pour it

I had to make this because it's written on a giant chicken.


Chicken-Artichoke Soup
16 oz. sliced mushrooms
Small amount of cooking oil
2 medium cans quartered artichokes, drained
5 boneless chicken thighs, chopped
2 or 3 medium potatoes
16 oz sour cream
1 tsp Worcestershire sauce
Seasonings to taste:
   -Salt
   -Pepper
   -Paprika
   -Chili powder

Boil or microwave* the potatoes. Then cut into small cubes and set aside. (You don't need to remove the skins unless you don't like them.)
In a large pot, cook the mushrooms in a little cooking oil, adding pepper to taste. Cover the pot when about halfway done to retain juices. Then, add the chicken and cook done.
Stir in the sour cream and the parsley. Bring to a simmer. Then add remaining seasonings to taste. Simmer for a few minutes.
Buttered rice goes really well with this.

*While microwaving potatoes does dry them out a bit, that won't matter after they've simmered for a while. Therefore, I recommend cooking them the quick way.

Adapted from an anonymous recipe card on Mid-Century Menu

First, we needed to retype the recipe. Some people can cook with the recipe on a laptop in the kitchen, but I have an unfortunate history of irreparable damage caused by splashed gravy. Oddly enough, we do not have a working printer in the house (though we have three dead ones that just sort of stayed parked where they printed their last) but we have multiple typewriters.

This is on the back of a receipt because I only use index cards if I know I'm keeping the recipe.

The recipe starts with cooking the mushrooms in enough butter (sorry, oleo) to make a batch of cookies. But rather than make something with a thoroughly unnecessary amount of grease, I used a much smaller splash of cooking oil instead. You will also notice that I am forgoing all this business of separately cooking everything and then adding it to the pan. Just because we have a machine to remove the drudgery of handwashing dishes does not mean I want a mountain of them piling up in the sink. Also, the skillet is the least-used of all the pots and frying pans. It's also a really nice one, and this seemed like as good a time as any to actually get it out of its usual perch and use it. 

At this point we made a short revision to the recipe: adding chicken to (hopefully) turn it into a one-pan dinner.

That was quick enough! And since we didn't use gobs and gobs of butter, we don't have to drain away all the flavorful mushroom juices in the pan. Ever since Fanny Cradock taught me that I actually like mushrooms when they're not boiled until quite dead, I think less of any recipe that would have me cook the mushrooms and then drain them. 

But to the ruin our merrily undrained pan, resplendent in its mushroom juices, we added a mistake. Unfortunately, one person in this house really likes marinated artichokes, so I got those instead of the artichoke-flavored artichokes. They would end up tasting like leafy balls of concentrated salad dressing.


Blissfully unaware that I had ruined dinner (or at least made it a lot harder to voluntarily go back for seconds), I blithely proceeded with the recipe, adding an entire carton of sour cream as is written on the card.


After turning what had looked like a lovely pan of chicken and mushrooms into an extra-large batch of not-quite-white glop, I realized I forgot to add that last ingredient: parsley! The parsley is a sign that this is a gourmet recipe. 

I think parsley is very underused in cooking. A lot of people seem to think parsley only exists as a garnish for Italian(ish) food, and that you're not supposed to eat it even though it's right next to your lasagna. They don't know that parsley is actually a lovely and flavorful seasoning. Hence, we are adding it to the casserole, in perhaps a more generous amount than the recipe writer intended.


At this point, we were ready to top the casserole with breadcrumbs and bake it! Most people would have breadcrumbs on hand since they are one of the cheaper items on the baking aisle. But I forgot to get any. So, to attempt to make do with what's on hand, I put the heels of the house's ever-present sandwich bread on the bare oven racks to (hopefully) dry out enough to crumble while the oven heated up.

A sumptuous supper awaits!

I really should have put a few more bread slices in the oven than just the heels. It took a lot of careful scattering, but I got this sad ration of crumbs to actually cover the entire casserole. I shook some Parmesan over everything to make the top of this casserole less... halfhearted-looking. 


We baked the casserole until bubbly, as people fondly love to say, and it came out completely unchanged (though it was nicely warmed through). As you can see, when you spooned out some of this, it looked the same as before it went into the oven.


Aside from my ill-advised choice of marinated artichokes, this tasted like something that someone would fondly remember Mom making when they were growing up, starting their reminiscing with "it wasn't fancy, but it was good!" And it would have been very good in a comforting way had I just used the plain canned artichokes the recipe calls for. But no, I thought I should fancy it up with marinated artichokes, which made it taste like Italian salad dressing. Sometimes you should just stick to the recipe and not assume you know better than someone who made it enough times to justify writing it down.

But with that said, no one really objected to making this recipe again. The next time, I decided to round the recipe out by adding some potatoes to it. Because I didn't want to wait a long time for the potatoes to cook in the soup pot, I just put them in the microwave first. I also (and this is important) did not use marinated artichokes. I used plain canned artichokes instead. They taste like artichokes instead of salad dressing. Marinated artichokes are a nice (if somewhat spendy) addition to a lot of foods, but they're just not right for this.


We then learned that we should have done this in the soup pot. The skillet was not prepared to contain this much chicken-artichoke-spud soup.


When we served it out, it looked just like the last time despite never seeing the inside of the oven. I guess baking this will warm up the kitchen if it's cold out, but it does nothing else. The only difference between the stovetop-only version of this recipe and the baked casserole is the presence or absence of breadcrumbs. If we happen to have stale bread I might turn it into croutons for this- they'd go well with the soup.


By request of others, I have already committed this recipe to a typewritten card. It's quick, easy, and really good. It's simple, and it's not an experience of gourmet ecstasy, but it hits the spot.

Thursday, June 16, 2022

Spinach Ramekins: or, Making vegetables delicious without a pound of cheese

Everyone I told about this recipe had the same question: "What is a ramekin?"

"Efficient Housekeeping" By Laura A. Kirkman, Fort Worth (Texas) Star-Telegram morning edition p. 7, July 6 1925

Spinach-Egg Ramekins
   Multiply the ingredient amounts by how many you are making.
1-2 tbsp leftover cooked spinach (or frozen spinach, thawed and drained)
1 tbsp half-and-half or milk
1 egg
Salt, pepper, and other seasonings to taste

Heat oven to 350°. Grease individual ramekins or custard cups. If you don't have custard cups, you can use a cupcake pan with paper liners.
Put one to two tablespoons of spinach in the bottom of each baking dish, seasoning as desired. Pour one tablespoon of milk over each of them, and then add salt and pepper to taste. Crack an egg into each custard cup.* Season as desired.
Bake 8 minutes, or until the egg is set. Serve hot.

*If using cupcake pans, you will want to crack each egg into a small bowl and carefully pour it in, rather than just cracking the egg right over the spinach. That way, you can more easily prevent some of the egg spilling down the back of the paper liner and onto the metal pan, which would me irksome to clean after baking.

Source: "Efficient Housekeeping" By Laura A. Kirkman, Fort Worth (Texas) Star-Telegram morning edition p. 7, July 6 1925

I kind of love how presumptuous Laura A. Kirkman, author of the syndicated column "Efficient Housekeeping" and giver of today's recipe, is. She has not only decided (without asking) that I, the modern housewife of 1925, devotedly follow her menus ("Sorry, my dearest husband, 'Efficient Housekeeping' didn't schedule your favorite dinner until next week!"), but she has also planned my leftovers! How am I supposed to make today's luncheon if my husband ate all the leftover spinach last night, Laura Kirkman? And what if my loving family polished off the entire spinach tureen (you just know it was served in a tureen) when I served it for supper, ruining the ramekin-based plans for today? 

We may not be following the "Efficient Housekeeping" schedule in this house, but we did purchase frozen spinach. We also have a lone custard cup that now lives with the bowls after all its siblings presumably cracked and went on to the municipal hereafter. 

Even in this tiny thing (the smallest oven-safe object I could find without gambling on whether a porcelain teacup will survive the oven), one tablespoon is not a lot of spinach.  I'm going to assume that Laura Kirkman means "one tablespoon ish but use your best judgement," not a home-economics class style perfectly level measurement using proper measuring equipment. We ended up using about 1½ tablespoons, or "one heaping tablespoon" as one might prefer to say.

In an attempt to put the "efficient" in "Efficient Housekeeping," we chose not to obsessively fret over deploying the perfect seasonings. We instead shook some seasoned salt over the spinach cup and thus finished seasoning this recipe in five seconds. 

I looked up Laura A Kirkman, and she appears to have vanished into the newspaper archives of yesteryear. She doesn't even have a two-sentence Wikipedia article with a flag on top inviting you to help Wikipedia by expanding it from a stub. Her (apparently) only foray into something more permanent than a newspaper column is a recipe book published in 1929 called Bridge Refreshments. It has my new favorite opening sentence of any cookbook: "In conducting a daily cooking column for a chain of newspapers for ten years, the writer of this book came to the conclusion that one great need of the housewife of today is an answer to the question: What Shall I Serve For Bridge Refreshments?" 

Any housewife of 1929 buying the new cookbook from the author of "Efficient Housekeeping" would no doubt have more pressing concerns before the year was out.

Anyone needing new ideas on what to serve during bridge games can read this book for free here!

Getting back to our lovely spinach, one might criticize Laura Kirkman for underseasoning everything, but keep in mind that we are supposed to be using leftover spinach which we presumably seasoned the first time we cooked it. Perhaps we even used bacon fat in our spinach recipe. Having seasoned our clump of thawed spinach like we would have for supper, we could proceed to pour a spoon of milk into the cup, making this look like small portion of creamed greens.

And so, we happily arrived at the big moment when this recipe finally becomes all it was meant to be: it was at last time to crack an egg on top! One could argue that today's spinach creation has a direct line to the many, many recipes of ancient Rome in which you put everything in a baking dish and break eggs on top to bind it all together. Or perhaps egg-topped baked things, like individual-sized meals encased in bread, are one of those things that every civilization on Earth has developed. 

I considered sprinkling cheese on top of this before baking it, but I wanted to try this recipe as written. After all, what is the point of making new recipes if you're going to change out all the steps and ingredients you're not already used to? Besides, like pouring melted butter over lobster, burying this under cheese feels like cheating. Anything will taste good if you put enough cheese on top. I wanted to know if baked eggs over spinach are good on their own. As my pre-pandemic figure slips ever farther away from me, I am always looking for more ways to serve vegetables that are good for you without being punitive to eat.

One might think I was extremely extravagant if I heated up the entire oven just for one little cup of egged spinach, and I would agree. But since one can easily slide a small glass cup between baking pans, I baked this when we already had a few other things in the oven. The spinach ramekin easily slid between all the other pans on the oven rack. 

I didn't start making our little spinach ramekin until after I had gotten everything else in the oven and cleaned up every countertop splatter that I had made that evening. I thought that with such a short cooking time, surely the spinach ramekin would be ready long before everything else in the oven was. But at the end of its specified 8-minute cooking time, the egg white was still as transparent as when I cracked it onto the spinach.

Everything else I was baking was done before this was, causing me to feel an annoying guilt twinge every time I looked into the vast empty oven containing one tiny glass cup. But at least we didn't expend all the energy required to heat the oven up solely on the spinach's account. We merely delayed turning off the already-hot oven for another few minutes.

As someone who didn't get my food tastes from letting expensive people tell me what to like, I never got the taste for eating runny eggs unless they are in cake batter. I will never forget the look of withering scorn I got on some camping trip (this was before I vowed to never be more than two minutes on foot from a flushing toilet and a hot shower). In the same ignorance that led me to send raw steaks back to the kitchen in restaurants before I decided I don't like steaks anyway, I told the person poaching eggs one mosquito-filled morning that I wanted mine cooked until quite firm. Where I'm going here is that I baked a perfect soft-set egg and it was wasted on me.

I have a theory that semi-set eggs superseded hard-boiled ones because they are so much more photogenic.

If you like poached eggs that are almost but not quite set in the middle, this recipe is perfect for you. I also can't help wondering if the recipe's 8-minute cooking time could have been correct had I put the custard cup in a pan of boiling water instead of inserting it into the oven undressed. 

But this recipe gives you exactly what is promised.It's kind of like a spinach quiche with more visual flair and without the bother of making a crust for it. I was afraid that it would be nothing better than a clump of soggy spinach under a cooked egg, but it seems the egg and the milked spinach commingled just enough to unite into a very nice baked whole. I might add a bit of Tabasco sauce or a shake of cayenne to the next round of these, but they're still very good without. I don't think this is worth firing up the oven during the hot weather. But if you were already baking, these are very nice to slip onto the rack next to everything else.