Showing posts with label beef fat. Show all posts

Sunday, January 14, 2024

Fante's Pizzelles: or, The recipes keep getting better

After more than a decade of trying, Ebay's suggestion algorithm finally got me.


Fante's Special Pizzelle Recipe
3 eggs
6 oz (¾ cups) sugar
5 oz (1 cup plus 2 tbsp) melted shortening
1½ tsp anise seeds*
1½ tsp vanilla
Juice and grated rind of ¼ orange or lemon
11 oz (2 cups) flour

Beat eggs and sugar until they become light and foamy.
Add the melted shortening, a little at a time. Add the anise seeds, vanilla, grated rinds and juices. Gradually add the flour until a light dough is formed; light enough to drop onto the iron with a spoon. You may have a little bit of flour left over.
Drop spoonfuls onto the center of a hot pizzelle iron. Use a knife to push the dough off of the spoon.
Cook until golden, following to the manufacturer's directions.

*Use ground anise seeds, anise extract, or anise oil if desired.

Note: This may be totally inauthentic, but our favorite way to flavor these is to add a near-excessive amount of cinnamon.

I'm impressed that Ebay sold me another pizzelle iron. After all, I already have one. Furthermore, I hate when clutter piles up around me. On top of that, I don't give Ebay a whole lot of shopping history to work with. About two-thirds of my purchases are out of necessity (such as tracking down replacement interior bits as my car ages). About half of the remaining purchases are not for myself, but for various friends and relations who ask me "Could you go online and find me a _____?" This leaves a tiny amount of recreational splurges for Ebay's computer to work with. Nevertheless, they sold me this thing.


Before we get to the recipe, I wanted to get to know this iron in the most low-stakes way possible. And so, rather than making anything from scratch, I reconstituted some instant waffle mix. I don't particularly like instant waffles, but they do make it easy to mix a small serving without measuring impossibly tiny amounts of baking powder. Heck, if you want a single pancake the size of a coaster, you can easily pour out a tiny allotment of powder and then stir in a half-splash of water.

Because I'm not an idiot, I gave our iron a good spritz of cooking spray. After putting the batter on it, I closed the lid and held it tightly shut as we have done for our previous pizzelles. I opened the pizzelle iron and immediately knew that I had failed. 

After giving it some thought, I remembered that you're supposed to put little cooking oil in waffle batter instead of just adding water. (Well, the directions on the back of the box call for melted butter. But we're economizing until we are competent.) And so, we reconstituted another single waffle's worth of batter (this time with cooking oil in it), put it on the iron, and.... 


Although the waffle didn't stick, it was too thin to lift intact. It easily let go of the iron with some gentle prodding, but the end results looked like this:

The first one is always for the fairies anyway.


At least we were improving. The first waffle had to be gouged off of the iron with a toothpick, this one flaked off without any cursing whatsoever. 

Anyway, this failure was very informative. It told me that with this particular iron, one must be very careful how thinly one presses the waffles within. With our first pizzelle iron (shown below), the actual waffle part is a little bit recessed inside a raised rim. And so, if you hold it tightly closed, your pizzelle will come out perfect. Or at least, it won't be squished to death.


However, the iron we're using today has no raised rim. So apparently, you want to press it sort-of closed so that your pizzelles are thin and crisp-- but you don't want to hold the handles too tight lest you squeeze your pizzelles out of existence.

I also gave this some thought and realized that I wasn't making pizzelles. I was making instant waffles. You're not supposed to squeeze those flat, but let the batter push up the lid as much as it wants. And while we might cook waffle batter on a pizzelle iron, it will never turn into a pizzelle. We needed to let the batter be its fluffy self instead of trying to make it act like Italian cookies. And so, for our third attempt, we put the batter onto the iron and then let go of the handles. 

Because I'm daft but not an idiot, I also drenched the iron with cooking spray. As the batter lifted up the iron, you could see the heavy coating of oil bubbling and sizzling within.


Upon opening the iron, we found a lovely-looking, totally-not-stuck waffle! However, I had no idea how to get it out. It's not like you can just slide a spatula under this thing. But after carefully pushing a wooden skewer under each ridge one at a time, we achieved liftoff!


At this point, I was getting tired of barely managing to get waffles off of this iron. Clearly there was a technique I was missing. I decided to reach out for help again. 

You may recall that when I first tried to cook pizzelles on the stove, I called Fante's Kitchen Shop in Philadelphia to ask how hot the burner should be under the pizzelle iron. Well, I poked around their website until I found an email address. I then sent an email with photos of the iron, more or less begging for help. The owner herself answered, advising that I grease it generously. I told her that I'd used plenty of cooking spray, and she replied that spray "is not always the best choice for these irons." She recommended brushing it with melted shortening.

She also asked "Is your iron is hot enough?" As far as how to pry them off the iron since a spatula was useless, she wrote "Pizzelle should slide right off."

Well I had no idea if my iron was hot enough. I had been getting it about as hot as I do a frying pan when I'm about to put dinner in it. Then I considered that I had been advised that one should be able to say one Hail Mary for each side of the pizzelles. But I couldn't say the Hail Mary slowly enough for how long mine needed to cook. 

I asked myself "What's the worst that can happen if I overheat the iron?" A burnt waffle would be disappointing but insignificant. A stuck-on waffle would be irksome, but I'd already scraped stuck-on batter out of this iron and we had only been together for one afternoon. We were in no danger of blackened cinders welding themselves to the metal because I was not going to put the iron onto the stove and then wander off to let it burn unattended. (And if things got really bad, I could cadge some of the more hazardous solvents from my friends who like working on cars.) 

With that in mind, I got the iron searing-hot. When I flicked some water-drops off my fingers, they didn't land with a sizzle. They vaporized with a harsh-sounding SPAT! 

During the surprisingly long wait for the iron to heat up, I melted shortening in the microwave and got out the marinade brush that gets used a lot in grilling. Usually, greasing the pan is one of the most forgettable parts of cooking. I was not mentally prepared for where today's pizzelles were taking me. Despite using a stovetop waffle iron, I wasn't ready to get so old-fashioned as to forsake the cooking spray. It felt like crossing a bridge over which I could never return.

Of course, greasing waffle irons with shortening is a very old technique. In the days before you could quickly melt it in the microwave (or set the shortening over the stove's pilot light), Miss Leslie directed cooks to rub their hot waffle irons with a small cloth bag of lard. 

I was telling a friend who is a chemist that I had forsaken my beloved cooking spray and gotten more archaic than I planned. He noted that shortening "has some uncanny nonstick properties more comparable to Teflon than a natural oil."

I should also note that a while ago, I asked an environmental scientist friend of mine whether shortening biodegrades or not. I said "I know that's not your area of study, but I figure you must be up the hallway from someone with an answer." A day later, he responded "She said 'under the right circumstances.'"

When the iron was finally hot enough and also hand-brushed with melted fat, I placed another dab of reconstituted waffle mix onto it. Our waffle required a lot longer than a single Hail Mary per side, but I figured that it was fluffy instead of thin and crisp. Therefore, the heat had a lot batter more to penetrate.

After the iron started to emit a toasty smell, I raised up the lid to see what we had inside. To my astonishment and delight, our waffle flapped around a bit as I lifted the top of the iron. In other words, the waffle let go of the iron of its own accord. I then held the pizzelle iron over a plate and flipped it upside down. The waffle fell right out, and landed on the plate in golden perfection. I didn't even use the spatula I had gotten out. In happy surprise, I returned it to the drawer instead of dropping it into the sink with the other dirty dishes. The waffle itself was fluffy in the middle, and crispier on the outside than any waffle I've ever made. Or maybe it was the same as the many other waffles I've made, and the secret ingredient was the sweet feeling of success. But whatever the reason, this was the best instant waffle I've ever had. It didn't even need syrup.


This brings us to today's recipe. Since the people at Fante's had been so helpful in my journey towards pizzelle competence, why not use the pizzelle recipe from their website? The note they typed above it was a decisive sales pitch: "This recipe has been around since the beginning of the century, and has been enjoyed by the thousands upon thousands of our customers who have, over the years, purchased pizzelle irons from us."

Established 1906
Telephone WA 2-5557
Fante's
Furniture • Home Furnishings • Importers
1004-06-08 South 9th Street 
Philadelphia 47, Pennsylvania.
______________________________
FANTE'S SPECIAL PIZZELLE RECIPE
6 eggs
¾ lb. of sugar (1½ cups)
10 oz. of melted shortening (1¼ cups)
1 tablespoon of Anise Seeds
1 tablespoon of Vanilla
½ orange or lemon
1 lb. 6 oz. of flour (4 cups)
Beat eggs and sugar until light and foamy. Add melted shortening a little at at a time, then add anise seeds, vanilla, grated rind and juice of either orange or lemon. Gradually add flour to make a very light dough, light enough to drop on the Fante's pizzelle maker with a spoon.
(Use a knife to push off dough from spoon.)
If more information is desired please call Mrs. Fante, WA 2-1066.
Source: Fante's Kitchen


I love that the original handout recommends calling Mrs. Fante herself "if more information is desired." 

As I got ready to make today's recipe, I decided to ask an Italian friend what to flavor them with. (One of the beautiful things about the modern age is that you can talk to people across the world much faster than the speed of pen pals.) I'm not obsessed with "authenticity," but I thought it might be a neat cultural insight. And I certainly got one when he answered "Do you know I have never heard of it?"

He went on to state "Being from northern Italy, it's not our tradition to make them." But he did a bit of internet searching for me, and came back with the most surprising (to me) part of the entire conversation: there are two kinds of pizzelles. Furthermore, the lacy-looking, waffle-iron cookies that appear in every Italian-American home I've ever been to are the "less known" (his words) kind in Italy. Apparently the word "pizzelle" more often refers to miniature pizzas stacked on top of deep-fried crusts. 

So pizzelles are more Italian than garlic bread, but they're not ubiquitous throughout Italy. I wasn't prepared for that answer, but I should have been. In America, it's easy to forget that Italy has multiple regions with different types of food. What we tend to think of as "Italian food" is (mostly) from southern Italy, because that's where most Italian immigrants came from. My friend, however, lives in the northern part of the country. To put this into American terms, it's like asking someone from New England how to make Southwestern food. They may not even recognize the names.

Because I sometimes have the foresight to plan ahead, I measured out the ingredients while supper was simmering on the stove. I only say this because our tiny mint cake looked very cute next to them.

(I made the mint cake just to find out what it tastes like to put mint extract into an otherwise unassuming cake. Turns out mint and butter go together unexpectedly well.)


The recipe directs us to beat the eggs until foamy (well really, the single egg because we're not cranking out 6 dozen pizzelles). I turned on the mixer and let it run while I finished tidying up the counterspace. By the time we had everything ready, our egg was so well-beaten that even Miss Leslie would have approved.

The bowl contains one egg and nothing else.

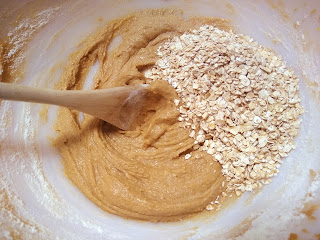
Unlike our previous pizzelle recipe, this one uses no baking powder at all. The only leavening is what you beat into it. With that in mind, I sifted the flour to break up any lumps before stirring it in. That way, we could do minimal stirring and thus deflate the batter as little as possible.

As a final recipe note, even though I was about to put copious amounts of shortening on the iron, I had reservations about putting it into the pizzelles themselves. And so, we dug into the freezer and pulled out the beef fat. You couldn't taste any meaty difference. It's like we're using lard, only we rendered it at home instead of buying an unnervingly heavy can of it. Also, I've been saving beef fat ever since the price of hamburger shot past the moon. It's been sitting in the freezer for ages. I had no idea what to do with it, but felt guilty about throwing it out.

And so, sooner than I expected, we were ready to try and cook these on the new zigzag pizzelle iron! This is our first real recipe on it, and I had high hopes. 

Well, we brushed on the melted shortening(!) and dropped on a tiny spoonful of pizzelle batter (better to go too small than too big when your excess batter burns when it oozes out). I then cooked it for a little over a minute per side, and then opened the iron to find that its first "real" pizzelle was stuck. No amount of striking the iron from the back with a wooden spoon would free the cookie. I think that after carefully and excessively dousing every notch and groove on the iron, I forgot to brush anything onto the flat circle in the center.


I barely (but successfully) managed to pry the pizzelle off in one piece. For our next one, I made sure to brush the entire iron, including that flat spot in the middle of it. After our next pizzelle had cooked, we raised the lid and hopefully wondered: "Does it look a little looser?" Well, we held the loaded iron over the cooling rack, turned it upside-down, and the pizzelle fluttered downward like a beautiful snowflake.


I started gradually increasing the pizzelle size, hoping to find that perfect amount of batter that fills the iron without dripping out of it. Our results were erratic. I frequently had to use the spatula to scrape off any oozing excess from the sides. 

Also, our first successful pizzelles looked like a pair of owl eyes on the cooling rack.


In full disclosure, a lot of our pizzelles had singed edges. I tried to convince myself that they were "rustic," but my powers of self-delusion can only go so far.


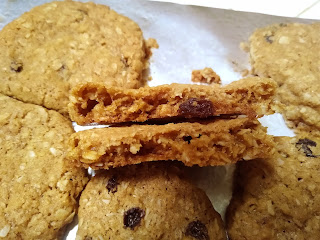
My friend's comments about the "uncanny nonstick properties" of shortening proved correct. If we hold one of these up to the nearest light, check out how wispy it is between the ridges. I can't believe it fell off the iron intact.


I thought that brushing on melted shortening would be a miserably messy ordeal. But while it is a very drippy process, it doesn't have the same blast radius as a can of cooking spray. All of our dripping fat was confined to one small zone instead of sprayed onto everything on the countertop. There were some stray shortening drops that get flicked off the brush, but the cleanup was a lot less greasy. Also, it's about as quick as cooking spray. You just flick the brush across the iron for a second or two. 

After the last of the pizzelles had been cooked, I had to stop and just stare at what we had done. I don't know if I've ever done cookies that looked this good before.


These tasted so good. I may end up adopting this pizzelle recipe instead of the one from my ex's grandmother's basement. In terms of flavor and texture, our my ex's grandmother's tasted professional, but these tasted homemade. If you want to try making your own pizzelles, I definitely recommend this recipe. Also, nutmeg is a surprisingly good spice for these. It goes really well with the toasty flavor that comes from cooking these to that rich golden brown. It's not authentic, it's not traditional, but it's delicious anyway.

And with this purchase, I am officially immune to any algorithmic attempts to sell me another waffle iron. In the unlikely event that the price doesn't ward me off, I only need to remember how crowded it's getting on top of the fridge.


I really hoped to end this with a short, jaunty paragraph demystifying stovetop pizzelle irons, or maybe a handy numbered list of tips for anyone who wants to try using one for themselves. But I'm still getting the hang of cooking on these myself! 

The only useful advice I can suggest is to put a paper mat down on which to grease the iron and apply the batter. In an earlier time, I would have suggested using old newspapers. These days, I've been saving the brown paper that pads a lot of mail-order boxes. 

Maybe someone out there can grease a waffle iron without any mess at all, but I am not that good. 

Anyway, if one of these stovetop irons seems daunting, you can always get an electric pizzelle iron. You just put your batter in there, shut it, and wait for the ready-light. A lot of them even have little dials that let you set how brown you want your pizzelles to be. And of course, they all come with instructions.

But regardless of whether one uses a stovetop pizzelle iron or an electric one, this is a really good recipe to put on it.

Thursday, December 21, 2023

Fruit Cookies: or, Surprisingly fruitless yet satisfyingly good

I've been wondering how these would come out for years.

Fruit Cookies
1 cup butter, margarine,* or shortening
2 cups dark brown sugar
2 tsp cinnamon
1 tsp cloves
1 tsp nutmeg
¼ tsp salt
1 tsp baking soda
3 eggs
2 tbsp cream
1 tsp vanilla
4 cups flour
½ cup chopped raisins
½ cup chopped nuts
1 cup chopped dates

Heat oven to 375°. Have greased cookie sheets ready.
Cream the butter, and sugar, spices, salt, and baking soda, beating until light and fluffy. Then beat each egg in thoroughly, one at a time. Add the cream and vanilla, beat well. Next, mix in the flour, stirring just until blended. The dough should be firm enough to shape in your hands. If it's sticky, add more flour. Then add the raisins, nuts, and dates.
Roll into 1 to 1½-inch balls. Place 3 inches apart on the pan. Gently pat each one to make it flat and about a half-inch thick.
Bake 10-12 minutes.
These are better the next day. The spices get stronger.

*Use the margarine that comes in sticks, not the spreadable kind that comes in tubs.
The original recipe calls for ⅓ teaspoon of salt. But I don't know anyone whose measuring spoons come with a one-third teaspoon. Rounding down to a quarter teaspoon won't hurt a thing. Omit the salt if using margarine or salted butter.

Source: Handwritten note, The Woman's Club of Fort Worth Cook Book, 1928


When I borrowed my college library's copy of The Woman's Club of Fort Worth Cook Book, I couldn't resist scanning the handwritten recipes in the back. After all, someone had carefully saved these. Many of us save recipes on the odd scrap of paper, but writing them into a cookbook is a commitment. At the time, I thought it was a shame that the handwritten recipes were now locked in a library's special collections instead of in someone's kitchen- especially after the first one I tried (Elizabeth's Rolls) was so amazing that I still regularly make them.

Granted, I didn't think all of the recipes would be as good as Elizabeth's rolls. But all of them looked really good. Well, all of them except the chicken mousse, which involved ground-up cooked chicken, mayonnaise, and gelatin. But we're not here for that today. Today we are making fruit cookies! I had high hopes for this recipe because the page has a grease stain on it which became very obvious after I converted the image to black-and-white for printing.


I think I avoided this recipe for so long because I thought it had a daunting list of ingredients. After all, the ingredients take up most of the page, and the directions are awkwardly crammed into the tiny space that remains. 

But really, the only thing we didn't already have at home was the chopped dates. Now, the last time we used the extra-nice dates in a recipe, that turned out to be a pointless extravagance. So this time, I skipped the fancy produce aisle and got these.


It wounded my soul that no store-brand dates (chopped or otherwise) were available.

Anyway, I figured that this recipe would go a lot easier if I had everything measured out ahead of time. With simple recipes, it's usually no big deal to stop midway and measure out the flour. But while this recipe has a short set of instructions, it has a long list of ingredients.

This is the surprisingly small allowance of fruit and nuts that goes into the cookies: a handful each of dates and raisins. I always imagined that the recipe called for so much dried fruit that the cookie dough would barely hold them together. I mean, it is called "fruit cookies."


Setting the unexpectedly small fruit bowl aside, we also needed to measure out some assorted spices. The only annoying one was the cloves because I had to grind them myself. I didn't do this because think fresh-ground cloves taste magically better. We grind our own cloves because the last time I needed to buy them, the store only had whole cloves in stock. The pre-ground ones were all bought up and sold out. 

And so, every recipe that calls for cloves will involve a little detour with the spice grinder until the end of time. I don't necessarily mind this (fresh-ground cloves do taste a bit better if you have a grinder). But it does annoy me that we have to grind our own cloves because I bought them for what proved to be one of the blandest recipes ever featured on A Book of Cookrye.

Anyway, the last ingredient we needed was the first on the list: "1 cup fat." Because we at A Book of Cookrye are always economizing, we only had one viable option: beef fat. This way, we didn't have to pay for butter or for shortening. 

I can't believe I'm about to say this, but you can't tell something is fishy when a dessert contains beef fat. I even swapped beef fat for butter in a batch of shortbread cookies (a recipe that has no spices to camouflage an unexpected intrusion of cow) and brought them to a family gathering without telling anyone what was in them. No one suspected a thing.


Anyway, this recipe starts off the way so many do: creaming the "butter" and sugar. Our recipe writer's handwriting, like my own, is a bit hard to read in some places. Sometimes you have to make a guess based on two recognizable letters. I always thought that the long squiggle before the word sugar meant "confectioners sugar." But upon close examination, it seems more like "dark brown" sugar. I wouldn't have figured that out had I not noticed a space halfway through what I previously thought was a single long word.

After we got the fat and sugar nicely creamed together, it looked oddly like the beginning of a graham cracker crust. And it didn't taste beefy at all.


After the egg was nicely mixed in, we got to the one ingredient that really shows this recipe's age: a spoonful of cream. Back when this recipe was written into the back of the book, milk was not homogenized. This meant you could easily pour a little cream off the top of the bottle to go in your cookies or your mashed potatoes. 

But if you're using cream for anything today, you have to go out and buy it. Since no one wants to buy a whole carton of cream and barely use any of it, you just don't see recipes calling for the occasional spoon or splash of cream these days.


Now that our cookie batter was nice and creamy, it was time to add the flour. This resulted in a firm yet slightly sticky cookie dough. When I worked a little bit of it between my hands, it felt like the cookie recipes we clipped from the 1930s newspapers. Maybe that spoonful of cream alters the cookies just a little bit. Or maybe this was the type of cookie that people preferred in those days, cream or not.


At any rate, it was time to put the fruit into the fruit cookies. Our dates, raisins, and nuts started out as a big mound that dwarfed the as-yet-unfruited dough behind it, but completely disappeared after we mixed them in. Afterward, our cookie dough tasted like raisin-studded gingerbread.


I wasn't sure how you're supposed to shape the cookies. Should they be little balls that spread out on their own, or did we need to flatten the cookies ourselves? After all, if the dough spreads on its own, then pre-flattening it would give us sad, thin sheets of cookie paper. But if the dough doesn't spread, we would have mound-shaped cookies. I decided try both on the first batch so that at least half of the cookies would come out right.


It turns out that the fruit cookies do spread on their own, but only a little. Like peanut butter cookies, they need a bit of a starting push. Our ball cookies turned into domes, and the pre-flattened cookies turned out perfect. 


However, the 12 minute baking time written on the page was too long. The cookies weren't burnt, but they were harder than they needed to be. Also, our recipe says to bake in "a hot oven," but I think I overestimated the temperature the first time. I baked the first batch at 400°, but the cookies came out better after I lowered it to 375°.

I was a little surprised at how understated the fruit was. After all, these are called "fruit cookies." But they tasted more like spice cookies with some extra things stirred in.

Aside from a less-than-expected fruitiness, the fruit cookies were a bit underwhelming right out of the oven, but they were fantastic the next day. I'll never understand why the spices hide for a day in recipes like this. When you eat the cookie dough, it tastes deliciously spiced. But then when you bake it, the cookies taste like blandness with some molasses. But after you let the cookies sit for a day, the spices come back. We saw that happen with our Golden Treasure Pudding and also the gingerbread.

At any rate, this recipe makes a lot of cookies. And fittingly enough, they're easy to store. You can just drop them into a bag with no fear of breakage. And while they're in a bag, you can give them away. I like using cheap bags to give away food. It means the recipient cannot possibly worry about whether I want the container back.


I've noticed that a lot of our 1930s cookies seem like they're meant to sit for several days in cookie jars or other containers that don't seal as well as modern plastic ones. They tend to be sturdier than many recipes from this millennium, and also resist going stale for an impressively long time.

These cookies were delicious, and good enough to give away. (Since it's Christmastime, it's socially acceptable to give away unsolicited sweets. Any other time of the year, people look at you funny.) But these cookies weren't merely good enough to give away, they were good enough to give to people we would see again. 

It feels so nice to liberate this recipe from between the pages of a cookbook that is in an archive's protective custody and will probably never see the inside of a kitchen again. Like Elizabeth's Rolls, these cookies are too good to leave on a bookshelf.

Thursday, November 4, 2021

The crispiest (attempted slice-and-bake) oatmeal cookies I have ever made

An interest was expressed in oatmeal cookies. I could have used the recipe in the big Better Homes and Gardens binder cookbook, but it uses only one egg in a recipe that makes like five dozen cookies. We do not have enough people to eat five dozen cookies in this house, (Well, we would definitely eat them all but I would have to start letting out everyone's clothes. If you do any sewing, you will know that letting out modern store-bought clothes usually involves coming up with a lot of extra fabric to insert into your to-be-expanded garment, which is a lot more work than making fewer cookies.)


Oatmeal Cookies
½ c shortening or schmaltz
½ tsp baking soda
¼ tsp salt
½ c brown sugar
½ c white sugar
1 egg
1 tsp vanilla
1½ c quick-cooking oatmeal
½ c nuts*
¾ c flour

Cream shortening, sugar, baking soda, and salt. Add eggs and vanilla. Alternately add the flour and oatmeal, then stir in the nuts.
The recipe then tells you to shape the dough into logs, wrap them, and refrigerate overnight before slicing and baking the next day. I tried it and most of my cookie slices crumbled. If yours do the same, or if you want to save time, roll the dough into small balls and then flatten them between your hands.
Bake at 350° until just barely darkened around the edges, 8-10 minutes. Put in a tightly sealed container after they cool.

*I used raisins instead.
I added a few shakes of cinnamon as well.

Source: Mary Fedor (Streator, Illinois), Anniversary Slovak-American Cook Book, First Catholic Slovak Ladies' Union, 1952

Now, a word about ingedients. The recipe tells us to use either shortening or schmaltz (viz. chicken fat). We decided to almost use schmaltz, except with a change of species.


Back in the Before Times, we used to get the extra-lean hamburger and skip draining it. Now we have this big tub of economization in the refrigerator. 

We've already found that beef fat doesn't add any meat flavor to anything (if it did, we wouldn't have put it in shortbread twice). The recipe says we should use chicken fat (or shortening). I don't think Mary Fedor would mind too much if we used cow fat instead. 


And here we have the proto-cookie sludge! After this point, I looked at how much flour this sugary gravy is supposed to receive and decided the hand mixer couldn't handle it. Also, at this point I added some cinnamon because I like that extra flavor in oatmeal cookies.


At this point, I reached into the pantry for the oatmeal and found that-- horrors-- we only had the instant kind! Surely this meant the end of our oatmeal cookie endeavors until the next grocery trip. A lot of recipe guides will tell you to use the quick-cooking oats in cookies but never the instant kind lest your oatmeal cookies die a horrible death. In my baking class, when we made a massive batch of oatmeal cookies for some faculty lunch, we were given dire warnings about how using the instant oats would ruin everything. 

Oddly enough, no one ever says why. Since we weren't going to put this half-finished cookie dough in the refrigerator until we could get the proper, Fornax-approved oatmeal for the cookies, we decided to bear the risk of oven explosions and whatever other kitchen disasters might ensue from the use of incorrect oats. (Fornax, as you either already know or are about to, is the Roman goddess of the oven.)

This may be the picture of culinary ruin.

Usually, recipes tell you to get the cookie dough completely mixed before adding the oatmeal, raisins, or whatever else. I always figured it was so you could tell whether you had any unmixed flour clumps before they hid themselves amongst the oatmeal. But this recipe tells us to add them alternately, and I'm not going to argue with someone whose recipe got accepted by the Cookbook Committee (always capitalized). 


With the last of the oatmeal, I added the raisins. I like raisins as much as those children who get them while trick-or-treating. I was especially disappointed after one of those how-to-eat-healthy talks I went to for the free food. The registered dietician told us that raisins are basically candy as far as nutrition is concerned, leaving me to think about how many times I could have just eaten chocolate instead. But I like raisins in oatmeal cookies. They add little concentrated spots of tartness that makes the cookies so much nicer. 


The recipe tells us that these are icebox cookies. I want to warn anyone following along at home that there is no dignified way to make a log of oatmeal cookie dough.


Making a slice-and-bake log of oatmeal cookies is about as embarrassing as baking brownies in a cornstick pan. I thought it was bad enough making brown logs of chocolate icebox cookie dough, but these are worse. If you make these, be sure to have a frying pan ready to swing at any attempters of scatological humor. Otherwise the jokes will get too repetitive for the unarmed.

I could more easily keep a straight face while making novelty bachelorette party dingledongle cupcakes than making these.


Depending on your perspective, these lovely logs were either worse or better when frozen enough to, er, stand on their own.


All this business of refrigerated cookies to slice and bake proved a waste of time. This is what happened when I tried to cut them.


A few cookies came out intact, but I shouldn't have bothered. You may be thinking I should have used a sharper knife, or a different shaped blade, or suchlike. I tried half the knives in the kitchen, from chef's knife to cleaver. None of them were any better. Perhaps this is the dire fate that befalls those who try to bake instant oatmeal. 

I cut up half the log before giving up and got a few intact-ish cookies that I had to very carefully lift onto the pan. I then rolled all the crumbled cookie dough into balls and flattened them between my hands. Because the dough was still hard from refrigeration, the oat flakes scratched at my hands a lot.


If we look at the only intact slices I got out of this, we can see fissure lines showing how they may not have broken apart but they really wanted to.


While the first batch baked, I got out the other dough log and cut it up to see if it would do any better than log no. 1-- it didn't. But at least cutting the dough up helped it soften enough to shape into actual cookies.


Honestly I think the rolled-and-flattened cookies came out better than the sliced and baked ones. They looked just a little bit nicer.

When we bit into one of these, they were the crispest cookies I've ever made. If you've ever stacked three Pringles at once and ate them, you can get a good idea of what we had made.


We could have used these cookies to record the sound effects for those aggressively perky commercials where Florence Henderson sang about frying chicken in Wesson oil. Seriously, when you bit into one of these it sounded like a Doritos ad. Because one of the other people in the house found this even funnier than I did, we have audio.


The Sound of Cookie Snarfing

 You might think they were tooth-breakingly crunchy, but if we crack one open you can see they rose into thin flakes and layers. It was about one fourth of the way between cookie and something with phyllo dough.


I don't know if it was the beef fat or Mary Fedor's recipe, but these cookies are crispier than multiple fistfuls of potato chips. If you skip the refrigerate-slice-and-bake business and just shape them in your hands, you will love these cookies.