Showing posts with label Mirro recipes. Show all posts

Wednesday, July 2, 2025

Chocolate Bars: or, Making every recipe Mirro sent out

I didn't know I am a completionist.

Chocolate Bars
¾ cup shortening
1 cup sugar
¼ tsp salt
1 egg
2 tablespoons milk
½ teaspoon vanilla
2 ounces unsweetened chocolate, melted
2 cups sifted cake flour

Heat oven to 375°. Have ungreased cookie sheets, a thin metal spatula, and a cooling rack ready.
Cream the shortening, sugar, and salt. Add the egg, milk, and vanilla. Beat to mix. Then add the chocolate, and beat until whipped and very light. Then sift in the flour. Add enough to make a soft dough- you may not use all of it. The dough should not be crumbly.
Put into a cookie press fitted with the bar tip. Pipe long strips of dough across the baking sheet. Then use a knife to cut lines every 2 or 3 inches, depending on how big you want the cookies to be. (Since you're not pressing the dough onto the pan, you can do this on ungreased parchment paper.)
Bake 8-10 minutes (mine were done in six).
Keep in a tightly sealed container if you want them to stay crisp. They will go soft otherwise.

NOTE: If desired, you can substitute six tablespoons of cocoa powder for the chocolate. Increase the shortening by two tablespoons. You will draw a lot more flavor out of the cocoa powder if you melt all of the shortening in the recipe, getting it very hot. Then whisk in the cocoa powder, and allow it to cool until it re-solidifies.

Source: Mirro cookie press instruction sheet (undated, but it looks like the mid-1940s)

Today we are trying the only cookie press stencil that I haven't gotten out yet, and also the last recipe on the Mirro cookie press instruction sheet.

CHOCOLATE BARS
Time 8-10 minutes (handwritten note: 6 minutes)
Temperature 375°F

¾ cup shortening
1 cup sugar
1 egg
¼ tsp salt
2 squares melted unsweetened chocolate
2 tablespoons milk
½ teaspoon vanilla
2 cups sifted cake flour

1—Cream the shortening.
2—Gradually add sugar.
3—Add well beaten egg, salt, chocolate, milk, and vanilla.
4—Gradually add flour.
5—Put bar plate in cooky press and fill press.
6—Make long strips on ungreased MIRRO Aluminum Cooky Sheets and cut into desired lengths. Yield 7 doz.

Printed in U.S.A. 
T-160
Mirro cookie press instruction sheet


I melted the shortening and added the cocoa powder so it could "bloom." Honestly, I can't believe it took me so long to learn about blooming cocoa powder. It's such a simple step, but it brings out so much more chocolate flavor than simply stirring the cocoa powder in with everything else. 

I didn't intend to let the chocolate-flavored shortening sit out overnight, but we had a really big dinner and no one wanted cookies afterward. And so, like letting your fresh herbs marinate overnight in the salad dressing, the cocoa spent all night exuding all its goodness into the fat.

The next day, we plunged the beaters into the shortening and prepared to beat it soft. I don't usually cream the shortening by itself before adding the next ingredients, but it usually isn't molded to the bottom of the bowl.


Readers will note that these cookies contain no leavener besides the air that you beat into them. And so, before adding the flour, I turned the mixer to its highest speed and let it run until the batter was beautifully whipped and utterly delicious.


I loved how easy these would theoretically be to squirt out. As I understood it, you don't even need to press these out one at a time. You just extrude long strips of dough on the pan and then break them up into cookies. In theory, I might even fit an entire batch onto a single pan! (Or two pans if I wasn't halving the recipe.)


At first, I tried piping out long cookie strips and then cutting them and spreading them apart. My first attempt at pushing out ribbons of cookie dough were wobbly and sad. I couldn't decide if I didn't like using the cookie press this way, or if I would get better with a little practice.


For the next batch, I tried putting short strips as the dough came out of the pan, which I could then cut in half before baking. That went a little better. They look like a mess on a pan, but at least they're a successful mess.


At this point, I realized that the dough was too crumbly. You might think I would have figured this out when I first tried to extrude the dough, but I thought it was supposed to be like that. I still don't know the correct dough texture for spritz cookies. It doesn't matter that I've now made literally every recipe that came with the cookie press. Maybe I will figure that out eventually.

For another batch, I tried cutting the dough off of the gun as it came out. About half of them looked so bad that I dropped them back in the mixing bowl. The remaining ones still didn't look all that great.


For my last batch, I decided to simply squirt strips that were as long as the pan, and then score them without moving them apart. In theory, I could break them up after baking. I know you're usually supposed to separate your cookies before they enter the oven, but sometimes I like to live dangerously. I should have made these cookies the "wrong" way the first time. They broke apart exactly where I cut them. Even those crackers with pre-scored lines don't separate so easily.


These cookies were really good on the first day. They were incredibly light, crisp without being hard, and with a perfect chocolate flavor that rivals the some really good brownies. But if you plan to make these ahead, you really need to store them airtight. Over the next day or so, they softened so much that they practically reverted to raw dough.

Monday, June 30, 2025

Lemon Crisps: or, More fun with a cookie press!

For some reason, a couple of lemons mysteriously landed in the grocery cart.

Lemon Crisps
1 cup shortening
½ cup sugar
½ cup brown sugar
1 egg
1 teaspoon grated lemon rind
2½ cups sifted flour
¼ tsp salt
¼ tsp baking soda
2 tbsp lemon juice

Heat oven to 400°. Have ungreased cookie sheets ready.
In a large bowl, cream the shortening until very soft. Gradually add sugar and lemon juice, beating well. Add egg and grated lemon rind. Sift the flour, salt, and baking soda. Add to creamed mixture a little at a time.
Put dough into a cookie press and form cookies on the ungreased cookie sheets. Bake until golden around the edges, about 10-12 minutes (mine were done in 7).

Source: Mirro cookie press instruction sheet (undated, but it looks like the mid-1940s)

Today, we are making another recipe from the Mirro instruction sheet. As I've said (often), they may have made a lousy cookie press, but their recipes are fantastic.

LEMON CRISPS
Time 10-12 Minutes
Temperature 400°F.
1 cup shortening
½ cup granulated sugar
½ cup brown sugar
1 egg
1 teaspoon grated lemon rind
2½ cups sifted flour
¼ teaspoon salt
¼ teaspoon soda
2 tablespoons lemon juice
1 — Cream the shortening.
2 — Gradually add sugar and lemon juice creaming well.
3 — Add egg and grated lemon rind.
4 — Sift flour, salt and soda. Add to creamed mixture a little at a time.
5 — Fill a MIRRO Cooky Press.
6 — Form cookies on ungreased MIRRO Aluminum Cooky Sheets. Yields 7 dozen.

One lemon did not yield enough rind for this recipe. Well, maybe one of those giant lemons would have, but oversized fruits are usually bland. Also, I am suspicious of unnaturally large fruits and vegetables. At any rate, we got half a recipe's worth of rind from one lemon, but we got two batches' worth of juice. So as a bonus, we were able to put the surplus (fresh-squeezed!) lemon juice on pasta salad a few days later. 

We do not skimp on lemons in this house.

After creaming everything together, the mixture was a lot paler than I expected. I wondered if I had somehow accidentally undermeasured the brown sugar. But then again, the recipes from this instruction sheet start out unnaturally white. So perhaps it was reverting to its true form.


And so, it was time to get the dough into our press! I decided to try out the five-pointed star stencil. They looked a lot more raggedy than the picture on the box. Since I didn't feel like reloading the dough and trying again, I left them on the pan to see how they baked. 


A lot of pressed-out cookie recipes hold onto their shape pretty well, but these spread out a bit. So in choosing what stencil shapes to use, pick one that will still look cute if it gets a little rounded out. I've said this before, but the stencil shaped like a big asterisk always comes out cute, even when your other cookies look like blobs. 


Once again, the Mirro people gave us an excellent cookie recipe. It's a real shame I can't make it using their own press, but I am very glad I nabbed the instruction sheet from some random Ebay seller's page. It makes me feel kinda bad for the people who resolutely made the plain spritz cookies every year for Christmas and never tried any of the other recipes that were right there on the same page.


The small hint of brown sugar gave extra depth to the lemon flavoring without overpowering it. And adding all of that lemon rind was definitely worth it. If you make these, definitely buy two lemons to grate into it. And just like the recipe title implies, they were very crisp. As with every other recipe I've made from the Mirro sheet, I would make these again.

Tuesday, June 3, 2025

Velvet Cookies: or, Not bad, but not enough peanut butter

This is the first peanut butter cookie I've seen that doesn't put it in the recipe title.

Velvet Cookies
¾ cup shortening
2 tbsp peanut butter
¾ cup powdered sugar
1 tsp baking powder
¼ tsp salt
1 egg
1 tsp vanilla
2 cups flour

Heat oven to 400°.
Cream the shortening, peanut butter, powdered sugar, baking powder, and salt. Beat in the egg and vanilla. When all is well-mixed, sift in the flour and combine.
Load into a cookie press, and pipe onto an ungreased cookie sheet. Bake 10-12 minutes, or until golden on the edges. (Mine were done in seven minutes.) When you take them out of the oven, immediately take them off the cookie sheet with a metal spatula and put them on a cooling rack.

Source: How to Make Fancy Cookies: Recipes from the Mirro Test Kitchen (undated, probably mid-1940s or early 1950s)

VELVET COOKIES 
Time 10-12 minutes 
Temperature 400°F. 
¾ cup shortening 
¾ cup sifted confectioner's sugar 
2 tablespoons peanut butter 
1 egg 
1 tsp vanilla extract
2 cups sifted flour 
1 tsp baking powder 
¼ tsp salt 
1 — Cream the shortening and add sugar slowly. 
2 — Stir in the peanut butter, egg, and extracts. 
3 — Sift flour, baking powder, and salt. 
4 — Gradually add dry ingredients to creamed mixture. 
5 — Fill a MIRRO Aluminum Cooky Press. 
6 — Form into desired shapes on ungreased MIRRO Aluminum Cooky Sheets. Yield 7 dozen.
How to Make Fancy Cookies: Recipes from the Mirro Test Kitchen

Today, we are playing with our cookie press again! Unusually for a recipe on the Mirro cookie press instructions, we don't start with a bowl of all-white ingredients. It seems like every Mirro recipe begins with creaming the sugar and shortening into an unnaturally colorless fluff. But today, we are adding a little bit of peanut butter which will hopefully make our starting mixture a little more colorful than mayonnaise.


After mixing everything together, it was the color of light honey. Even though we barely added enough peanut butter to lightly tint the the mixture, it had a surprisingly strong flavor .


Our dough was almost the same color as unbleached flour before we added any. 


I gave the it a final taste before baking, and had a few polite misgivings. This is the first time I actually measured the vanilla in who knows how long, and I already regretted my level teaspoon.

Now, I have previously mentioned that the Mirro cookie press has given me nothing but vexation. I may or may not have checked the listing details after a particularly bad experience to see if the seller takes returns. Well, I decided to give it one last chance before getting it back out of the house. I carefully followed every step in the directions (which I printed out so I could make very sure I was doing right), and this happened.


That's the end of the Mirro press in this house. They put some really good recipes on their instruction sheets, but I am not impressed with their products. (Well, I say that. I still like my Mirro percolator.)

I transferred the dough to our cheaper, flimsier press. Even though it feels like it could fall apart at any minute, I'm starting to call it "Old Reliable" because it always works. Instead of cursing at the cookie press, I could once again happily play with my kitchen toys. Peanut butter hearts sounded really cute, but they ended up looking kind of bad. However, unlike the Mirro press, every single cookie stayed where I put it.

Same dough, same pan, same room temperature. The only variable we changed was the press.

I really want to like this cheap press. It's easy to use, and it makes perfect cookies that actually stay where I squirt them. But every time I use it, it feels closer and closer to falling apart. However, it survived making an entire pan of peanut butter--- rings? flowers? I'm not sure what these are supposed to be. But whatever they are, they stuck to the pan and not the press.


As is rapidly becoming my way, I couldn't resist trying out the other shapes. The flowers came out really cute. Even what one of my friends has dubbed the "cosmic horror of boobs" stencil came out nicely (second from right, top and bottom rows). In full disclosure, I had to gently nudge some of the, um, nodules closer together after pressing them out. But, again, all of the cookie dough stayed where the press put it. You can't say that for certain other cookie presses that were sitting on the counter waiting to be hand-washed.


I found out that the segmented-ring cookies don't look very good when piled on a plate. They just look like a mound of cookie nubs. But (and I cannot say this enough) they are a mound of cookie nubs that released themselves from the cookie press without any problems.


These had nearly the same texture as Mexican wedding cookies. If you were to plunge them into powdered sugar right out of the oven, they would be fantastic. They were like extra-fine, very delicate shortbread.


Even though these cookies had a perfect texture, they were bland. They weren't tasteless, just underwhelming. If you feel the urge to make these, I suggest being a little more heavy-handed with the vanilla than the original recipe suggests.

Friday, December 27, 2024

Spritz Cookies: or, The instruction manual is better than the thing it came with

I had to find out: Would I have a monogamous relationship with these cookies?

Spritz Cookies
1 cup shortening
¾ cup sugar
¼ tsp salt
½ tsp baking powder
1 egg
1 tsp lemon extract (or flavoring of choice)
2¼ cups sifted flour

Heat oven to 400°. Have ungreased cookie sheets, a thin metal spatula, and cooling racks ready.
Cream the shortening, sugar, salt, and baking powder. Beat in the egg and extract. Continue beating until very light. Then stir in the flour, mixing gently until all is combined.
Put through the cookie press onto ungreased sheets. Bake for 10-12 minutes (mine were done in 6).
Immediately upon removing from the oven, use the metal spatula to transfer the hot cookies to a cooling rack.

Source: Mirro cookie press instruction sheet

SPRITZ COOKIES (handwritten note: 1963)
Time 10-12 minutes
Temp. 400°
____________________________
1 cup shortening
¾ cup sugar
1 egg
1 tsp lemon extract 
¼ tsp salt 
½ tsp baking powder
2¼ cups sifted flour (handwritten note: less ¼ cup)
(handwritten note: 2 cups flour plus 2 tablespoons)

1—Cream the shortening.
2—Gradually add sugar and cream well.
3—Beat in the egg and extract.
4—Gradually add the flour, sifted with the salt and baking powder.
5—Fill a MIRRO Aluminum Cooky Press.
6—Form into desired shapes on ungreased MIRRO Aluminum Cooky Sheets. Yield 6 doz.

Apparently whoever owned this recipe page made these cookies a lot. We have a note of what I think is the first year they made them. We also have two changes to the amount of flour, which appear to be in two different people's handwriting.

When I shared the cookie press instruction sheet/recipe handout that I nabbed and saved from someone's Ebay listing, a lot of people on the recipe swap group said things like "We only ever made the plain ones!" and "I didn't know there were so many kinds!" And so, I decided to temporarily set aside the thrills of spices and brown sugar to make the plain ones. I wanted to taste the recipe that apparently pops up every Christmas in countless homes. Would I think they were good enough to forsake all others?


And so, as often seems to be the case with spritz cookies, we begin with a mixing bowl full of ingredients and devoid of color. Given how many shortening-loaded spritz cookies, I've made of late, one might think I'm using up the entire can of shortening at an alarming rate. But I've halved all of these recipes for evaluation purposes.

Our ingredients whipped into a white fluff that looked unnervingly well-bleached. You can really appreciate how colorless it was after putting our half-egg on top. 

No matter how many shortening-loaded spritz cookies I make, I can't get over how much the starting mixture tastes like knockoff Oreo filling that has gotten just a tiny bit too old.


After adding the vanilla, egg, and everything else that has a bit of color in it, our mixture was precisely the same color as unbleached flour.


I added exactly as much flour as the recipe instructions told me to, and thought the dough was too sticky to put into the extruder. Like, you could press it into a square pan and call it bar cookies, but any attempt to make cute little cookies out of it would result in unfortunate-looking mounds. 

I was about to add more flour, but then I realized that I've had to add a lot of extra flour to every recipe on this handout. Had I been over-flouring every single batch I've made? Did I even know what this dough should look like? The instruction sheet didn't even have pictures to show me how firm the dough should be. Perhaps the Mirro press was so hard to use because my over-floured dough simply wasn't sticky enough to stay on the pan. 

I then reminded myself that ugly cookies were the absolute worst thing that could happen if I baked the dough as it was. No one would organize a Circle of Judgement for a cookie failure. I further reassured myself that kitchen misfires are not mortal sins. Thus emboldened, I loaded the sticky dough into the press.

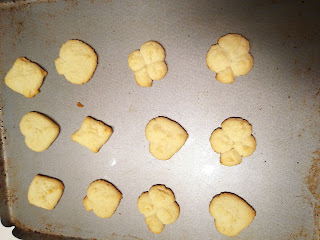
The cookie press came with a full set of playing card suits- hearts, clubs, diamonds, and spades. I think it's so charming that people had canasta and bridge get-togethers so often that they needed thematic refreshments. (Heck, there's even a cookbook called Bridge Refreshments.) And so, I decided to pretend I was hosting a bridge party even though I do not like card games. This meant that I could start off my latest struggle with this this finicky press by making diamonds, the most fail-proof shape in the entire stencil set. 

Our first few cookies turned looked into blobs, but we soon figured out how much dough to extrude to make them look just right. After getting the pan halfway covered with successful cookies, I began to think that this press might not be a waste of money. I even imagined using it so often that I could just give the handle a quick twist without looking to see how much dough had come out.


After making a few diamonds, we did the clubs. These almost came out all right, but the little stem had an annoying habit of sticking to the press while the three lobes came out fine. For once I didn't mind when the cookies failed to press out. It meant I could put the defective ones back into the press and play with more shapes without running out of pan space.


All of the hearts came out nearly perfect. I immediately thought of Valentine's Day cookie bags. But after all this success, we were running out of room on the pan and still had to try out the spades. Impatience would not let me wait for the next batch. I was too excited about getting this blasted thing to work (most of the time). And so, I plucked some of the lesser-looking cookies away to make room.


Our spades came out of the press with very little trouble, leading me to think that I had solved all my cookie press problems with practice and reduced flour.


Our pan of bridge refreshments melted in the oven. They didn't turn into flat puddles, but they didn't look like playing cards either. I hate waste, but I told myself that no one would benefit from me eating lousy cookies, just like those starving children in far-off countries never benefit from anyone finishing their boiled peas at home. In other words, no one in the world would feel the happy effects of me doing a calorie penance for my baking misfires. And so, I thanked the cookies for helping me learn more about the recipe (which they did), and let them go to the municipal hereafter.


After I added more flour to the remaining cookie dough, it decided to stop staying on the pan. After scooping up the odd-shaped dough squirts and returning them to the mixing bowl, I gave up on my vintage cookie press. It was time to forget about vintage and get out the one that is more reliable. After transferring the dough from one press to another, I piped out a perfect batch of cookies in like fifteen seconds. I just had to go squirt, squirt, squirt across the pan. (Granted, the lever flexed unnervingly and felt like it would snap off at any minute.) 

So, without intending to, we did a near-perfect press-versus-press test and controlled for nearly every other factor that could ruin the results. We piped the same dough onto the same pan on the same night in the same weather, with the dough at the same temperature. Having eliminated all those other factors (and a few others which I didn't think of), we now know the problem is the Mirro press itself.

But those 8-pointed stars are easy. I have barely started using a cookie press, and I've already learned that the 8-pointed stars always come out fine. So I put in one of the more finicky, error-prone stencils that has a lot of little tiny holes that seem to love to get clogged whenever I use it. The cookies came out perfect.


I really wanted to like the Mirro press. For one thing, it comes with the prettiest little cookie stencils. Also, there was no point in returning it. I would probably lose the entire refund on return shipping. Aside from money matters, I felt like I had failed. After all, this thing was in production for decades. Surely a lot of people got theirs to work. Furthermore, a lot of people online saw mine and said "Oh, we had one of those!" and "We used ours every Christmas!" and "It's a real workhorse!" I doubt people would say such happy things if the Mirro press was a dud.

And so, just like when I made my first pizzelles, I went online and asked for help. One person suggested that I refrigerate the dough so it gets really firm before pushing it out. In addition to heeding others' advice, I decided to carefully read the instructions instead of skimming over it. It said to put the stencil into place with the number facing up. "What number?" I muttered to myself. I looked at a stencil closely, and finally saw it--- barely stamped into the metal, right next to the edge, and too tiny to notice without squinting. 

How could I ever miss that?

I didn't know why it mattered which side faced up, so I looked over the stencils very carefully to figure it out. The holes that make up the designs aren't cut at an angle that would change what happens when you lift the press off the pan or anything. Eventually, I noticed that the stencils aren't flat but slightly curved. This meant we had two things to test: whether I had been inserting the damn things the wrong way up the whole time, and also whether refrigeration helped at all.

Because I didn't want to wait several hours, I decided to test whether correctly assembling the press solved all my woes. Our results were still hit-or-miss, but slightly better than before. The cookies seemed more likely to succeed if I extruded enough dough to ever-so-slightly squish them. With the happy feeling that comes from a nearly 7 out of 10 success rate, I decided to try the stencil that had come out terribly every single time. After carefully installing it number-side up, and making sure to squish the dough under there (it is called a press after all), I got some surprisingly lovely cookies. Since the weather was too hot for the oven, I put all of the cookies back into the canister so I could wait until both the dough and the outside temperature had gotten a lot colder.

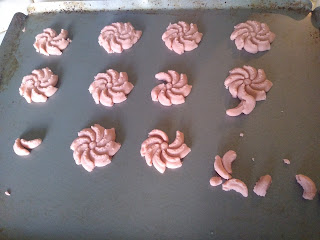
They're not great, but they're better than before.

A few hours later, when the sun had gone away and taken its excessive heat with it, I turned on the oven and got our fully-loaded cookie press out of the refrigerator. Our dough had turned to rock. I couldn't get the handle to turn at all. At first I thought it's supposed to be like that, and my dough had hitherto been too soft. But no amount of white-knuckling the handle would force anything to come out. After a few minutes of this, I decided that if the dough was supposed to be this hard, it wouldn't feel like I was about to snap the press apart. And so, I took off the cap and pushed out this perfectly cylindrical brick of raw cookies.


I nearly flung it into the garbage, but unfortunately I tasted it first and it was too delicious for the landfill. I then thought "Maybe I over-chilled it!" I also thought that my vintage Mirro cookie press is far too finicky if I have to temperature-control the dough with such precision.

To avoid waste, I hacked the dough into smaller lumps with a knife and kneaded it until it softened up again. After I reloaded the press, I discovered that refrigeration was futile.

To make sure it was the press' fault and not a bad batch of dough, I transferred it to our crappy yet reliable press. I could tell the dough was too hard from the way the handle bent and flexed. Nevertheless, we got a perfectly competent batch of cookies. And so, with great reluctance, I had to admit that I had been outwitted by a cookie press. As soon as we get a suitable-sized box, it's going back on Ebay to bother someone else.

That round one is the last of the dough that doesn't quite make it out of the press. I carefully peeled it off the piston and baked it.

So, the vintage Mirro press is a bust. I'm not going to frustrate myself by trying to use it again. But what about the reccipe?

These cookies reminded me a lot of the ones that come in those blue tins that infamously always contain sewing supplies-- except they were better because they were fresh. If you want a good, plain cookie, this recipe is a great choice. All the same, I can't help feeling bad for anyone who said "This is the only recipe we ever made!" There are so many other cookies out there, even if you look no farther than the instruction sheet!


I will definitely make these again, but I wouldn't take this recipe to have and to hold, forsaking all others. And I must give the Mirro people credit where it is due. Their recipe developing department did excellent work.

Friday, November 22, 2024

Brown Sugar Spritz Cookies: or, Buying a press to go with the instructions

I didn't want to wait for our cookie press to break before getting a better one.

Brown Sugar Spritz Cookies
½ cup shortening
1 cup light brown sugar
¼ tsp salt
1 egg
1 tsp vanilla
2¼ tsp sifted flour

Heat oven to 400°. Have ungreased baking sheets, a thin metal spatula, and a cooling rack ready.
Beat the shortening until soft and creamy. Add sugar and salt, beat until light. Then add the egg and vanilla, beat until well-whipped. Mix all but about two or three tablespoons of flour. If dough is too sticky, add the remaining flour. You can also add a little more if necessary.
Put into cookie press. Then press the cookies onto the ungreased baking sheet. Bake 8-10 minutes (mine were done in about six), or until golden at the edges.
Immediately after removing from the oven, use the spatula to transfer the hot cookies to the cooling rack.
These cookies are better the day after baking.

Source: Mirro cookie press instructions

BROWN SUGAR SPRITZ.
Time 8-10 minutes
Temp 400°F
½ cup shortening
1 cup light brown sugar
1 egg beaten
1 tsp vanilla
2¼ tsp sifted flour
¼ tsp salt

1— Cream the shortening well.
2— Add sugar gradually.
3— Stir in the egg and vanilla.
4— Gradually add the flour, sifted with the salt.
5— Fill a MIRRO Aluminum Cooky Press.
6— Form fancy designs on ungreased MIRRO Aluminum Cooky Sheets. Yield 7 doz.
DO NOT GREASE COOKY SHEETS
Source: Mirro cookie press instructions

As Thanksgiving approaches, the baking aisle and other parts of the store are getting worryingly empty. In earlier, happier times, I would have figured it was the natural result of the holiday baking surge. But this year, I've been looking at the bare shelves and asking "Is this just the holidays, or are people quietly stockpiling before the next president launches a trade war?" 

And so, because sometimes new toys are entertaining in times of distress, I bought a Mirro press to go with my Mirro instructions. Now I only need someone to get me a Dormeyer stand mixer to go with the Dormeyer recipe book. When I turned the press' handle, it glided on its screw-threads. The whole thing felt like quality in my hands. Also, it came with little stencils for doggies and butterflies! I couldn't wait to make dog-shaped cookies.

The doggie is right under the press handle.

I only made these cookies so I could try out my exciting new toy, but I had high hopes for the recipe. I imagined they would be like a cuter-looking version of the slice-and-bake blondies from Mrs. George Thurn.

And so, we begin with brown sugar and shortening. Every recipe on this handout begins with shortening. Perhaps they were leery of overly moist butter in those days, too.


After halving so many recipes, I have gotten unexpectedly good at splitting eggs. These days, it's a trivial task. I used to put the other egg half into a frying pan for a quick mid-recipe snack, but these days I freeze it for when I'm making another half-recipe later. That's why our egg looked like this:


I forgot to defrost the egg, but figured that letting the mixer kick it around the room-temperature batter would melt it fast enough-- like when you stir butter into hot spaghetti. Sure enough, the egg was thawed and perfectly mixed after about a minute.


After our dough was floured and ready, it was time to bring in our beautiful, high-quality cookie press. We giddily learned that this new(ly acquired) press can hold a lot more dough than the first one. It nearly held all the dough at once.

Unfortunately, our cookies did not want to stick to the pan. I don't know whether to blame the recipe, the cookie press, or good old-fashioned operator error. But I had to pry about half of our cookies off of the press without bending them out of shape. Some shapes seemed to work better than others. Almost all of the butterflies and about two thirds of the stars stayed on the pan when I lifted the press off. But most of the cookies came out like this:


I also tried the tiny star, but the cookies all like ragged plops (though at least they all stuck to the pan). Even though I don't care about "presentationality," I reloaded them into the squirter. I think this tiny star stencil must have a specific use that I don't know about, because it makes ugly cookies.


I hate to say it, but I like the cheaper cookie squirter more than this one. If you ignore how the cheaper press feels like its little ratcheter could snap at any minute, it is a lot easier to use. In fact, if the cheap one proves durable, I may let the older one find a new home.

But when the vintage press worked, it worked really well. It made the cutest Christmas trees (when they actually stayed on the pan). Unfortunately, the doggie cookies I was so excited about turned into blobs. The butterflies were not much better. Someone said the dogs might actually be donkeys since those are a big part of Christmas iconography. But I don't think it matters. They look like misshapen capital H's.

The swirly starburst one is my favorite.


When the cookies were freshly baked, they were hard. Like, they put your teeth were peril. The next day, they had softened to an astonishingly perfect texture. I didn't even put them in a container. I just left them out on a plate. The day-long ripening period makes these cookies perfect when you have everyone coming over for the holidays. You can finish all the baking and cleanup the day before, and forget about them while you're frantically preparing on the morning of "the big day."


After softening overnight, these cookies were really good. They tasted exactly like I hoped they would. But while the molasses cookies had been far better than I hoped, today's cookies were merely exactly as good as I hoped. Not every recipe from an instruction manual can be a magically blissful. If I hadn't picked the molasses recipe first, this one would not have seemed like a lesser experience.