Showing posts with label gluten free. Show all posts

Tuesday, September 2, 2025

Satiny Beige Frosting: or, Brown sugar shaving cream

We finally got a cake plate!

Satiny Beige Frosting
½ cup dark brown sugar, firmly packed
¼ cup light corn syrup
2 tablespoons water
2 egg whites
1 teaspoon vanilla

Mix sugar, corn syrup, and water in 1 quart saucepan. Cover and heat to rolling boil over medium heat. Uncover and boil rapidly to 242° on candy thermometer (or until a small amount of mixture dropped into very cold water forms a firm ball that holds its shape when pressed).
As mixture boils, beat egg whites in 1½ quart bowl (ie, the small bowl that comes with most stand mixers) just until stiff peaks form. While still beating, pour hot syrup very slowly in thin stream into egg whites. Be sure to keep the mixer going the whole time. Add vanilla; beat on high speed until stiff peaks form. It may seem like the icing will never have peaks, but have patience and let your mixer keep going.
Spread on the cake while it's warm (no need to let it cool off).
Enough for a 9"x13" cake, or the tops and sides of two 8- or 9-inch cake layers.

Note 1: You really want to use a stand mixer for this recipe. If you use a handheld mixer, you have to carefully avoid pouring dangerously hot syrup on the back of your hand while you beat the icing. If you use a stand mixer, both of your hands are safely out of the way.

Note 2: The molten sugar cooks the egg whites as you pour it in. So you don't need to worry about raw eggs.

Note 3: Any extra icing freezes well if placed in a well-sealed container, or a plastic bag with the air squeezed out.

Source: Betty Crocker's Cookbook, 1986 edition

I've been wanting a nice, big, flat platter for cakes for a long time. After temporarily removing the microwave from service to borrow its platter a few times, I thought to myself "This is actually a really nice plate! I don't think you could get one as good if you tried to buy an actual cake platter!"

Unlike a lot of decorative trays, the glass platters in microwaves never crack-- not even when I'm a bit fumble-handed when getting one in and out of the dishwasher. I'm not a glass expert, but I know there are multiple types of glass, and some kinds are sturdier than others. Some kinds of glass seem to love chipping, but the glass they use for microwaves can withstand a lot of mishaps before it finally gets damaged.

Rather than pay for one, I went on the town's Reddit page asking if anyone was unloading a dead microwave. I offered to dispose of the entire microwave in return for letting me take the plate out of it. Someone responded that they had one, and furthermore I didn't even need to make room in the car for the whole microwave. By happy coincidence, this was bulk trash week. So they said they'd remove the plate and put it out of the way, and leave the rest of the microwave on the curb with the rest of their dead tree branches and broken furniture.

They said that it would be "behind the picket fence on the side of the house," adding "Don't knock, you'll only rile up the dogs. Just grab it." I didn't know what they meant (well, I understood the part about the dogs), but I figured it'd make sense when I got there. And sure enough, there was a tiny little picket-fence box on the side of the house, with nothing but bare dirt in it.

It's not the Canadian way to post pictures of random people's houses, so I had fun in MSPaint instead.

I don't know why these people had a little fenced-in box on the side of the house. There were no signs of a former tomato patch or something in there. It's almost like they fenced in a special area just for leaving out random things they were giving away.

I absolutely love the idea of having a designated giveaway zone on the side of your house.

As an anecdotal side note, I think this year's bulk trash piles show the state of the economy better than any graph on the news. In more prosperous times (and heck, even during the "Great Recession"), you'd see a lot of things that were not necessarily worthless, but also not worth the time to put on Craigslist (or later, Facebook Marketplace.) You could easily get new(ish) dinner plates, a slightly rusted patio bench, and other things like that. But this year, I only saw broken junk in people's curb piles. Few people can afford to throw out a solid-wood table just because the finish is ruined.

Here it is, fresh out of the car and ready for its first trip through the dishwasher!

Setting aside this year's shortage of slightly-distressed curbside furniture, I had to modify the platter for its post-microwave life. Some microwave plates have a raised ring on the underside so that they can sit flat on a tabletop in spite of those three nubs in the center. This one did not, so it wobbled very badly when removed from its former home.


I could have taken it to an art glass studio, and they probably could have flattened it in a few minutes. But they would likely have charged for their service, at which point I may as well have taken my money to the nearest thrift store and bought a castoff serving tray. Instead, a brutal and surprisingly tedious job with a Dremel ensued.

It's not the best tool for the job, but we had one at hand.

Those three glass bumps seemed a lot bigger when I was trying to grind them away. But the plate can now rest on the counter without shaking, even though it looks terrible.

Those peak-pandemic-era face masks came in really handy.

I wanted to polish the scars away, and I did have at the plate with extra-fine sandpaper which helped a little. Then I went online to ask if there ways a way to properly smooth it out without any specialized tools. The best answer I got: "Cover it with cake." And I realized that actually, no one will see the damage until after the cake has been served.

Anyway, I wanted this plate's first cake to be something special and self-indulgent. I tried a new recipe that didn't work and wasted half a dozen eggs on its way to the trash can. I didn't want the next cake to add too much to the pile of eggshells. Fortunately, Mrs. Wilson of the Philadelphia Evening Public Ledger came to the egg-carton rescue with her one-egg cake!

I really love fun cake colors, even if most people don't like blue and purple cakes. But this is my cake, which I am making for my special new cake plate. After dyeing it a rather fetching shade of aqua, it was ready to bake. And because Mrs. Wilson's recipes never fail, it came out perfect.

I tried to do a two-toned swirl, but it didn't quite work.

This finally brings us to today's recipe. We are covering our plate's first cake in something called "Satiny Beige Frosting." I always noticed this this when I was flipping through my mother's Betty Crocker cookbook and thought it was a peculiar name. It's an odd choice to proudly call something "beige." How many people get excited about beige anything? I still remember when people derisively called home computers "beige boxes" until the whole industry switched to black plastic. Anyway, I never made the satiny beige frosting because I only got one birthday cake per year and didn't want to risk bad icing.

Unfortunately, I couldn't get the recipe from our family's copy of the book. It fell apart years ago and Mom threw it out. So even though I wanted to finally find out if satiny beige was any good, I couldn't. But what should I espy in a used bookstore but... this!


It's a different book edition from one we had, but I doubt they altered this particular recipe. I nabbed a picture of the relevant page and left the book in the store. 

WHITE MOUNTAIN FROSTING 
½ cup sugar 
¼ cup light corn syrup 
2 tablespoons water 
2 egg whites 
1 teaspoon vanilla 
Mix sugar, corn syrup, and water in 1 quart saucepan. Cover and heat to rolling boil over medium heat. Uncover and boil rapidly to 242° on candy thermometer (or until a small amount of mixture dropped into very cold water forms a firm ball that holds its shape when pressed). 
As mixture boils, beat egg whites in 1½ quart bowl just until stiff peaks form. Pour hot syrup very slowly in thin stream into egg whites, beating constantly on medium speed. Add vanilla; beat on high speed until stiff peaks form. Frosts a 13x9 cake or fills and frosts two 8- or 9-inch cake layers. 15 servings; 45 calories per serving. 
NOTE: To get an accurate temperature reading on the thermometer, it may be necessary to tilt the saucepan slightly. It takes 4 to 8 minutes for the syrup to reach 242°. Preparing this type of frosting on a humid day may require a longer beating time. 
Cherry-Nut Frosting: Stir in ¼ cup cut-up candied-cherries, ¼ cup chopped nuts and, if desired, 6 to 8 drops red food color. 
Chocolate Revel Frosting: Stir in ¼ cup semisweet chocolate chips or 1 square (1 ounce) unsweetened chocolate, coarsely grated. 
Cocoa Frosting: Sift ¼ cup cocoa over frosting and fold in until blended. 
Coffee Frosting: Beat 1 teaspoon powdered instant coffee into Satiny Beige Frosting (below). 
Peppermint Frosting: Stir in ⅓ cup coarsely crushed peppermint candy or ½ teaspoon peppermint extract. 
Satiny Beige Frosting: Substitute packed brown sugar for the granulated sugar and decrease vanilla to ½ teaspoon.

As a recipe note, the directions say this covers 2 cake layers. Even though only baked one, I made the full amount of icing anyway. As we have learned, it's better to have too much icing than to run out early.

Satiny beige frosting starts with a lot of brown sugar (always a good sign) and... corn syrup. I tried not to think about how long this syrup has been in the pantry. I bought it when I needed two tablespoons of it for a candy recipe. To my surprise, it still hasn't expired as long as you ignore the date on the cap.


We are told to put a lid on the pot and then let it come to a full rolling boil. This is the first time I have ever wished I had a glass lid. I figured I'd just keep one ear on the pot and wait for the noise. 

Meanwhile, it was time to set our cooled cake onto our beautiful, dishwasher-friendly cake plate! When I got it out, I thought to myself "Ooo, those grinding scars look even worse." And of course, the glass shows every dirt smudge on the counter beneath it. But really, any clear plate will do that. But I followed the advice I got online and covered both problems with cake.

All hail Mrs. Wilson!

They say a watched pot never boils. Well apparently, an unwatched one tries to boil over. I took off the lid to see if we had any bubbles yet, and found this.


Sooner than I thought, the uncovered syrup reached the firm-ball stage. It was time to take the pot off the stove and try to aim a slow dribble at our mixing bowl. Keep in mind that candy syrup is literally hotter than boiling water. (Also, this is how you get away with covering a cake with raw egg whites. The hotter-than-boiling syrup cooks them.)


After we had emptied the pot of its molten contents, our frosting didn't look very beige. It was more tan-colored. It was also far too gloppy to stay on a cake.


I left the mixer going, periodically checking if the icing had stiffened up a bit. Even with our stand mixer going at full-speed, it took a few minutes. But eventually, the icing managed to stand up on its own. By this point, its color had lightened until it was as beige as the recipe name.

And so, it was time to get this icing onto the cake!


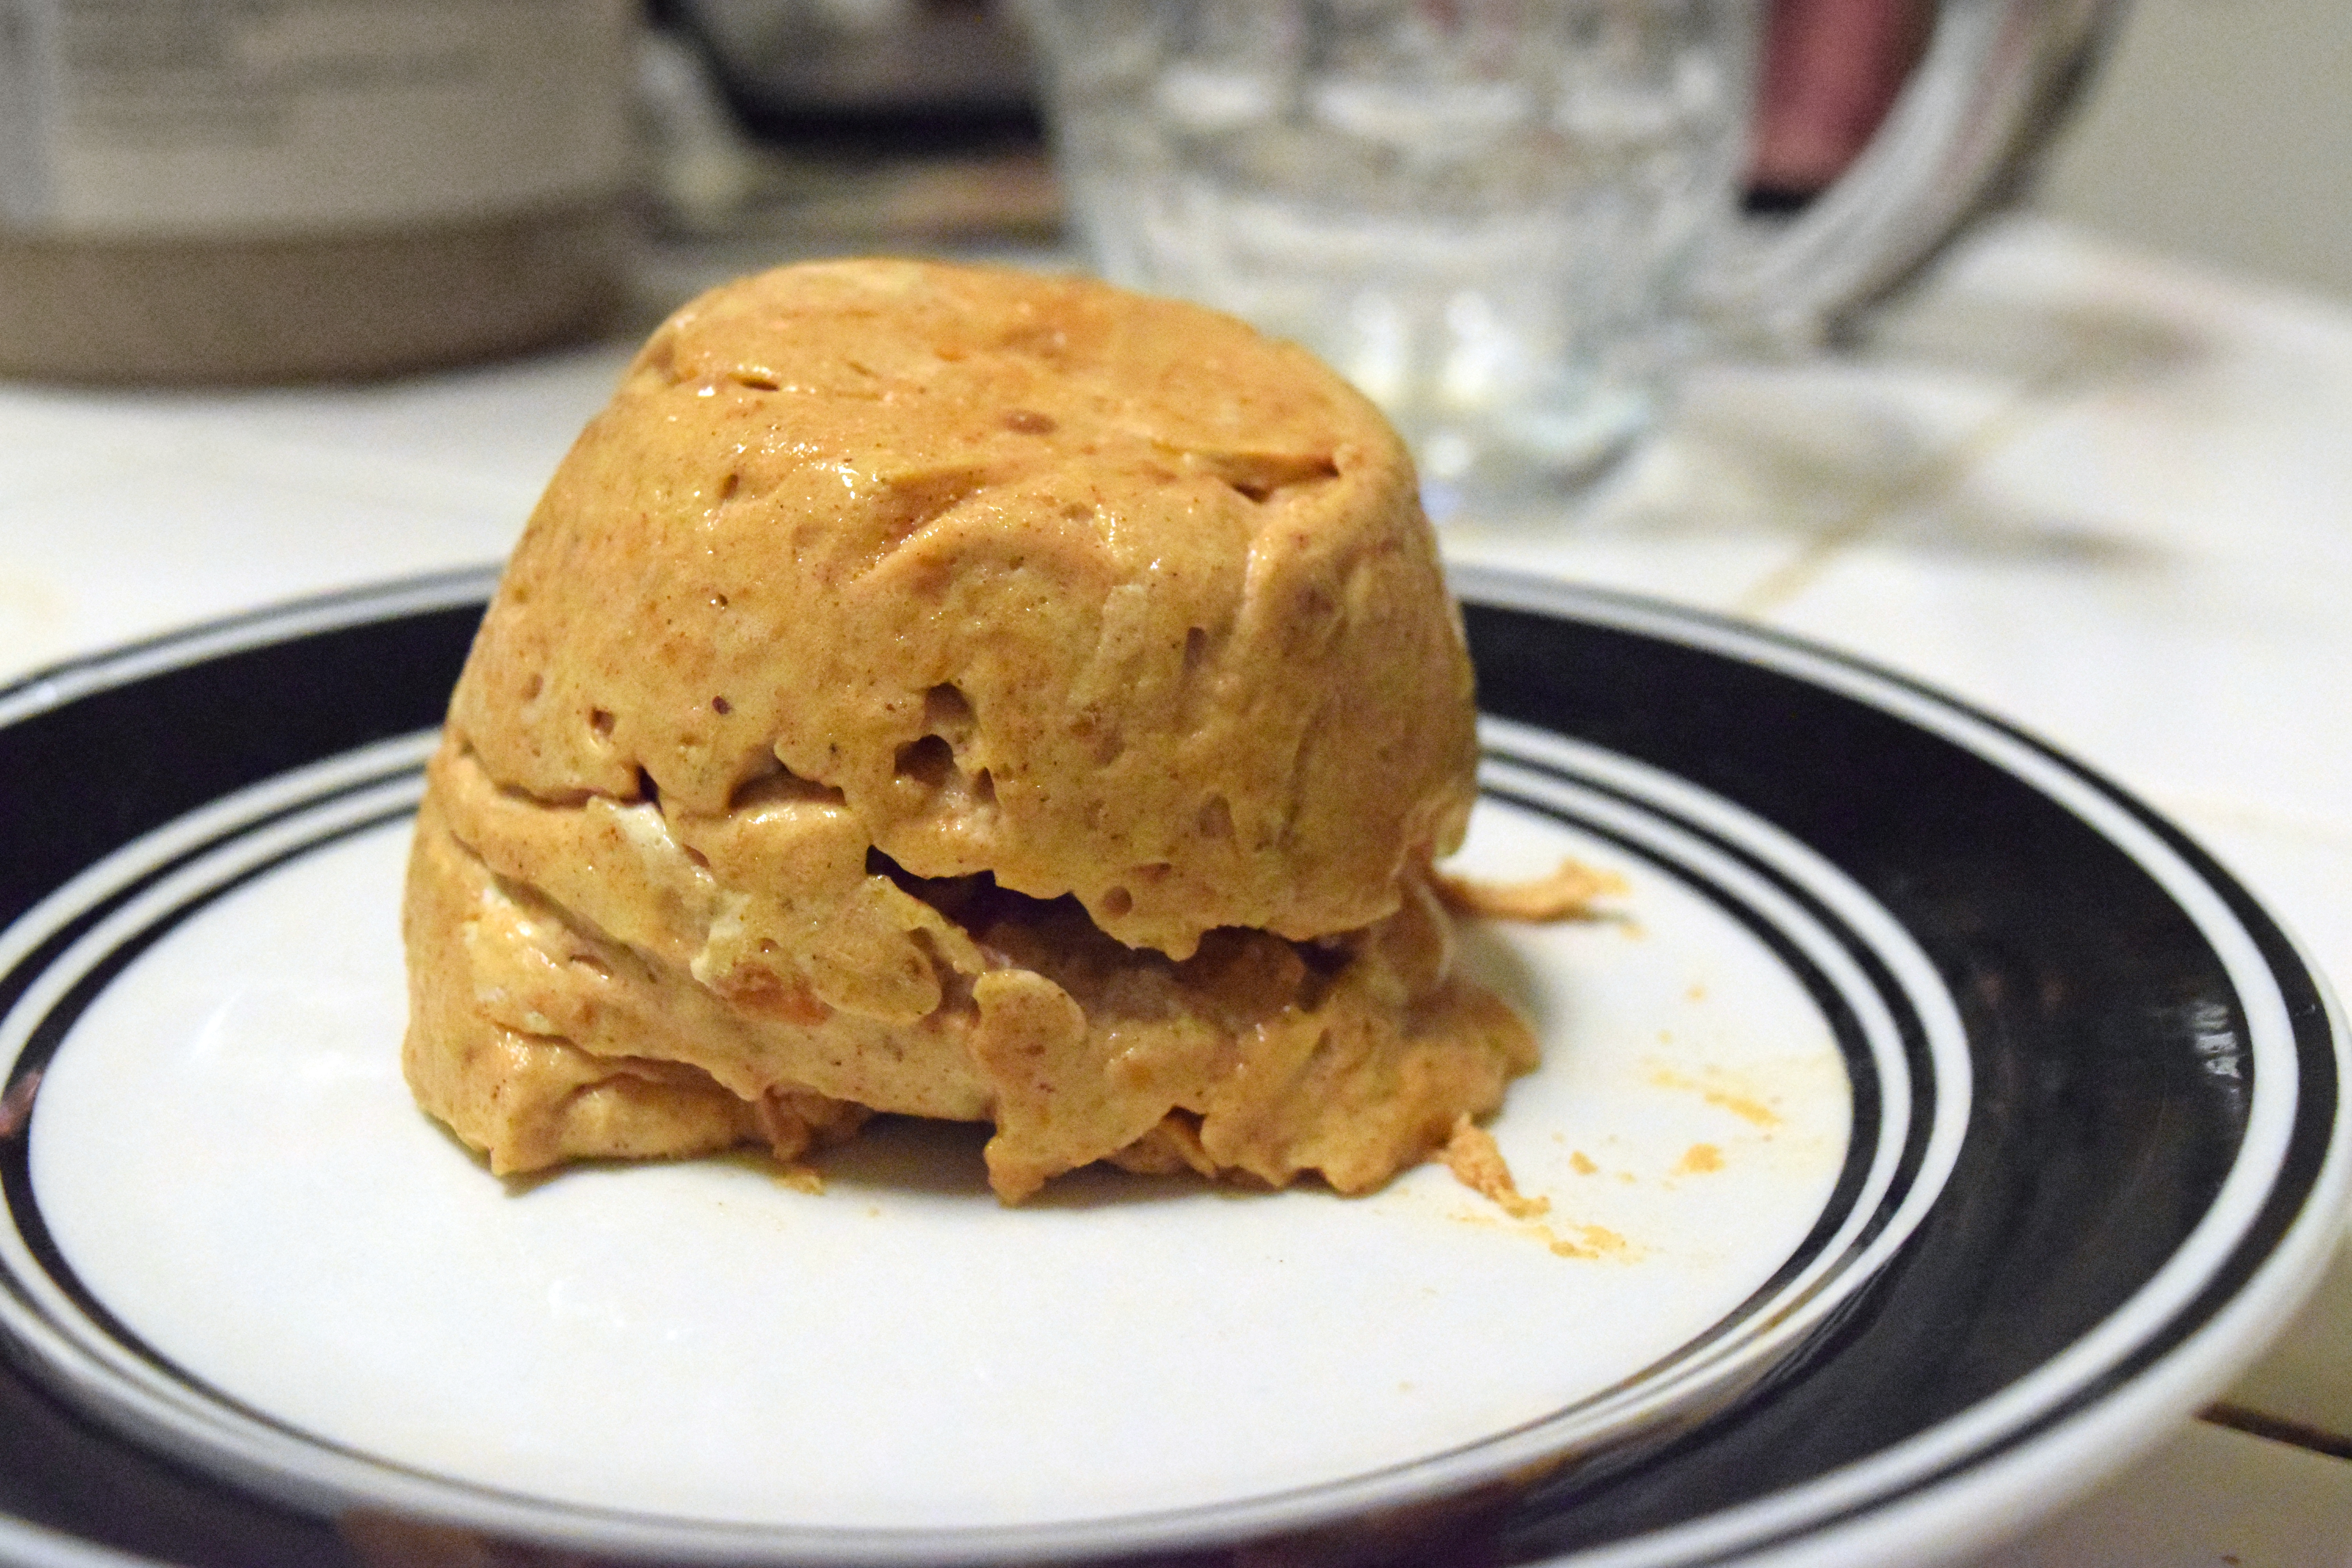
This was the softest icing I have ever put onto a cake. It felt like shaving cream under the spatula. I am pleased to say that without an annoying dinner plate rim to get in the way, we managed a pretty good icing job in just a few minutes! (Well, a pretty good icing job by pre-social media standards.)


Seriously, this is what cakes used to look like unless Mom had worked in a bakery at some point. Our Pieathlon friend Poppy Crocker has a book of home cake decorating from back then. And while I didn't attempt any ambitious decorations, the icing itself looks about the same as the cakes that made it to print.

As for the icing, it tasted a lot like divinity. (If you've never had divinity, it's basically whipped white sugar. Imagine unflavored taffy, but not hard enough to pull out your tooth fillings.) The brown sugar taste had all but disappeared, leaving nearly-blank sweetness. And it it really is as soft as shaving cream. 

I'm actually going to say that because it's so hypersweet, it's perfect for kids' birthday parties. Slather this stuff on a cake, and they'll all have their sugar fix a lot quicker. This would theoretically allow you, the parent on a budget, to get away with much smaller cake pieces.


But this icing is not good after the first day. It turns into a hardened, sticky mess. I could have repurposed the cake as a fly trap. Satiny beige frosting okay the first day if you like sugar-flavored mousse, but by day two it's just not good. So, if you want to keep this cake around the house for a few days and gradually cut slices off of it, this is not the icing for you. But to Betty Crocker's credit, the icing didn't deflate at all. Three days later, it was just as fluffy as when we first took it out of the mixer. 

And so, we joyously welcome our new cake plate into the kitchen! The next cake on it will be something less vividly colored, even if I don't think that's nearly as fun.

Friday, August 29, 2025

Wilted Lettuce: or, When the old times come back, the old recipes come with them

Are your salads getting monotonous? Do you need a "pleasant variation from the day's usual tricks?" Are you concerned about budget cuts to food safety monitoring and therefore want to ensure that any stowaway microbes don't get past your stovetop?

Wilted Lettuce
3 hard cooked eggs, sliced
1 large head lettuce
½ teaspoon salt (or more to suit taste)
1 teaspoon sugar
6 slices bacon, cut into small (half-inch ish) pieces
2 tbsp vinegar

Wash the lettuce thoroughly, drain it, and chop it into pieces slightly larger than bite size.
In a very large frying pan, cook the bacon until it is crisp and the drippings have come out of it. Reduce heat to medium-low. Add the vinegar, then add the lettuce and eggs. Cook until the lettuce is tender but still bright green. 
Serve at once. The leftovers aren't as good as when it's fresh, so make only as much as everyone will eat the first time.
We recommend serving with a crusty bread to soak up the juices.

Source: Chicago Tribune; April 17, 1936

Today, we are opening my great-grandmother's recipe binder and trying one of her newspaper clippings. I ran into problems at the first line of the ingredient list. An unfortunately-placed ink smudge made it impossible to read the amount of boiled eggs. I couldn't tell if it called for six or eight.

Hot lettuce salad, or wilted lettuce as often called, offers another pleasant variation from the day's usual tricks 
WILTED LETTUCE 
3 hard cooked eggs 
1 large head lettuce 
½ teaspoon salt 
1 teaspoon sugar 
6 slices bacon 
2 tablespoons vinegar 
Wash lettuce, drain, and chop. Add salt and sugar. Broil the bacon until crisp and brown. Cut into small pieces, add the vinegar, then the lettuce. Put over a low burner and, with a fork, keep the lettuce in motion so that it will wilt evenly. Add eggs, cut in slices, and serve it at once.

I emailed the Chicago Public Library, asking if they could track this recipe down and find a more legible copy. A reply arrived within a few hours: "Today is your lucky day, this recipe happened to be in the Chicago Tribune, whose database we can pretty easily search. The recipe is attached. It looks like 3 is the number of eggs."

Join or donate to your local Friends of the Public Library, everybody!
 

At first I wondered what kind of lettuce I should put in this. Today, we mostly default to iceberg, but how common was it in 1936? Before I let myself get caught up in period-correct salad greens, I checked the prices. Iceberg lettuce suddenly seemed perfect.

Back at the house, the lettuce had to wait until I had boiled the eggs. Since I never remember how to do that, I have to look up Delia Smith's guide every single time. I didn't think to look if she has a guide for neatly slicing them elsewhere on her site. But if you look past my inept knifework, you can see that these came out of the pot at the perfect time. Unfortunately, they also stank up the kitchen.


I have previously mentioned my theory that the weirder and wackier flavors of yesteryear made more sense when everyone smoked, whether they lit their own or inhaled a pack a week secondhand. In a similar vein, I would like to speculate that people didn't mind adding boiled eggs to everything because you couldn't smell them over the omnipresent stale smoke. Price of eggs notwithstanding, it seems like people these days don't "volumize" casseroles with chopped boiled eggs as often as we did when sofas were incomplete without an ashtray balanced on the armrest.

After getting the eggs ready, our recipe conveniently has us cover the faintly sulfurous smell with bacon. This is one of those recipes where cheap bacon (the kind that's mostly fat) might actually be the better choice. I don't think the recipe necessarily wanted to add bacon meat much as harvest the drippings for lettuce-wilting.


This salad can torture everyone in the next room of the house. First, they get the tantalizing scent of sizzling bacon. Then, all at once, they get the bitter smell of hot lettuce. I wonder if the people in a certain Chicago apartment were leery whenever they smelled bacon coming from my great-grandmother's stove. Sometimes you get bacon and waffles, other times you get wilted lettuce.

Speaking of title ingredients, we were ready to wilt our lettuce! We are told to "wash lettuce, drain, and chop." It is surprisingly hard to get all the water out of lettuce after you've washed it. I didn't want to go out and buy a salad spinner, but I definitely wanted to borrow one.


I cut the recipe to one-third, and the biggest skillet was barely up to it. Did everyone in Chicago have paella pans?

Just like fresh spinach, the lettuce shrank a lot. This may be why people don't cook lettuce very often. But on the other hand, it's a lot easier to eat your greens when you can compress them into a small bowl.


Things were going so well with this recipe until I added the egg after the lettuce was done. While I was stirring everything long enough to warm up the egg, the lettuce lost its bright green color and took on the dull gray look that says "You're not leaving this table until you finish your vegetables."

That bowl contains a third of a head of lettuce. That's, like, two or three wedge salads. Lettuce shrinks a lot on the stove.

Did you know iceberg lettuce has a flavor? Well, after shrinking it down to a seventh of its original size, its flavor is concentrated. The bitter lettuce (not overcooked, just its actual taste), salty bacon, vinegar, and boiled eggs went together better than I thought. But you have to be in the mood for pungency before you think this is "a pleasant variation from the day's usual tricks." As I said earlier, I can't help wondering if the flavor of this made more sense when life had a background of cigarettes and higher liquor sales.

Purely for the heck of it, I sent a picture of this to Marcus, longtime friend who definitely isn't traumatized from trying various recipes on the blog. He did not seem to regret being too far away to drop by and share the experience.

Me: (pictures of the recipe and a bowl of hot lettuce salad) 
Marcus: Oh god 
Me: After all we've been through I didn't think that would faze you. 
Marcus: Oh it doesn't i'm more referring to how it resembles a plate of already chewed salad 

Because I still had two-thirds of a lettuce and another boiled egg in the refrigerator. I soon made a second wilted salad. This time, I cut up the bacon before cooking it instead of after. As we learned from the cream onion pie, the bacon gets crispier and the fat renders off better. I also didn't have to pause mid-recipe for a chopping break. (As a food safety note, chop your lettuce and get it off the cutting board BEFORE cutting up the bacon. That way, you don't get raw-meat germs in the greens.)

This time, I added the boiled eggs just as everything was heating up. The lettuce stayed green this time, but I don't think it made a dramatic visual difference. There's really no way to make iceberg lettuce look pretty after you've cooked it.


This recipe is neither disgusting, nor is it a classic waiting for rediscovery. You have to be in the mood for some well-placed bitter flavors before you can like it. But if you're like me and always keep a jar of sauerkraut on hand, you might not be disappointed. Some of my friends suggested I try this with kale instead of lettuce, so I'm going to keep an eye on the clearance produce. 

But I'm not going to cross out the wilted lettuce in my reprinted copy of the book. This recipe may have regained a place in our kitchens thanks to CDC budget cuts. It might be wise to start cooking all our vegetables again-- or at least briefly heating them to get rid of any microscopic stowaways. And of course, this salad a good way to salvage any salad greens that aren't quite as fresh as they were when you bought them.

Thursday, August 14, 2025

Applesauce Meringue: Low effort, and not that bad

Ever want to make dessert without putting in the effort?

Applesauce Meringue
2 eggs, separated
2 cups applesauce
Sugar to taste
3 tbsp powdered sugar (for meringue)

Heat oven to 350°. Grease a small baking dish. (Like, a really small one. I used a round pan about 5 inches across.)
Beat the egg yolks in a medium or large mixing bowl. Mix in the applesauce, and add sugar to taste. Pour into the baking dish and bake 15 minutes.
When the baking time is almost over, beat the egg whites until frothy. Gradually add the powdered sugar, beating all the time. Then continue beating until the mixture forms stiff peaks.
After the applesauce has baked 15 minutes, remove it from the oven and carefully spread the meringue on top. Bake for another 15 minutes, then allow to cool completely.

Undated newspaper clipping, Chicago area (probably 1930s or 1940s)

Today we are revisiting my great-grandmother's cooking notebook. I get the impression that this recipe was made for those days when you feel fundamentally done with cooking but still want dessert. It also looks perfect for those who are short on both money and time (and keep in mind this was probably printed in the 1930s). 

Apple Meringue 
A simple dessert is made by stirring the well-beaten yolks of two eggs into two cupfuls sweetened apple sauce. Bake fifteen minutes. Cover with a meringue made of the stiffly beaten whites and three tablespoonfuls of powdered sugar and set in oven to brown. 

That's barely legible, isn't it? It was a little better in person, if not by very much. But if we really mess with color filters, we can make it almost easy to read.


And so, we begin by putting egg yolks into applesauce. Of course, egg yolks are a pretty standard way to thicken custards. But I almost got the impression that we're only adding them here because we already cracked the egg whites for the meringue. After all, it's hard to justify throwing out eggs in any era.


The recipe says to add two cups of "sweetened applesauce." I don't know if they meant to purchase sweetened applesauce, or if they were implying to add your own sugar without wasting any column-inches on extra words. Our applesauce was factory-sweetened but a bit bland, so I stirred in about two tablespoons of sugar to help it along.

If this recipe didn't involve making a meringue, I would have called this a Hump-Day Quickie. We had it in a baking dish only three minutes after our egg yolks landed in the mixing bowl. 


After the prescribed fifteen minutes, our apple custard hadn't set. I would have baked it longer, but I don't know if two egg yolks were up to the task of setting an entire pint of applesauce. They might only serve to make the dessert "richer" in some undefined way. So I got the meringue on top of it as best I could without mixing the two together. I didn't have an aesthetic triumph, but it's kind of silly to get hung up on presentation when the recipe was supposed to be simple.

Really, the meringue is the only part of this recipe that takes more than a minute. But hand-cranked eggbeaters had already gotten cheap by the time this recipe was printed. So even if you couldn't afford the monthly payment on an electric mixer (or if the electricity in your city was either unreliable or absent), this wasn't an hourlong ordeal with a whisk. And I can't imagine the newspaper's recipe writers having someone hand-whisk a meringue only to spread it on applesauce.


Of course, I didn't turn on the oven just for this little bowl. But that's another advantage of the recipe: if you're baking your dinner, you can easily find room on the rack for dessert. Of course, as often happens when I economize on oven heat, the tiny pan took longer to bake than everything else. I tried and halfway succeeded to convince myself that it's not too horrible a waste of heat if I simply leave the oven on for a few minutes after dinner is ready.

The meringue puffed up beautifully in the oven. At first I was absolutely delighted, then I realized that every time they rise like that, they always fall back down. But for a short half-minute, our dessert had a golden, airy dome on top.


Sure enough, the meringue deflated only a few minutes after it left the oven. Even though I made sure it made contact with the pan all the way around the side, it ripped off and shrank away. I could have gotten dismayed about this, but instead I told myself that 1: this is supposed to be "a simple dessert" (their words) and 2: there is no point in fretting over barely-modified applesauce.


After our simple dessert had cooled off, I put it in the refrigerator. I can't imagine anyone liking warm applesauce for dessert.


I almost want to say this is bad, but it's more like... exactly what you think it is. I was going to throw it out, but then I was like "Hmm... I actually kinda like it." And even though applesauce never excites me, this was really nice with lunch on a hot day. I wouldn't go out of my way to make it again, but I wouldn't mind sliding it into the oven if I was already baking something.

Sunday, August 10, 2025

Corn Tortillas: or, Sometimes good things are waiting next to the street

Hooray for free things!

Corn Tortillas
2 cups corn masa
1½ cups water

Mix the masa and water, stirring for 2 minutes. You should have a soft dough that doesn't stick to the hands. If it's dry and crumbly, mix in more water, one teaspoon at a time.
Divide the dough into balls that weigh about 1 ounce each (about the size of ping-pong balls).
Place a griddle or frying pan over medium-high heat.
Put two sheets of thick plastic inside a tortilla press. If you don't have thick plastic wrap, you can cut off the sides of a gallon-sized ziploc bag. Place a dough ball between the plastic sheets and press it thin (about 5 inches in diameter).
Lightly grease the pan, or spritz it with cooking spray. Carefully peel the tortilla off the plastic and cook it for two minutes, turning it every thirty seconds or so.
As you're cooking, re-grease the pan whenever they start to stick, usually after every 3 or 4 tortillas.

Source: Instructions on the back of Maseca corn masa


I finally own a tortilla press! My mother has her grandmother's. While she always lets us use it, it's one of the few things she will not let anyone take away from the house. I've been wanting my own for a while, but I've always felt that it is invalid to just buy a tortilla press. For reasons I can't explain, I think they are supposed to find you. 

I tried to speed up this process by asking various friends traveling to Mexico to bring one back with them (never mind that the supermarket I go to every week has them for a nearly forgettable price). But for some reason, no one wanted to do my shopping while they were taking baggage across international borders.

But a few nights ago when I was taking an evening walk, I passed a house with a folding table of stuff in the front yard with a sign that said FREE. I had no need for any of the slow cookers (they had an entire potluck's worth of them), but I found this. 

IT FINALLY HAPPENED!


Today we are making my mother's recipe for corn tortillas. By that I mean when I asked how to make them, she told me to just follow the directions on the bag. (Incidentally, this was also her answer when I asked how to make white rice.) I do like that since corn tortillas only contain corn flour and water, you don't need to worry about the dough toughening if you stir it too much. Or at least, things won't go awry unless you really overbeat it.

Now, the directions on the bag say to stir for two minutes. It turns out that when you first mix the cornmeal and water, they become a sort of slurry. But as you keep stirring, the cornmeal absorbs more of the water. After about two minutes, the former gritty sludge almost has the consistency of Play-Doh.


Now that our dough is ready, we are supposed to put sheets of heavy plastic into the press. Plastic wrap really won't work for this. Even if you can get it to stop sticking to itself, it is too flimsy. But if you (like most of us) don't keep food-grade acetate around the house, a gallon bag will work just fine after you cut off the top and sides. 
 
I actually learned that from Mom. I thought it was a shortcut she started doing to avoid having to deep-clean the press every single time. Then she told me over the phone that now that I have my own press, it's so much easier if I cut up a bag just like her grandmother did. So this is an heirloom cooking tip!


The directions tell us to roll these into one-ounce balls. I got out the scale for this, and it turns out that one ounce of dough is about the size of a ping-pong ball. So for those who don't have a kitchen scale at hand, now you know. 

The rest of this recipe is simple: place a dough ball on press, squish it down, then put it on a frying pan. I was unnerved at how perfectly round this came out. 


My great-grandmother's tortillas always came out in flawless circles. Up until now, mine always came out looking like each of the 50 states. Perhaps this is why this press found me. If I had just bought a press like a normal person, I might have ended up with amoebas instead of circles.


I should note that the tortillas are a bit tricky to get off of the plastic without ripping them. It's easier to take the whole dough-laden plastic, place it dough-side-down on your open hand, and then peel the plastic away.


I hate giving recipes that involve specialized supplies, so I really wanted to write that you don't need a tortilla press for these. I wanted to write that you can put the dough between two sheets of plastic and then press it with a heavy book or some other flat object. Or, I wanted to write that you can smash them flat with a two-handled pot, or use a rolling pin-- because even people who don't have a rolling pin can find some object that will suit the purpose. I tried every alternative I could think of, and none of them worked. But if you don't have quasi-spiritual views against buying tortilla presses, they're fairly inexpensive.

If you've only ever bought pre-packaged corn tortillas, you have no idea what you're missing. It's like tasting fresh vegetables when you've only had them canned. And if you don't have weird superstitions about how to get kitchen implements, tortilla presses are pretty easy to get. I see them on the pans-and-whisks aisle in most of the stores I go to. I won't say you owe it to yourself to learn about what you've missed, but I do think it's impossible to be happy with pre-packaged ones ever again.

Saturday, May 10, 2025

Sweet Potato Pudding

Today, we're trying one of my great-grandmother's recipe clippings! We have made a few handwritten recipes from her binder, but this is our first time making something that she pasted in from the newspaper.

Sweet Potato Pudding
1 tablespoon (or one ¼-oz envelope) powdered gelatin
½ cup water
1 large sweet potato (big enough to yield at least 1 cup when mashed)
½ cup brown sugar
2 tsp cinnamon
⅛ tsp nutmeg
½ tsp salt
1 cup heavy cream
½ cup coarsely ground hazelnuts*

Sprinkle the gelatin over the water and set aside.
While the gelatin is soaking, cook and peel the sweet potato. Then firmly pack it into a measuring cup. You want one cup of potato. (Reserve the extra potato for another use, or season to taste for a quick snack.)
In a large mixing bowl, lightly break up the hot potato with a fork. Add the gelatin and stir until it is melted. Then mix in the brown sugar, cinnamon, nutmeg, and salt. Insert an immersion blender and blenderize until completely smooth. Let stand to cool and thicken.
When the sweet potato mixture is about as thick as whipped cream, whip the cream and fold it in. Pour into gelatin molds or a large serving bowl. Refrigerate or freeze overnight.
Serve chilled or frozen, with the nuts sprinkled on top.
Store in an airtight container. This will keep in the refrigerator for at least a week, and in the freezer for about as long as any other ice cream.

*Use black walnuts if you really want to stick to the original.
In the old days, you would have needed to boil or bake the sweet potato until it was done. We recommend using a microwave instead. Simply prick the potato a few times with a fork or knife, and microwave it until it's soft when you stick a fork in it, about 6 to 8 minutes.
You can do this in a normal blender by putting the soaked gelatin in the bottom and adding the potato. You'll need to stop a few times and use a rubber spatula. When it's almost thoroughly blenderized, add the sugar (it will help the blender finish its job). Or, if you have no blender of any kind, you can do it the old-fashioned way: force the sweet potato through a sieve. Then, while the potato is still hot, mix in the gelatin.

Source: Undated newspaper clipping (Chicago area), probably 1930s or 1940s

Sweet Potato Pudding. 
Another new dessert which I am sure you would like to try is made with sweet potatoes. 
Boil enough sweet potatoes to make one cup of pulp when they are run through a strainer. To one cup of hot pulp add one tablespoon of moistened gelatin and stir it until it is mixed through the pulp. Then add one-half cup of brown sugar, two teaspoons of cinnamon, and one-eighth teaspoon of nutmeg. Whip one cup of heavy cream, and while the potato cream is still soft but not warm fold the cream evenly through the pulp. Add one-half cup of finely grated black walnuts and place in molds and chill. This dessert may be frozen, but I think the chilled cream is as delicious as the frozen.

 Whoever wrote this loved the word "pulp."

The same recipe image as above, but every occurrence of the word "pulp" is highlighted.

I really wanted this recipe to be good. For one thing, if you microwave the sweet potato, you can make this in the summer without heating the kitchen. Furthermore, it is egg-free, which is really nice as the price of eggs keeps rising. (And given the recent mass-firings of government scientists, bird flu is probably not going away.)  

The directions tell us to add "moistened gelatin" with no further explanation. I assumed this means to sprinkle it over water and let it sit, as one usually does. 


While our gelatin was moistening and our potato was microwaving, I measured out our brown sugar and spices. I had cynically assumed this recipe would be underspiced, but look at the massive mound of cinnamon on top of the sugar!

I soon discovered that one cup of sweet potato requires a bigger spud than the fist-sized one I bought. But I decided to just go with what we had. I'm sure that anyone else who clipped this recipe did the same.

My mistakes are period-correct.

At this point, we were supposed to mix the still-hot sweet potato and the moistened gelatin. The pulp smelled like steaming dog food.

It's been a long time since I got a hard whiff of hot hoof powder.

I had initially thought this would be a long, laborious recipe. But at this foul-smelling moment, I was already halfway done. And so, with strong hopes that the brown sugar and spices would obliterate the gelatin's stink, I dumped them in. I didn't realize how much cinnamon this recipe uses until the smell of it unclogged my nose. 


Because I don't hate myself, I used a potato masher instead of forcing the pulp through a sieve. I am not persnickety about presentation, so I figured that I didn't need perfectionism. But after mixing everything together, my pulp was unpleasantly lumpy. 


I got out an immersion blender and made our pulp smoother than anyone with a sieve could have done. Heck, it was velvety. Unfortunately, it was also the color of a well-splattered bathroom.


Questionable color aside, the blender also whipped the potato unexpectedly well. I wondered if I could have run it long enough to aerate the pulp and make the whipped cream unnecessary.

Before adding the cream, I paused to taste our pudding-in-progress. It wasn't bad, but the flavor lacked something. Also, the cinnamon was unexpectedly harsh. But, I thought, maybe the spices would meld and mellow in the refrigerator overnight. After all, my great-grandmother wouldn't have clipped and saved a bad recipe... right?


I may have let the pulp sit and cool off for too long. Because it had gotten so thick and heavy, I'm not sure if I carefully folded the whipped cream in, or if I did an unusually tedious job of deflating and stirring it. But even if the cream added no fluff at all, it changed our pudding from an ugly brown to a cute orange. And it made the pudding's flavor complete in a way I can't explain.


Some readers may notice that I didn't add any walnuts to the pudding. As we learned with the cranberry-celery salad, nuts turn soggy when they spend the night in gelatin. Also, walnuts are terrible. I've heard that walnuts are delicious when they're fresh off the tree, and I'm willing to keep an open mind. But no one in my area has a walnut tree, so I am restricted to the walnuts on the supermarket shelf. They always taste bitter and slightly rancid, regardless of how far in the future the expiration date is. 

I have a theory that people back then didn't mind the taste of bitter supermarket walnuts because everyone smoked. Even nonsmokers probably smoked a pack a week secondhand. Why else would people freely contaminate everything from gelatin to brownies with walnuts? In all seriousness, I think the more bizarre flavors of older recipes make more sense when pre-seasoned with nicotine.

Walnuts aside, the directions end by saying this is good both chilled and frozen. So, I put half in the refrigerator and froze the rest. We are also told to "place in molds and chill." Since I don't have any, I put a serving of pudding into a measuring cup. I wanted the complete recipe experience-- except the walnuts.

By the next day, the pudding had become astonishingly resilient. It's always strange when your dessert can bounce. When I finally got it to fall out (which involved a lot of spoon-thwacking and hot water), I saw that my gelatin molding skills are quite bad.


In order not to ruin this dessert's appearance with my own ineptitude, I put it in a cute bowl and sprinkled hazelnuts on top. Unlike walnuts, hazelnuts taste good. Also, hazelnuts are called "filberts" in some places, and walnuts don't have such a cute-sounding name (nor do they deserve one).

When you taste this, it is surprisingly hard to tell whether it has sweet potatoes or pumpkin. But I do like how using a sweet potato instead of pumpkin lets us drastically reduce the sugar (and therefore the grocery money) going into dessert.

When I made this again, I decided to heat the cream, add the spices to it, and let it infuse while it cooled. But it turns out that scalded and spiced cream refuses to whip. I don't know if heating the cream denatured something, or if the spices reacted with something in it. Either way, the cream looked like this after ten minutes with an electric mixer. It didn't turn to butter, it didn't whip, it just wasted my time.

There's a science lesson here, but I don't know what it is.

I felt terrible about the waste, but at least everyone reading this will know not to repeat my mistakes. So hopefully my cream didn't go down the drain in vain.

But I don't want to end a good recipe with a mistake. So I'll by close by saying this is really easy to make, and very sating after a light supper. Since you have to refrigerate it overnight anyway, it's perfect for making ahead. And just as the directions say, it freezes really well. If you refrigerate it, it's like a mousse. If you freeze it, it's like ice cream.