Showing posts with label bread. Show all posts

Sunday, August 10, 2025

Corn Tortillas: or, Sometimes good things are waiting next to the street

Hooray for free things!

Corn Tortillas
2 cups corn masa
1½ cups water

Mix the masa and water, stirring for 2 minutes. You should have a soft dough that doesn't stick to the hands. If it's dry and crumbly, mix in more water, one teaspoon at a time.
Divide the dough into balls that weigh about 1 ounce each (about the size of ping-pong balls).
Place a griddle or frying pan over medium-high heat.
Put two sheets of thick plastic inside a tortilla press. If you don't have thick plastic wrap, you can cut off the sides of a gallon-sized ziploc bag. Place a dough ball between the plastic sheets and press it thin (about 5 inches in diameter).
Lightly grease the pan, or spritz it with cooking spray. Carefully peel the tortilla off the plastic and cook it for two minutes, turning it every thirty seconds or so.
As you're cooking, re-grease the pan whenever they start to stick, usually after every 3 or 4 tortillas.

Source: Instructions on the back of Maseca corn masa


I finally own a tortilla press! My mother has her grandmother's. While she always lets us use it, it's one of the few things she will not let anyone take away from the house. I've been wanting my own for a while, but I've always felt that it is invalid to just buy a tortilla press. For reasons I can't explain, I think they are supposed to find you. 

I tried to speed up this process by asking various friends traveling to Mexico to bring one back with them (never mind that the supermarket I go to every week has them for a nearly forgettable price). But for some reason, no one wanted to do my shopping while they were taking baggage across international borders.

But a few nights ago when I was taking an evening walk, I passed a house with a folding table of stuff in the front yard with a sign that said FREE. I had no need for any of the slow cookers (they had an entire potluck's worth of them), but I found this. 

IT FINALLY HAPPENED!


Today we are making my mother's recipe for corn tortillas. By that I mean when I asked how to make them, she told me to just follow the directions on the bag. (Incidentally, this was also her answer when I asked how to make white rice.) I do like that since corn tortillas only contain corn flour and water, you don't need to worry about the dough toughening if you stir it too much. Or at least, things won't go awry unless you really overbeat it.

Now, the directions on the bag say to stir for two minutes. It turns out that when you first mix the cornmeal and water, they become a sort of slurry. But as you keep stirring, the cornmeal absorbs more of the water. After about two minutes, the former gritty sludge almost has the consistency of Play-Doh.


Now that our dough is ready, we are supposed to put sheets of heavy plastic into the press. Plastic wrap really won't work for this. Even if you can get it to stop sticking to itself, it is too flimsy. But if you (like most of us) don't keep food-grade acetate around the house, a gallon bag will work just fine after you cut off the top and sides. 
 
I actually learned that from Mom. I thought it was a shortcut she started doing to avoid having to deep-clean the press every single time. Then she told me over the phone that now that I have my own press, it's so much easier if I cut up a bag just like her grandmother did. So this is an heirloom cooking tip!


The directions tell us to roll these into one-ounce balls. I got out the scale for this, and it turns out that one ounce of dough is about the size of a ping-pong ball. So for those who don't have a kitchen scale at hand, now you know. 

The rest of this recipe is simple: place a dough ball on press, squish it down, then put it on a frying pan. I was unnerved at how perfectly round this came out. 


My great-grandmother's tortillas always came out in flawless circles. Up until now, mine always came out looking like each of the 50 states. Perhaps this is why this press found me. If I had just bought a press like a normal person, I might have ended up with amoebas instead of circles.


I should note that the tortillas are a bit tricky to get off of the plastic without ripping them. It's easier to take the whole dough-laden plastic, place it dough-side-down on your open hand, and then peel the plastic away.


I hate giving recipes that involve specialized supplies, so I really wanted to write that you don't need a tortilla press for these. I wanted to write that you can put the dough between two sheets of plastic and then press it with a heavy book or some other flat object. Or, I wanted to write that you can smash them flat with a two-handled pot, or use a rolling pin-- because even people who don't have a rolling pin can find some object that will suit the purpose. I tried every alternative I could think of, and none of them worked. But if you don't have quasi-spiritual views against buying tortilla presses, they're fairly inexpensive.

If you've only ever bought pre-packaged corn tortillas, you have no idea what you're missing. It's like tasting fresh vegetables when you've only had them canned. And if you don't have weird superstitions about how to get kitchen implements, tortilla presses are pretty easy to get. I see them on the pans-and-whisks aisle in most of the stores I go to. I won't say you owe it to yourself to learn about what you've missed, but I do think it's impossible to be happy with pre-packaged ones ever again.

Saturday, May 18, 2024

Second-Stab Saturday: Cheddar Cheese Puff Bread!

The weather may be getting warmer as spring goes on, but we recently had a random chilly night. Although it wasn't quite cold enough to turn on the heater, we were wearing jackets in the house after sunset. It was the perfect time to revisit a recipe that involves an unspeakably hot oven. (Indeed, it may be our last chance of the year.) And so, we decided to make cheddar gougères! 

 Before proceeding, let's reiterate the recipe:

French Yorkshire Pudding or La Gougère Bourguignonne
4⅜ fluid ounces milk (½ cup plus 2¼ tsp)
1 oz butter (2 tbsp)
2 eggs
¾ teaspoon salt,
2½ oz flour (½ cup plus 2 tbsp)
2 eggs
1½ oz diced cheese, divided into 1 and ½ oz
½ oz grated cheese

Before beginning, crack one of the eggs into a small bowl. Then beat it, and set aside a small spoonful to brush onto the top.
Select a small saucepan that can handle using an electric mixer in it. (You can beat this by hand with a whisk, but if you use a mixer you'll be glad.)
Put milk, butter and salt in the saucepan. Heat slowly until butter melts and the milk boils. Toss in flour all at once. Allow to boil for a few seconds until the milk begins to bubble over the flour.
Turn off heat, insert an electric handmixer, and beat on high speed until smooth. Add the eggs one at a time, beating each time until mixture is smooth. Stir in 1 oz diced cheese. Spread mixture into buttered shallow cooking dish (mine was about 5" x 7"). Brush with the reserved spoonful of beaten egg, then sprinkle on remaining diced and grated cheese.
Set aside until it gets completely cold (you can refrigerate it to speed this up).
When ready to bake, heat oven to gas mark 8, 450°F, or 230°C. Bake for 20-25 minutes, or until the top is a deep golden brown.
Allow to cool for a few minutes, and serve warm.
Leftovers can be placed on an uncovered pan and reheated at 350°F (180°C, or gas mark 4).

Note: You can assemble this ahead of time and put it in the refrigerator until ready to bake. If wrapped airtight, it should keep for at least a day before baking. There's no need to bring it back to room temperature. Just take it directly from the refrigerator to the oven.
Note 2: Gruyere or Emmenthal cheese is the traditional choice. If you choose something else, be sure to use a type of cheese that melts well.

Source: Fanny Cradock via Keep Calm and Fanny On

When last we made Fanny Cradock's gougère, we learned that "gougère" is a fancy word for cheesy bread. We speculated that although "the classic preparation" (as the purest of purists say) uses gruyere or emmenthal cheese, this would be absolutely delicious with cheddar cheese. 

The name "gougère" may sound French and fancy, but-- and I say this in the most loving way possible-- it tastes like it should come in a cardboard box from the nearest cheap pizza place where the owner often works the cash register.


I thought cupcake-sized cheese poufs would be as cute as they are delicious. And look at that beautiful orange-golden color on top!


Despite my excessive use of cooking spray, our cheddar puffs stuck to the pan. Maybe I should have brushed the pan with melted shortening instead. I had to get out a knife and cut them free. Unfortunately, these things are as fragile as they are airy. They really don't stand up to being manhandled as you try to gouge them out of a pan. Despite my best efforts, they all came out of the pan looking a bit stomped on.


This was my punishment for contravening Fanny Cradock's directions. She put her gougère in one big pan, and it didn't stick. I used a different pan than Fanny Cradock did, and paid for my disobedience with welded-on cheesy bread.

I think I know why the cheesy poufs stuck to the pan. It seems the tops of these rose so fast that the egg wash hadn't set. Instead, the egg dripped down the rising cupcake domes. It then slid between the dough and the pan, and welded the two together. So if you're going to do individual gougères, we recommend omitting the egg wash. Otherwise, you'll have to soak your cupcake pan overnight because it looks like this:


Moving back to the food, none of the cheese poufs came out of the pan intact. This one came the closest.

De-panning problems aside, cheddar cheese gougères are absolutely delicious. If you like the cheese breadsticks from the nearest not-at-all-Italian pizza place, you will love these. We will be revisiting this again when the weather gets cold (or when I feel the house's air conditioning has had it too easy), this time with provolone, and a lot of garlic. But seriously, if you don't mind a really hot oven, you owe it to yourself to try the cheddar poufs.

Thursday, January 18, 2024

La Gougère: or, The high class cheese pouf!

I've been holding onto this recipe and waiting for winter.

French Yorkshire Pudding or La Gougère Bourguignonne
4⅜ fluid ounces milk (½ cup plus 2¼ tsp)
1 oz butter (2 tbsp)
2 eggs
¾ teaspoon salt,
2½ oz flour (½ cup plus 2 tbsp)
2 eggs
1½ oz diced Gruyere or Emmenthal, divided into 1 and ½ oz
½ oz grated Gruyere or Emmenthal

Before beginning, crack one of the eggs into a small bowl. Then beat it, and set aside a small spoonful to brush onto the top.
Select a small saucepan that can handle using an electric mixer in it. (You can beat this by hand with a whisk, but if you use a mixer you'll be glad.)
Put milk, butter and salt in the saucepan. Heat slowly until butter melts and the milk boils. Toss in flour all at once. Allow to boil for a few seconds until the milk begins to bubble over the flour.
Turn off heat, insert an electric handmixer, and beat on high speed until smooth. Add the eggs one at a time, beating each time until mixture is smooth. Stir in 1 oz diced cheese. Spread mixture into buttered shallow cooking dish (mine was about 5" x 7"). Brush with the reserved spoonful of beaten egg, then sprinkle on remaining diced and grated cheese.
Set aside until it gets completely cold (you can refrigerate it to speed this up).
When ready to bake, heat oven to gas mark 8, 450°F, or 230°C. Bake for 20-25 minutes, or until the top is a deep golden brown.
Allow to cool for a few minutes, and serve warm.
Leftovers can be placed on an uncovered pan and reheated at 350°F (180°C, or gas mark 4).

Note: You can assemble this ahead of time and put it in the refrigerator until ready to bake. If wrapped airtight, it should keep for at least a day before baking. There's no need to bring it back to room temperature. Just take it directly from the refrigerator to the oven.

Source: Fanny Cradock via Keep Calm and Fanny On

When not wrapped in blankets and looking like an ambulatory fabric bale in the house, we at A Book of Cookrye have been recreationally baking. When it was merely freezing, we lit the stove burner and made pizzelles. When the daytime temperature dipped to 12 degrees (that's -11° for our Celsius friends), it was the perfect time to bake in a ridiculously hot oven.

It turns out that this recipe is easy to shop for. There aren't a lot of ingredients, and most of them are cheese.

I first saw this recipe on a TV show about the history of TV cooking. One episode focused on Fanny Cradock and Graham Kerr (aka The Galloping Gourmet). I skipped through all the non-Fanny parts. 

Fanny Cradock got very mixed reviews when they asked other chefs to talk about her. One person said that her cooking style was outdated although "in terms of cooking she was on the money." He gave this recipe a special mention and said he still makes it. This was immediately followed by a demonstration. 


For some reason, they didn't give any ingredient amounts or oven temperatures, but I found the directions on the utterly delightful Keep Calm and Fanny On. At first I didn't read the instructions very closely and therefore didn't know what I was getting into. It turns out that we're basically making choux paste with cheese. I was not daunted by choux paste. If you watch Fanny Cradock make it, choux paste is so easy you wonder why people reserve it for fancy foods.

As aforesaid, I didn't closely examine the recipe when I first decided to make it. It turns out that whatever a gougère is, we're not making very much of it. The beginning of our recipe barely covered the bottom of the smallest pot in the kitchen.


Although choux paste is easy to make, you want to have everything measured and ready before you start. With some things, it's no bother to pause every so often and measure out the next ingredient. But with choux paste, you need everything ready to dump into the pot when its time comes. Perhaps I was a bit excessive to pre-crack my eggs into individual bowls, but that's because I always end up fishing out eggshell fragments. (Also, sometimes I am a bit too excited about having a dishwasher to put all those tiny bowls into.)

Fanny Cradock's original instructions were to toss in the flour all at once and "beat violently." I could have gotten out a whisk, but I was taking full advantage of the power grid's miraculous avoidance of another Texas-sized failure. Even though the trees were crackling with frost and the power could go out at any minute, I let our electric handmixer beat the flour violently for me. 


This could be the mixer that broke Texas.

In short order, we were ready to add the first egg. As soon as our mixer resumed its assault on the Texas power grid, the choux paste entered what Fanny Cradock gracelessly calls "the globule stage."


If you've never made choux paste, I can easily imagine how you might think you failed when it looks like this. But if you keep beating it really hard (or grinding away with the electric mixer), eventually the globules give way to a smooth paste.


Then you add the second egg and it goes back to globules again. But after a long and stubborn beating (or about thirty seconds with an electric mixer), you have what almost looks like somewhat elastic mashed potatoes. Our choux paste was ready to receive the cheese.


Because I didn't know what pan size we would need, I waited until we had our choux paste before getting one out. It turned out that the smallest pan in the kitchen was just a smidge too big. But after lightly spritzing cooking spray onto the top of our cheesy choux, we gently persuaded it to reach the edges of the pan. It later occurred to me that this would probably be really good baked in a (well-greased!) cupcake pan. (Because the oven is hot enough to ignite paper, I would either use foil cupcake liners or none at all.)


In less-than-freezing circumstances, I would have felt singularly stupid to run the oven to 450° (230° for our Celsius friends) for something so small. However, I did not feel compelled to halt production of our cheese pouf as the weather got colder by the minute.

I had been debating what to do about the egg wash that we are directed to put on top. I didn't want to crack open another egg for this and waste most of it (or put the rest of it back in the refrigerator and try not to forget to use it later). But my extravagant use of tiny bowls solved my egg-use problem. Since I did an accidentally terrible job of cracking one of them and broke the yolk, I simply did a deliberately bad job of pouring the egg into our batter. The remaining egg residue was exactly enough for brushing purposes.


As a side note, between our recent pizzelle phase and the increased application of various egg washes, the single brush in the kitchen drawer has been used a lot more in the last month than its entire previous year of existence. It's already falling apart. I sometimes have to remove bristles from food before baking, and a few have stayed hidden long enough to get cooked. If I'm feeling extravagant, I may get one of those silicone brushes that you can can drop into the dishwasher.

Molting brushes aside, our cheese pouf was ready to bake in a very short time. The instructions don't mention cooling our still-warm choux paste before baking, but I watched the the Fanny Cradock episode about petits fours in which she went into a long rant about how it's absolutely essential to get your choux paste completely cold before you cook it. She says it's "the most important point, the really VITAL point" in making choux paste. 


I can also say from experience that if you don't let choux paste get all the way to room temperature (if not colder), it doesn't cook right but instead stays gooey in the middle no matter what you do. I'm going to assume that when Fanny Cradock gave the recipe, she had already introduced us to choux paste in an earlier episode. Therefore, anyone following Fanny Cradock's program (you were following the program and not picking recipes willy-nilly, right?) would know that the choux paste should cool before baking.

I should have waited to heat up the oven until the choux paste had gone completely cold. Even after putting it in the coldest part of the refrigerator, it needed 10 minutes before the last of the warmth had gone out. I felt kind of bad about running an empty oven at 450° for so long, but given the cold I didn't turn it off.

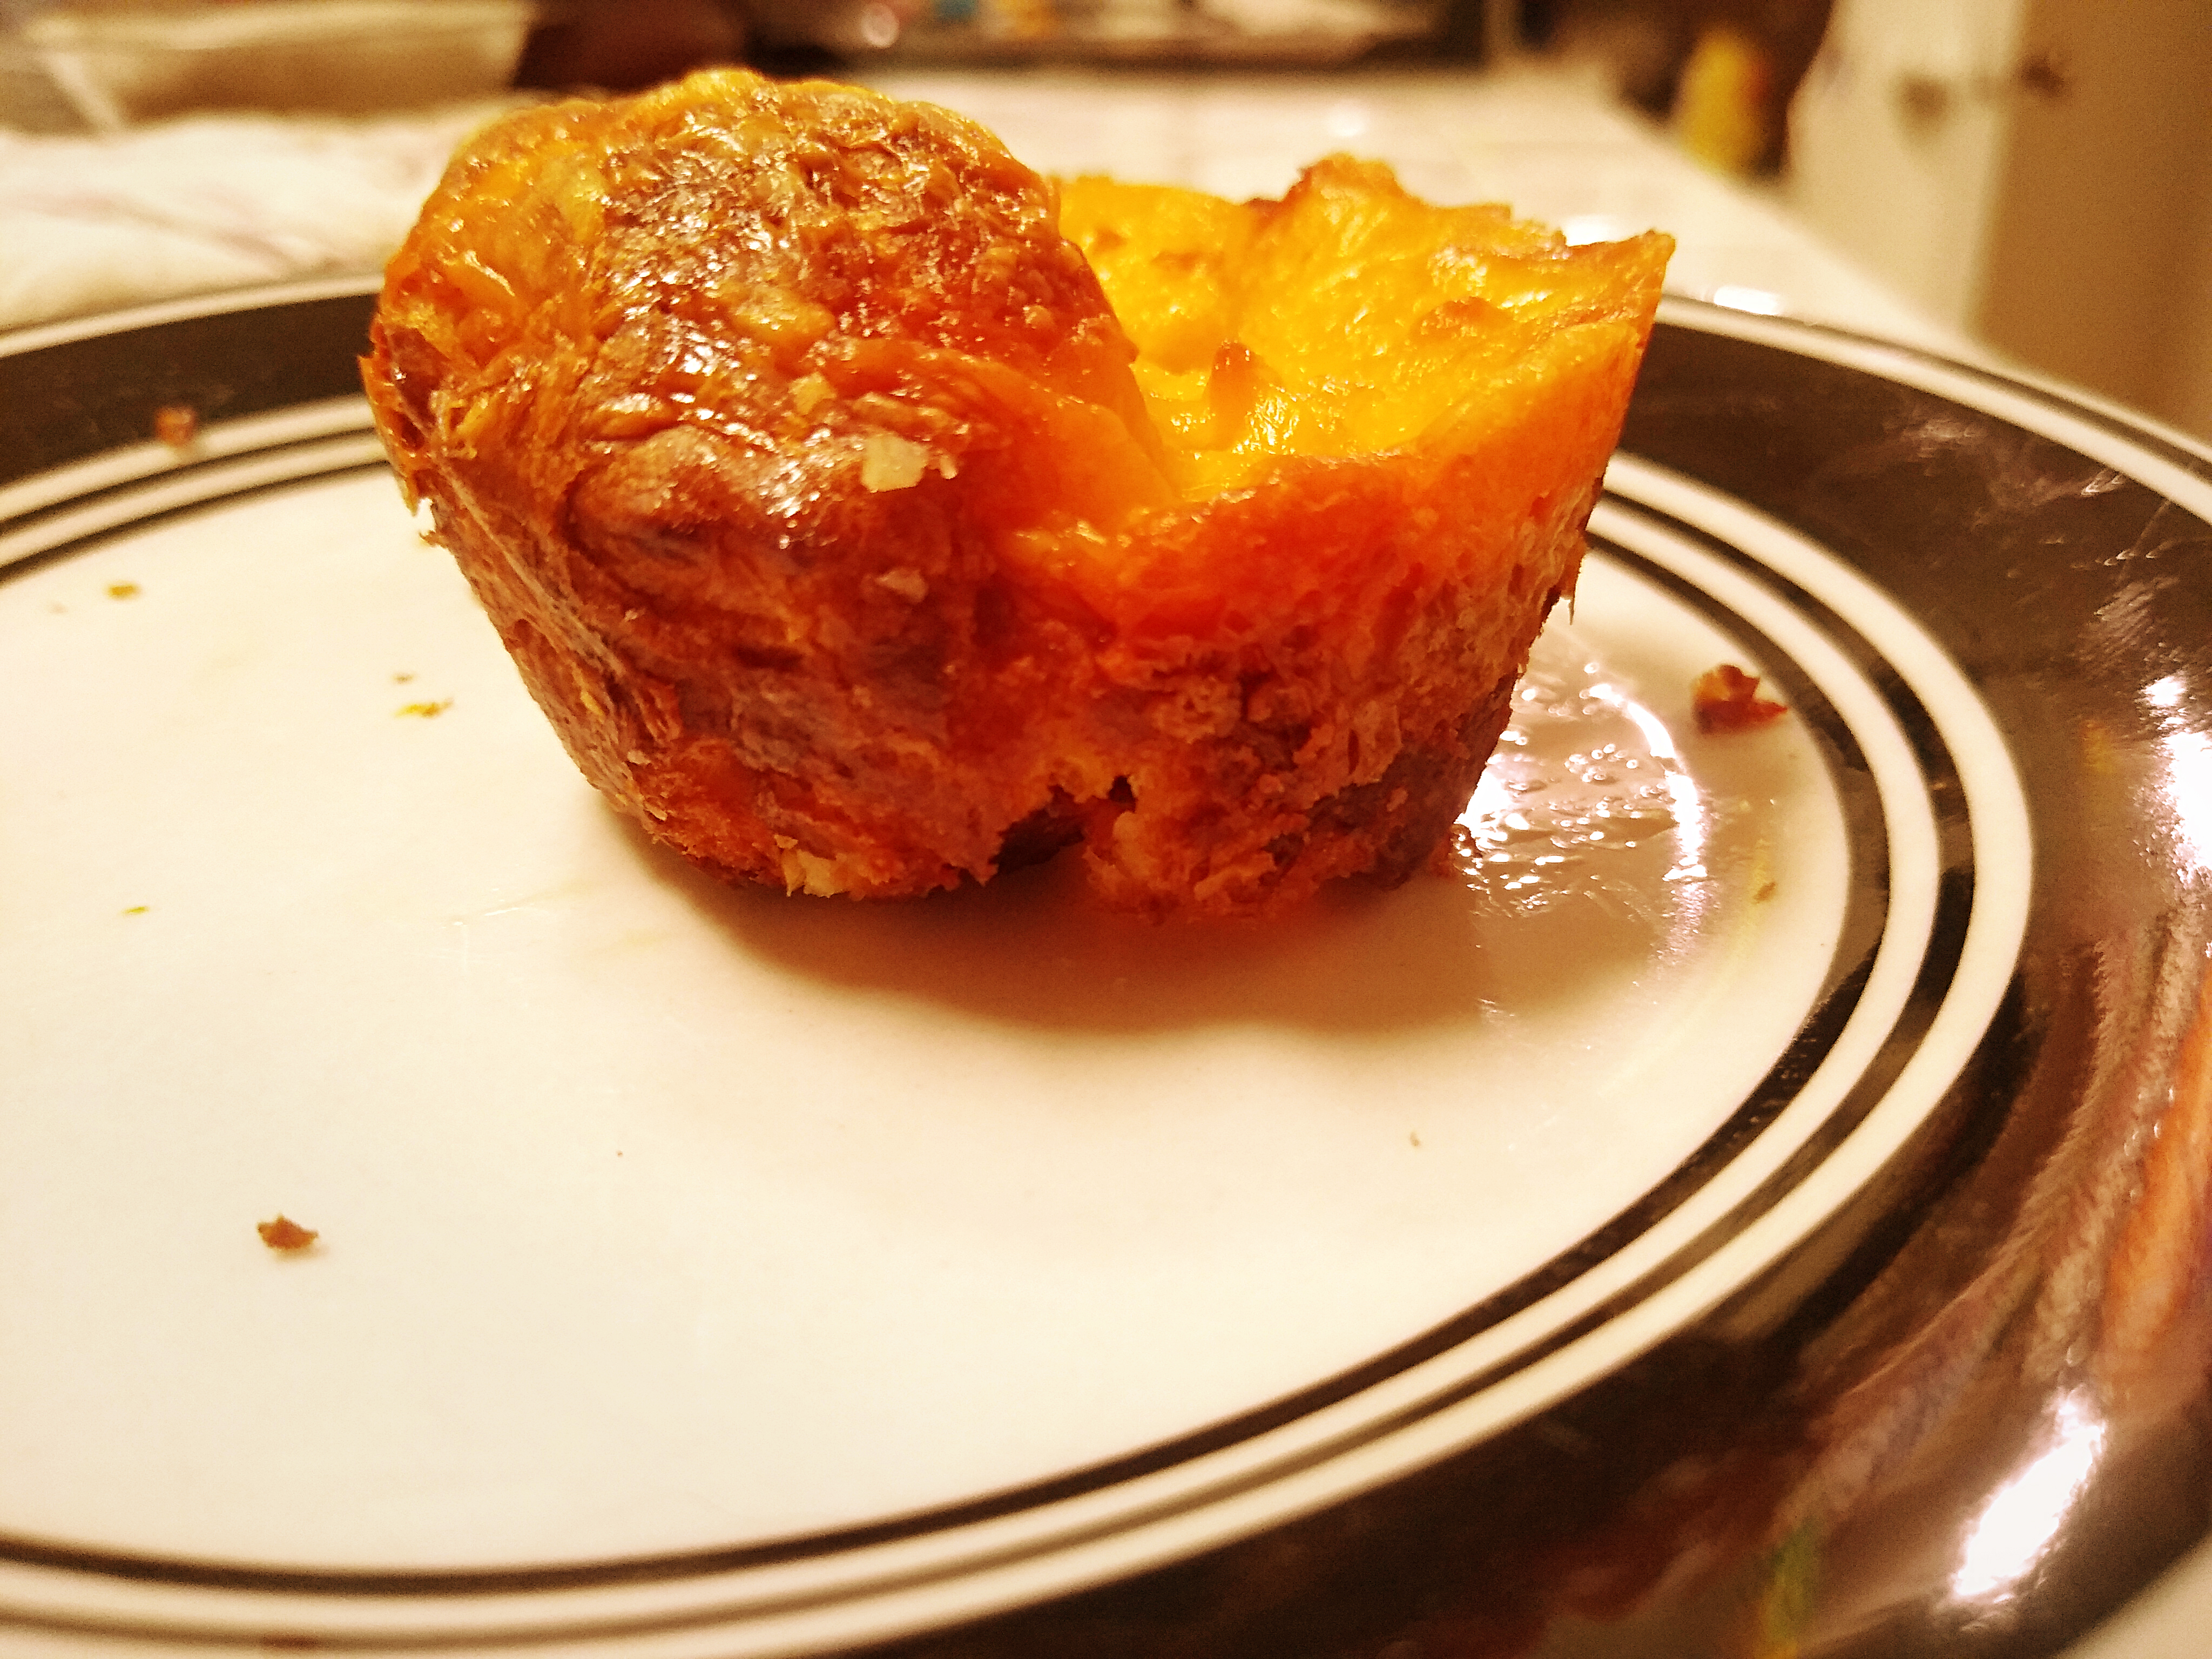
Eventually, we put our cheesy choux into the oven, wondering if it would rise at all. It looked so puny in the pan. But before it was halfway done baking, it almost looked like I'd crammed a tiny chicken into a small dish.


I wasn't prepared for our cheesy pouf to look so good. You'd think I spent hours on it instead of a minute or two with an electric mixer. That beautiful deep golden crust, the gooey puddles of cheese on top, the almost unnatural height to which it rose... I couldn't believe I made this myself.


I know that the underside of bread is rarely worth noting, but look at that beautiful golden dough interspersed with shiny pieces of toasted-brown cheese. It's like a mosaic of deliciousness.

Our entire gougère had risen to an impressive height despite the nearly cracker-thin state of the dough before baking. I really wanted to see what happened under that massive off-center mountain that rose out of the pan. It turns out, the entire thing lifted off from the bottom of the pan and made a bread-tent.


We tasted this and.... it's cheesy bread. It's the best cheesy bread I've ever had. Don't be distracted by the fancy-sounding French name, it's cheesy bread and it's also really easy to make. With that said, I want to branch out with future cheese selections. Some quick internet searching tells me that gruyère is the customary cheese (or as food snobs say, "the classic preparation"), but I want to try this with provolone or really sharp Cheddar.


After my cheese stupor wore off, I had a grim suspicion that as amazing as this was right out of the oven, it turns into a gummy sad mess as soon as it gets cold. But some poking around on the internet said that you can just put it back into the oven and reheat it. I was suspicious of that. Most of the time, when you reheat bread in the oven, it gets dried out and hardened- and no one wants that unless they're making toast. 

But emboldened by the freezing heat and telling myself that I wasn't just making up excuses to stand in front of a hot oven, I unceremoniously threw the last leftover piece of cheese pouf into the oven the next night. Our fancy French bread looked tragically undignified sitting on the baking stone that occasionally makes pita bread but mostly gets used for frozen pizzas.


To my surprise, the cheese pouf reheated really well. I won't say that it was exactly the same as when it was fresh, but it was respectably close. It didn't dry out like I feared (though it was a bit crunchier than the first time). Also, I have to note that since you reheat this at 350° (or 180°C), you can easily put something else in the oven alongside the leftover cheesy bread.

Since you need to make this early enough for the dough to completely (and I do mean completely) cool off before baking, a cheesy choux pouf is a really good choice if you have friends coming over. You can get it ready to bake at your convenience, completely clean away the mess at a leisurely pace, and let the cheesy delight wait in the refrigerator. Instead of cooking when your friends are here, you can simply put pop this into the oven and make sure you can hear the timer from wherever you are. Or, you can make this for yourself and whoever is lucky enough to wander into the kitchen when the cheese smell drifts to them.


Tuesday, September 19, 2023

Rosemary Rolls: or, Presentation doesn't matter if people eat them in a few short minutes

Some recipes have more potential than their own writers would credit.

Rosemary Rolls
1 c milk
2 tbsp fresh rosemary, finely chopped
½ scant tsp salt
1½ tsp sugar
1½ tsp lard (or shortening)
1½ tsp butter
1 egg, well beaten
¼ cake compressed yeast*
½ c tepid water
About 3¼ cup flour, divided into 2½ cup and ¾ cup

       Topping:
2 tbsp fresh rosemary, finely chopped
¼ cup melted butter
Salt to taste

Before making the dough, mix the topping ingredients. Then, let the topping sit out all day to infuse.

Add rosemary to the milk, then scald it (this draws out the rosemary's flavor better than simply mixing it in). Then stir in the salt, sugar, lard, and butter. When all is melted and dissolved, pour into a large bowl and set aside and cool until lukewarm. Dissolve the yeast in the tepid water, then beat it in along with the egg. Add enough flour to form a stiff batter (about 2½ cups), mix well. Then add enough flour to make a dough that is only just firm enough to knead, about ¾ cup.
Cover the top of the bowl with a wet cloth and let rise overnight, or until it is bubbly and has at least doubled in height.
In the morning, knead the dough well, lay it onto a well-floured surface, and sprinkle more flour on top so it can't stick to anything. Pat it out to somewhere between ½ and 1 inch thick (this dough is so soft that you really don't need a rolling pin). Then cut it into squares about 1½-2 inches on all sides- you don't need to be precise about this unless you want exactly uniform buns. Then roll each of these into a ball, pressing firmly with your hands as you roll them.
Let rise until doubled in size.
When ready to bake, heat oven to 350°.
Melt the topping if it has re-solidified and brush it over the rolls. Use all of the topping. If it seems to make puddles on the dough, they will become deliciously concentrated rosemary flavor after they're baked.
Bake for 35 minutes. These go stale quickly, so wrap any extras tightly. Or, cut them small and make croutons.

*or ¼ envelope dry yeast, or ½ tsp dry yeast.

Adapted from "Efficient Housekeeping" By Laura A. Kirkman, Fort Worth (Texas) Star-Telegram morning edition p. 10, November 24, 1921

We have made Laura Kirkman's cinnamon buns many times since we first encountered the recipe, and every time people have absolutely loved them. I remain more than a bit surprised that non-dessert cinnamon rolls would be so popular. But oftentimes, people are more broad-minded than we expect, especially when bread is involved.

When it came to Laura Kirkman's cinnamon buns, I couldn't help thinking how the bread itself was quite flavorful and delicious- even without the cinnamon on top and the raisins within. So, I wondered what else might be good with these buns. This brings us to our bounty of fresh rosemary.

We have no working printer, so if I want a recipe typed I have to do it myself.

I was going to write about how rosemary is such an easy plant to grow no matter how relentless is the summer. I was going to cheerfully say that if you put it outside, it practically cares for itself and thrives on getting sun-roasted. However, our rosemary struggled in the fiery summer heat, drooping despite our valiant efforts with a garden hose. Then winter came (or at least, the first round of winter) and finished off the plant. I looked up how to grow rosemary online, hoping the plant was more deciduous than I remembered. But Wikipedia dashed my hopes of plant dormancy by stating that rosemary "is an aromatic evergreen shrub." I then tried to convince myself that it would come back from the roots, but in the spring nothing came up but weeds.

However, my sister-in-law had much better luck with hers, and cut off some branches of it for me.


I first thought I would let the leaves remain whole, and that they would artistically intersperse the dough. However, it looked less like artisan craftsmanship and more like I threw a handful of grass clippings into the food. But that was an easy problem to solve. The blender made short work of long leaves.


This recipe is always easier than I think it's going to be. In nearly no time at all, our dough was ready to rise. Laura Kirkman tells us to leave the dough out all night (or in our case, all day). A lot of modern bakers use a similar technique of adding only the tiniest pinch of yeast to bread and letting it slowly rise all day. This gives the yeast more time to make all those delicious flavor compounds that make yeast bread so good. 

But almost every recipe I've seen directs you to let the lightly-yeasted dough sit for a few hours and then add a whole packet of yeast later on. In other words, you make a delicious-smelling spongy substance, and after it's bubbling you just pretend you're making bread the normal way. Laura Kirkman doesn't have time for that business, and she decided that her readers didn't have time for that either. The bread may be an all-day affair, but we readers of "Efficient Housekeeping" can just drop a wet rag over the bowl and spend the entire long breadmaking time doing literally anything else.


I decided to make the topping as soon as I had covered the dough for its day of leavening. That way, the butter could infuse with herbal oils the entire time the bread was sitting out. I resisted the temptation to complicate things with parmesan, garlic, or paprika. I wanted nothing to get in the way of the rosemary. There's no need to complicate beauty. Unfortunately, our rosemary butter looked like were about to make brownies with Satan's salad greens.


Every time people ask me if I can make special brownies (and that happens a lot), I tell them I will make the brownies if they supply the special. (So far, no one has.) But now I think I should recommend special rosemary rolls instead of special brownies. Not only are rosemary rolls less cliched, but they already look right for it. 

The butter with a damp heap of ground rosemary looked so much like the beginnings of special brownies that I considered putting the rosemary and the butter in a hot frying pan. I am informed that a short time on a hot stove really draws out the, um, herbal flavor. But even before the butter had cooled enough to re-solidify, the rosemary had already dyed it a refreshing jade green. I promise we're not cooking with the groovy greens. It just looks like it.


After sitting out all day while the dough rose, the butter was (depending on your perspective) either well-infused, or a suspicious shade of green. Every now and then, I picked up as I passed by so I could get a whiff of lovely rosemary. The butter had plenty of time to infuse since the dough was extremely slow to rise. I began to fear I had killed the yeast by putting it through a blender. But eventually, the dough got over whatever problem was bothering it and rose to life.


I meant to serve these with dinner. We were eating thrilling leftovers that night, and it's nice to have something fresh alongside the fruits of the microwave. However, since the bread dough took so long to rise, we ended up having middle-of-the-night bread instead. And there is nothing wrong with that.

Here you can see my big mistake: I quartered the recipe. This would prove regrettable as soon as the rolls were out of the oven and before they had a chance to cool off.


Our rosemary rolls came out of the oven looking just as infused with illicit herbs as they did before they went in. I might add paprika to the topping next time just to make these look less like the product of some dispensary, but this time I didn't want to impede the flavor of rosemary.


And gosh, did the rolls ever come out golden and beautiful on top! When you broke one open, it was so perfectly fluffy inside.


I never bother writing about the underside of bread, but I have to note the fantastically buttery crispness underneath these. All of that rosemary butter seeped between the rolls and infused them with pure deliciousness as they baked.


However, because I am picky about what I make (particularly when deciding whether to make it again), I carefully tasted some bread from the middle so I could see if it's good without the rosemary butter, or if the herbed topping was like cream cheese icing making up for an underwhelming cake beneath it. The bread itself, completely unadorned, is absolutely wonderful. The rosemary made it so delicious that I was glad I avoided any other spices.

But the biggest compliment came when I told everyone else that the bread was at last done. (I should not that due to my poor planning, the bread was ready six hours after the rest of supper had been cleared away.) I wandered away from the kitchen for a few minutes, and returned to find everyone else standing over a near-empty pan. The bread didn't even have time to get cold. "This is the best bread you ever made!" they said. "You should double it next time!" So great was the clamor over the bread that I had to promise to ask my sister-in-law for more rosemary branches for future culinary use.

I am surprised that Laura Kirkman didn't recommend using herbs instead of cinnamon glaze as a suggested variation under the cinnamon bun recipe because it is so good. And if you plan ahead and make the dough the night before you want it, it's not a whole lot of work when you want to serve it. While you do need to let it rise for 8-10 hours, you can simply cover the bowl and forget about it all day. You don't even need to check on it occasionally throughout the day.

I'm sure rosemary isn't the only herb that would be good here (and yes, the marijuana jokes keep setting themselves up). So feel free to use whatever herbs appeal to you when you're getting groceries- or whatever you have growing outside. You will be very glad you made these.


Wednesday, May 24, 2023

Chili-Cheese Rolls: or, Had I known these were so good I wouldn't have given the peppers away

Sometimes I lay awake thinking about future bread. 

Chili-Cheese Rolls
1 cake or envelope yeast
¼ cup warm water
1 tbsp sugar
¼ cup milk
1 tbsp shortening
1½ cups flour
1 cup grated Cheddar cheese (extra-sharp cheese is particularly good in this recipe)
1½-3 tsp red pepper flakes
½ tsp salt

Dissolve the yeast in the warm water to make sure it foams to life. Set aside.
Scald the milk, remove from heat.* Then add the shortening and stir until melted. Pour into a large mixing bowl and allow to cool until it won't kill the yeast.
Mix the yeast and the milk. Then sift in the salt and half the flour. Beat until smooth. Add the cheese, pepper, and remaining flour (sift the flour over everything else). Beat everything well; do not knead.
Roll out to ¼- to ½- inch thickness. Cut with a biscuit cutter. Set on a greased baking pan.
Allow to rise one hour.
Heat oven to 375°. Bake the rolls 20 minutes, or until nicely browned.

*We recommend pouring the milk into a large mug, and then scalding it in the microwave. All you have to do is let the milk cook in the microwave until it bubbles around the edges.

Adapted by a recipe by Mrs. Bryant Nowlin, Woman's Club of Fort Worth Cook Book, 1928

When last we made the two-hour rolls, I couldn't help pondering them at length. They break every carefully taught rule of breadcraft. We didn't do the normal steps of letting the dough rise, kneading it, letting it rise again, or any of that business. And yet we got the kind of yeast rolls that tasted like someone had patiently babysat the dough for half a day. Also, the rolls were very firm in a way that would be perfect for sliders, even though the recipe was printed 80 years before the slider fad. 

In my late-night bread contemplations, the two-hour rolls seemed perfect for cheddar-jalapeño bread. And so, jalapeños were added to the grocery list (cheese is a standing item). I wasn't sure how many to get, so I asked the person who happened to be purchasing peppers at the same time what she thought..

She asked, "What are you making?"

I told her we were making cheese-jalapeño rolls. She asked, "How many?"

I said probably a dozen or so. She thought about it and assuredly said "Get two."

And so I did. But when I got back to the house and tasted one, it tasted like slightly spicy plastic. I could not delude myself into thinking we would get good bread out of these peppers. But what else can one expect when purchasing peppers in the early months of the year?

As much as I hate sending grocery money to the city dump, I threw the peppers out. They simply did not taste good, and I did not want to ruin bread with them. This brings us to the only plants that survived the garden last summer:

Last year, when the springtime weather was suspiciously perfect, we detoured through the plant nursery on our way out of the hardware store and purchased a lot of chili peppers and tomatoes.Our bountiful garden hopes died before the end of July. Despite my valiant attempts with a garden hose as the heat set in, the tomato plants got cooked to death. The few fruits we got off of them before they drooped and died were really delicious, but I respectfully suggested that next year, we should just go to a farmer's market instead.

But while the tomato plants died in the merciless sun, the peppers thrived in the heat. We had a bumper crop of peppers in the same way that some people in the Midwest have their gardens ruined by too-successful zucchinis.  But at least you can eat zucchinis. While some masochists can bite into peppers like baby carrots, we had no idea what to do with over a pound of the things. We made a few batches of salsa, but most of the peppers went uneaten. I gave away as many as possible, and dutifully hung the remainder up to dry even though I had no idea what we would do with them. 

This brings us to the pepper bread, which threatened to be impossible due to the aforementioned flavorless jalapeños that were worse than nothing. I decided that since the purchased peppers were a flavorless bust, we may as well try out some of the peppers that had been hanging off the cabinet knobs since last summer. 

And so, I took one of them down and put it into the spice grinder. Even though I kept the lid firmly closed, the act of grinding a yard-pepper brought tears to my eyes. For my own safety, I decided to let the grinder remain tightly shut for an hour or two before opening it, which would hopefully let the fiery dust settle. Nevertheless, the peppers still stung when I opened it later. Fortunately, the eye assault was so mild that I could simply dab my face with a moist cloth and feel fine after less than a minute. 


I don't have toughness of a 19th-century lady following Miss Leslie's Directions for Cookery, a book that directs you to pound dried chili peppers in a mortar and pestle and advises that you "wear glasses to prevent your eyes being incommoded by them," a suggestion that seems far too optimistic to me. Though I love how Miss Leslie's instructions suggest that cooks in the early 1800s were willing to burn out their eyes pounding peppers in a mortar and pestle (and you thought onion tears were bad!) because in those days spicy food was worth it.


The next part of the recipe was pretty straightforward. We added the peppers in a haze of red dust (without our eyes being incommoded by them) and a glorious amount of cheese. I thought I would economize by purchasing the cheese in brick form and grating it myself. That did not work as hoped. The entire time I was grating the cheese, people kept coming in to eat some. One person even announced "I have come for my cheese tribute!" We may have failed to economize, but everyone was happy.


I rolled out the dough thicker than I normally would, so that each roll would have lots of a soft cheesy goodness in its interior. As the rolls rose, they seemed to separate into layers. Maybe the cheese encouraged them to be extra-flaky. After all, if you ask anyone from Wisconsin, they will tell you that cheese is magical. 

I am not exaggerating about how much Wisconsin people love cheese. Many people from Wisconsin even call themselves cheeseheads. Fried cheese curds are a routine item at nearly every restaurant. I was at a dinner party in Madison, and someone proudly announced "I brought special extra-aged cheddar!" while waving an orange shrink-wrapped brick of cheese. Immediately, everyone was like "Oooo, extra-aged cheddar!" and crowding around for a sliver of it. You'd have thought he brought a chocolate cake from "the good bakery." (While we're on the subject of the foods of Wisconsin, the fruit salad served at that dinner party contained multicolored mini marshmallows, Cool Whip, and canned oranges in syrup.)


Let's get back to the rolls, which contained a Wisconsin-approved amount of cheese. After they baked, the cheese on the surface had turned into enticing flecks of golden crispness. 


We only needed one thing to crown these to perfection: butter!

Everyone who ate these liked them so much that they already wanted to know when I would make them again. However, not everyone was willing to try them. One person saw me putting the yard peppers into the bread and was too frightened to taste one. I only note this so I can tell you the yard peppers were his idea.

But I cannot in good conscience run a recipe that starts with growing your own ingredients and then drying them over several months. So, to test whether we can make delicious chili-cheese rolls without a summer of diligently watering pepper plants, I obtained these:

We were going to order a pizza and ask for extra pepper packets, but even the cheapest pizza is damned expensive these days. So I decided to just go in and ask if they'd hand me some pepper if I asked nicely. Instead of politely requesting spice packets, I got the pepper in the most introvert-friendly transaction I have ever had. Thanks to the restaurant industry's habit of chronic understaffing, no one was working the front counter for me to ask permission to take pepper flakes. I pinched the pepper packets from the little basket on the counter with no human interaction at all. 

When we made the rolls with commercial red pepper flakes, the flavor was a little different. The pepper was ever-so-slightly smokier. The rolls also had more of a slow burn to them than the ones made with yard peppers. The heat didn't kick in until a few seconds after you started eating them. And so, while the taste isn't the same as growing the peppers yourself, you will be just as happy if you purchase a shaker of pepper flakes and get on with your merry baking.

On a closing note, I looked up Mrs. Bryant Nowlin online because I wanted to know who liked bread but didn't like waiting all day for it to rise. (I'm always curious to see if I can find anything about the people behind interesting recipes.) I found this picture on a university's archives. It's from 1941, which was 13 years after the Fort Worth Woman's Club had their cookbook printed. That's Mrs. Bryant Nowlin on the right, wearing the high society battle-furs.

Junior League children's entertainment bureau meeting attendees (left to right) Miss Kathryn Waller, Miss Jo Kelly and Mrs. Bryant Nowlin are pictured here. The three women are shown standing side by side in a row against a bare wall and smiling for the camera. Miss Waller, Classroom Teachers Association, is wearing a short-sleeved dark dress with a jeweled necklace and a hair scarf. Miss Jo Kelly, Association for Childhood Education, is wearing a dark, long-sleeved jacket with a blouse underneath and a wide-brimmed hat. She has a brooch pinned to her blouse. Mrs. Bryant Nowlin, American Association of University Women, is wearing a coat that has a large, fur lapel and holding a pair of gloves. Published in the Fort Worth Star-Telegram morning edition, December 3, 1941.
 "Junior League children's entertainment bureau meeting representatives: Kathryn Waller (Classroom Teachers Association), Jo Kelly (Association for Childhood Education), and Mrs. Bryant Nowlin (American Association of University Women). Published in the Fort Worth Star-Telegram morning edition, December 3, 1941. "

Granted, the picture was taken in December, and all three women in the photo look like they've dressed for the cold. But you just know that Mrs. Bryant Nowlin selected the furs to compete with the fist-sized pearl brooch and extra-large jeweled necklace that her fellow clubwomen brought forth. Well, maybe the bread recipe helped her ascend the women's club social ladder. After all, if you constantly make bread that requires a whole day instead of two hours, how could you find the time to place orders at the local furrier?