Today on A Book of Cookrye, we are revisiting a recipe I have made many times. The other night, I realized I've filled in the missing instructions made it a lot harder than I needed it to be. Here we have the original recipe:
 |
| Incidentally, assuming "821 Louisiana" is Elizabeth's address and that she lived in Fort Worth (since the recipe was written in the Woman's Club of Fort Worth Cook Book), her house site is now under the interstate. |
When someone writes a recipe down in a cookbook, they mean to keep it. Recipes written on index cards or paper sheets can be thrown out as wanted. But if you're writing a recipe in a cookbook, you have decided that this recipe is not getting kicked out of the kitchen. Furthermore, this recipe isn't written in the back of the book. It is written right at the beginning of the bread chapter (you can kind of see it on the back of the page). Therefore, whoever wrote this down didn't even want to flip through the blank pages at the back of the book. They put it right where anyone looking for a bread recipe would find it.
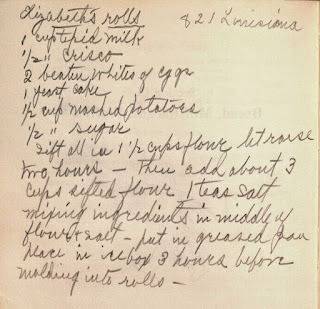
| Elizabeth's Rolls 1 c milk ½ c shortening ½ c sugar ½ c mashed potatoes* 2 egg whites 1 cake or envelope yeast about 4½ c flour, divided 1 tsp salt Scald the milk†, then stir in the shortening to melt it. Stir in the sugar. Then whisk in the mashed potatoes and about 1½ cups of flour, beating until smooth. Whisk in the yeast and the egg whites. Set in a warm place and let rise for about two hours. (Be sure it has a lot of room to expand.) In a large bowl, mix the salt and remaining flour. Press it against the sides of the bowl, making a big hole in the middle. Pour the mixture into it. Stir from the center outwards, gradually incorporating more flour until all is mixed. Knead, then set in a greased pan or bowl. Refrigerate for at least 3 hours. (Overnight or a few days is fine.) When ready to bake, set the dough in a warm place to rise. When it has doubled in size, shape it into rolls. You can either roll the dough into a sheet (somewhere between ¼" and ½" thick) and cut it like biscuits, or you can shape the dough into balls. The dough may be sticky- if you're using a rolling pin and a biscuit cutter, have plenty of flour ready for dusting the counter and the top of the dough. Let rise, then bake at 400° until nice and golden on top, about 15-20 minutes. *If you don't have any left over, microwaving some instant potatoes will work just fine. If you mashed your potatoes with the skins on or if they stay a little chunky when you mix them with the rest of the ingredients, putting the batter mixture into a blender will reduce the skins to really pretty-looking flecks and eliminate any potato lumps. †I prefer scalding milk in the microwave instead of the stove. It never scorches like it does in a pot, and it's so much faster. Just use a large bowl so the milk has plenty of room to bubble up. Pop the milk in the microwave and cook until it looks like it's starting to simmer, and that's all you needed to do. Source: Handwritten note, The Woman's Club of Fort Worth Cook Book, 1928 |
Recently, I thought to myself that it's been a while since I made Elizabeth's rolls, and that we should make them again. Then I realized my interpretation of the recipe was a lot harder than it needed to be. Up until now, I always mixed the flour and mashed potatoes together, then slowly added the liquids until it was mixed into a smooth batter. I had to add the milk very slowly, beating every little spoonful and splash in very hard, otherwise I would get unmixable clumps floating in a gravy. It was a bit like making a stovetop white sauce, except you have to stir a lot harder. It was also the only way I knew of to get this done with absolutely no lumps unless I wanted to clean out a blender in my dishwasher-free kitchen.
Today I was looking back over the instructions and realized... I could have just thrown everything together and gotten out a whisk. First we start with the milk, shortening, and flour, and get everything mixed in about an eighth of the time it took to do this with a spoon.

Then we just dropped in the smashed spuds and flicked the whisk around some more.

Doing it the long way makes sense when you only have a wooden spoon to work with. But if you have a whisk at hand, it slices right through those little lumps and clumps without even slightly wearying your wrist. Another thing I like about this recipe: it doesn't matter if you accidentally get a bit of egg yolk in your whites. You needn't expend yet another egg in the name of getting 100% yolk-free whites like you would if we were making a meringue. I thought that perhaps we were supposed to beat the whites stiff anyway (the original instructions call for "beaten egg whites"), but then I realized that the yeast livens and aerates this mixture really well anyway-- and then it gets worked, kneaded, and squished.

After this point Elizabeth's original handwritten instructions get a bit clearer, and we can finish the recipe by following the original handwritten notes. But as we removed the dough from the refrigerator after its requisite three hours, we ran into a bit of a problem. As aforementioned, hamburger makes regular appearances on our table. Therefore, we have been using the rendered-off beef fat instead of shortening in many recipes. However, bread dough made with a bovine substitution gets unworkably hard in the refrigerator. You can't roll the dough out with a rolling pin, though smashing it flat might work. We ended up just leaving it out on the counter until it softened up a bit.
In a later batch, we tried simply shaping the dough before giving its requisite three hours of refrigeration, but for whatever reason it refused to rise no matter how many hours I let them wait in a warm, moist environment. Well, they expanded a tiny bit, but you can tell just from looking at the rolls that they were dense and hard.

I've made so many batches of Elizabeth's rolls in the Before Times and they were always so good that I would voluntarily make the recipe again. People would specifically ask me to make this recipe. Therefore, I was not prepared for this recipe to betray me.
I thought the failure to rise might be a result of making little dough balls instead of shaping the rolls with a rolling pin. So I tried to see if perhaps making these with a rolling pin and a biscuit cutter might give me the results I've gotten before. They rose a bit after three hours of rising time, but most of what you're seeing is the result of the bread puffing up the way it always does when you first put it in a hot oven. It didn't rise much before baking, though I guess the yeast put in enough tiny bubbles that they could expand when suddenly heated up.

I was not prepared to have to test the errors out of a recipe I've made more times than I can count. Usually, when I make these, they are slow to rise at first but then suddenly start growing and expanding more than one would ever expect. Elizabeth's rolls are (normally) so good that I once made six dozen of them and gave them away at Christmas. You don't spend all that time waiting for rolls to rise if they're not good enough.
 |
| You don't make this many rolls unless the recipe actually works. |
I was so frustrated. How could one of my most-used bread recipes suddenly stop working? Then I checked the notes and realized I had omitted a step: letting the whole mass of dough rise again after removing it from the refrigerator. Apparently this is more crucial than I thought. Maybe it wakes up the yeast from its refrigerated slumber so it will actually raise the bread. After an embarrassing number of disappointing bread batches, I had finally figured out how to, um, make my bread recipe again.
When I used a rolling pin and a biscuit cutter, they rose so high they fell over themselves. If one was better at planning ahead, one could use a muffin pan to steady them as they rise. But the point is, they rose gloriously and unstoppably. Everyone eating these instantly knew why I had been determined to make rolls using this recipe.

Just for completeness, I also rolled the dough into balls and baked those. They started out this big:

They soon rose until they almost melded into one big bread slab in the pan.

In case you're wondering about the saucepan, I've learned a new (to me) method for making a yeast-raising habitat out of the oven. I used to set it to a very low temperature and then turn it off after putting the dough in. But I've had much better results by boiling a full pot of water and setting it into the oven. This way, the bread doesn't dry out before you had the chance to bake it.

Granted, they look a little flat in the picture, but keep in mind that the pan has very high sides. So while the rolls barely peep over the top of the pan, there's a lot of pan under there. As further proof, we can break one open to show the airy happiness inside.

I am very happy to share this bread recipe after having to do too many trials and make too many errors before it actually worked like it ought to. They're delicious. Also, since you are supposed to refrigerate the dough for a few hours before baking, you can do all the mixing and resultant cleanup early. So if you're making these to go with dinner, you won't have a small pile of bread-related measuring cups and stirring spoons needing a wash with all the dinner dishes.
Anyway, this is by far my favorite roll recipe. I highly recommend you give it a go.
I love homemade bread so much, and those rolls look great! I'm lazy, though. I always just put ingredients in the bread machine, set it to "Dough," and then shape and bake once all the hard work of mixing and kneading is over.
ReplyDeleteYou know, I see no reason a bread machine wouldn't work if you just dumped all the ingredients in. If I had one, I'd try it myself. Though letting the dough sit in the refrigerator before you let it rise and bake does give the yeast more time to make the bread taste as good as it does. (Before refrigeration, it tastes kind of like cheap Hawaiian rolls, after refrigeration it tastes like there will be no leftovers.)
DeleteIf I were doing it, I would let the dough rise in the machine, punch it down and put it in the refrigerator for a few hours, and them let it rise again before shaping.