Monday, December 20, 2021

Resurrection Rolls: or, Don't trust me with children's recipes

It's Christmas time, which means it's time to bust out the traditional Christmas recipes! Today, we are making a church holiday classic:

Resurrection Rolls
1 or 2 cans of crescent dinner rolls
Marshmallows (large size)
Margarine (melted)
Cinnamon sugar (use a lot more cinnamon than you usually would)

Heat your oven---- that is, your tomb--- to whatever temperature is listed in the baking instructions on the can.
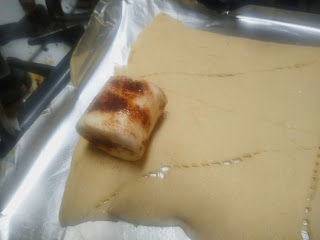
Separate the dough into triangles (representing the linen cloth used for burial – Luke 23:53). Dip marshmallows (representing the body) “in soil and spices” – Luke 23:56. Wrap the “body” in the “linen cloth” (lightly pinch seams) and lay on cookie sheet. Place in the “tomb” and bake according to directions on the can of the rolls. (We recommend putting foil on your pans in case of leakage.)
Remove from “tomb” to discover the body is gone! HE IS RISEN!!!

Source: Canadian Bible Society Celebration Cookbook via Caker Cooking

What, you think we're baking for the wrong holiday? Well, what could be more appropriate for the holiday than American-sized marshmallows dipped in simulated butter? Also, a global collapse is no time to adhere to arbitrary calendars.

Anyway, one of the people in the house has taken to hot chocolate with marshmallows in it. 


When I saw the marshmallows that barely fit in the mug, I was like "We should allegorically represent Bible stories with prefabricated convenience foods!" After a brief explanation to everyone else in the house, a can of crescent rolls and tub of margarine were added to the grocery list.

To me, the most bizarre part of this recipe is that we're baking without getting out a mixing bowl. But anyway, we decided that our sugary Jesuses were perhaps a bit large. Therefore, we purchased the reduced-calorie linen wrappings.

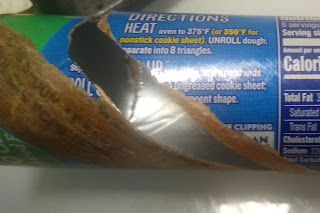
I can't open biscuit cans. Some people talk about how they get scared every time the can pops in their hand. I on the other hand, always pull the little paper tab that says "PEEL HERE" and end up with a slightly stripped yet still sealed can that I angrily smack into the countertop with un-Christian thoughts until someone else opens it.


Though no one ever tried bring marshmallow Jesuses into bible study when I was of the right age, the recipe shows up in so many church fundraiser cookbooks that I may be one of the few who missed out. The cashier saw the marshmallows and crescent rolls, and he immediately recognized what we were making. It seemed like an amusing way to get some relatively bland yet inoffensive dessert. 

Here we have the Bible represented in decidedly un-Biblical food-style products.

However, our Jesuses were a bit too American-sized to fit in one burial cloth. 


I thought this would be a simple recipe, but it is really hard to pinch this rubbery bread dough shut around a slippery greased marshmallow. You just never know what recipes will involve skills beyond yours.

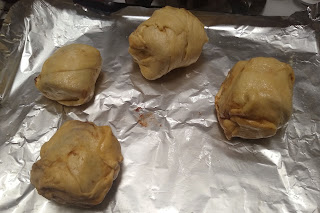
We only had enough linen for four Jesuses.


Also, I have a big rant about package design. You can't open a can of biscuits without ripping the baking instructions off. Surely they know what parts of the can will get torn off when you open them, so why can't they print the instructions around them? We had to look up the baking instructions for these prefabricated simulacra of bread online.

"Could you check the package and see how long we're supposed to bake them?"
 

We were all so amused at this recipe that two of us just sat in front of the oven to see if Jesus would leak. He did. First, we saw a few marshmallow spurts from the roll that I already knew had the least structural integrity.


But before our resurrection was fully baked, every single corn syrup Jesus had prematurely escaped the tomb. If you drop the religious slant, this recipe could be a slightly messy way to keep children entertained just watching through the oven window.


All right, let's see what Sunday school disaster emerged from our oven.


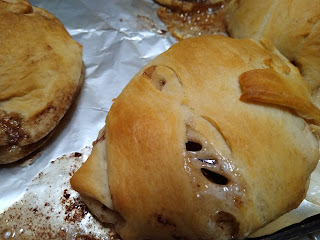
It's been a long time since I was so emphatically glad I put foil over the pan. I didn't want to even think about getting all this sticky candied-on mess cleaned away. Let's have a look at one of the more intact resurrection rolls.


On one roll, the dough had baked enough to keep a shape before the marshmallow oozed out. If you were to carefully unstick it from the pan and transfer it to a plate without causing a collapse, you could get the ecclesiastic metaphor across to the wee ones without explaining why Jesus is now all over the pan. 


As for the taste: these are exactly like canned cinnamon rolls. Maybe they use the same dough in both. But I think we all know that the taste isn't the point of these. But with that said, these are a surprisingly good if somewhat messy breakfast-or-dessert item.

Sunday, December 19, 2021

The perils of food processor cheesecake

Sometimes, one wants to branch out from banana bread. I think randomly passing by the graham crackers in the grocery store while aware that we had rapidly-expiring bananas on the countertop gave me a slight craving for banana cheesecake that festered and grew until I went out and found a recipe for it. I've never had (much less made) a banana cheesecake before. As much as I like cheesecake, it's not something I get cravings for. But just like I often want to make peanut brittle when it's frigid out (even though I don't really like it the rest of the year), apparently sometimes a cheesecake just insidiously takes over my mind until I make it.

Banana Cheesecake
2 (8-oz.) pkg. cream cheese
1 c. bananas (ripened)
1 c. sugar
1 graham cracker crust (use a deep pie pan)
2 eggs

Beat cream cheese until soft, add sugar and eggs. Beat well, add bananas, mix in and pour into graham cracker shell. Bake in oven for 30 minutes or until golden brown.

Source: Cooks.com


Looks straightforward enough, doesn't it? I wanted a recipe without boxes of cake mix, cottage cheese, or any other odd things in the batter. I also avoided any cheesecake recipe that involved gelatin instead of baking.

When we were purchasing bananas last week, the normal ones were green enough we could hang them up for a festive Saint Patrick's Day mood. The organic bananas were perfectly ripe, yet exactly twice as expensive. However, towards the end of the fruit shelf lay bags of bananas on clearance, well into the "eat these now or they will expire" phase. Delighted with being able to economize on fruit, we brought them back to the house. Now I wonder if I saved any money if half of the bananas had to be hastily put into desserts because we weren't eating them fast enough.

Anyway, some people go out of their way to find single-bowl recipes. Today, we at A Book of Cookrye are making this not a one-bowl recipe but a one-appliance one:


We at A Book of Cookrye are learning all about the food processor. These things just never figured into our culinary lives. We've had blenders, but I didn't encounter a food processor in person until I went to cooking school. My mother wasn't very big on filling the kitchen with sporadically-used appliances. We've used the food processor for relatively tame things like making pie crust and grinding graham crackers (the latter for what would have been my Christmas cake this year). Today, we will make the food processor whizz its way into making a complete dessert!


At first I was absolutely delighted to try this exciting new approach to baking.  Instead of putting ingredients into a bowl in the right order and ensuring proper mixing and incorporation, we can just dump everything in and press a button! Or so I thought. Despite the motor's best efforts, the cream cheese hovered over the whirlpool, steadfastly remaining above it all.


This initial failure turned out to be for the best. While I was doing some rubber-spatula reshuffling, I realized I had forgotten a certain crucial ingredient:


I was just too excited about using this new, modern appliance to think about minor details like whether I had added the sugar. I don't know whether I wanted cheesecake or if I just wanted the experience of food-processing one. If you recall how much happiness I got out of using a cornstick pan, you can no doubt surmise how I went right over the moon while using the same countertop device to pulverize my graham cracker crust and then make the cheesecake to pour into it. However, my excitement waned when I opened up the machine to find a sweet soup of cream cheese chunks.

I began to suspect that perhaps I shouldn't have dumped all the ingredients into the food processor all at once. But like I said, food processors are a new device to me. I don't know anything about how to use them correctly. So instead, I let it run for long stretches of time. Then I pulsed it repeatedly in case the starting and stopping made a difference. However, no matter what I did, I still had little specks of cream cheese that absolutely refused to mix in.


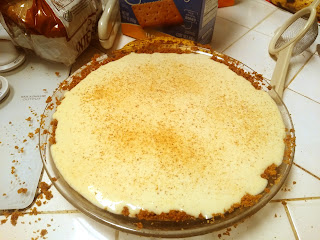
Eventually, I decided that I would have to pour all of this batter through a strainer and then put the curds into a blender. That was too much work, so I just dumped it all in a pie pan and hoped for the best. 

I can't decide if sprinkling graham cracker crumbs on top made it look nicer or not.

While it was baking, I decided to test something that I had been wondering the whole time I was getting this made. We have successfully made beef fat biscuits, beef fat pie crust, and even beef fat cookies. Beef fat has proven to be a surprisingly neutral flavoring. I wanted to know what would happen if we used it instead of butter in a graham crust--- but I didn't want to risk a whole cheesecake. So I made a little bit of test graham cracker crust in a bowl instead.


This is the first time anything has tasted beefy. You would think it would be the beef fat shortbread since it has absolutely nothing to hide any suspicious flavors. But no, the beef fat graham crust tasted ruinously meaty. But no matter, we didn't put this would-have-been cheesecake ruiner in the pie pan. 

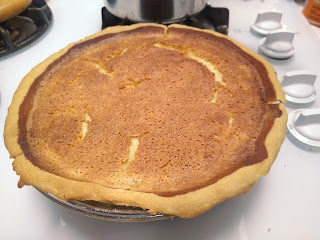
At any rate, the finished cheesecake suggested that we have a bit of oven tilt.


We cut into this as soon as it was cold enough, and it did not taste like a cheesecake. It was a very nice, light-textured custard pie with a hint of banana. In texture, it reminded me of the ricotta pie I made once out of an Italian cookbook. 

However, after it had sat in the refrigerator for a day, it had gotten denser and tasted like the cheesecake we meant it to be. If I had to guess, I would say that the little cream cheese speckles interspersed throughout somehow dissolved and melded with the rest of the pie after a day or so. At any rate, if you mix this like a normal person instead of like a food processor enthusiast, you will no doubt be delighted with what you get. I thought I was the only one in the house who liked it until I came into the kitchen a few days later and saw someone else eating the last of it right out of the pie pan.


Saturday, December 18, 2021

Pumpkin-Spice Cookies

 Here at A Book of Cookrye, we believe it's always pumpkin spice season in your heart, any time of year, if you truly believe. And so, as the grocery store plays relentlessly festive music which hits the ear a bit differently as prices rise, we are bringing the flavors of autumn into our kitchen. Which brings us to... cookies! We wanted to have our pumpkin spice in cookie form, and decided to swap out the title ingredient in the banana cookies we liked enough to make multiple times. After all, canned pumpkin is about the same texture as blenderized banana.... right? 

Pumpkin Spice-Oatmeal Cookies
1 c sugar
½ c shortening
½ tsp baking soda
¼ tsp salt
1 tbsp pumpkin spice
1½ c flour
1 c canned pumpkin
1¾ c oatmeal
½ c nuts if desired

Heat oven to 350°. Line a cookie sheet with foil and grease it.
Beat together the sugar, shortening, soda, salt, and spices. Mix in the flour (it will be sandy). Add the pumpkin and oatmeal, mix well.
Measure the dough into 1-tbsp portions. Roll them into balls, and press each one flat in your hands. Bake 12-15 minutes (I only needed to bake for 12). Separate them from the foil while still warm (you may need a spatula).
These cookies aren't as well-suited to leaving out on an open plate- they will go stale. Put them in a sealed container as soon as they're cool so they keep fresh.

adapted from a recipe by Mary Skurka (Whiting, Indiana), Anniversary Slovak-American Cook Book, First Catholic Slovak Ladies' Union, 1952

Today, we are using the last of the shortening.

I don't know what unnerves me more: that we bought a 3-pound can of shortening, or that we (gradually) ate it all. Anyway, in the comments to the original recipe, Freezy noted that they were a lot easier to make in a food processor. I keep forgetting that one can use a food processor because I haven't had access to one until very recently, but I'm game!


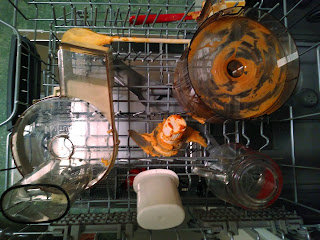
Indeed, we had these cookies mixed up in mere minutes. We had no frustrations with keeping sandy, dry ingredients from flying out all over the kitchen. Just like those gushingly ecstatic advertisements promised in the 1950s, we had cookie dough at the press of a button.  However, you should know that a food processor requires a big commitment of rack space in the dishwasher.

I firmly believe that if you have to rinse your dishes, your dishwasher is broken.

 The pumpkin cookie dough was a little bit stickier than the original banana cookies.


They baked up fine, though they were a little bit more cake-like than cookie-like in texture. Despite the big scoop of shortening and other diet-killing ingredients, they reminded me a lot of the desserts you get from a place that still substitutes carob for chocolate. To my further disappointment, a lot of the pumpkin flavor baked out. You could easily compensate for this by really putting the "spice" in "pumpkin spice." But even then, they would just be spice cookies with a little bit of a pumpkin undertone. 

So this didn't live up to my autumn dreams, but they weren't too terribly bad either. This just means more attempts are needed so we can have pumpkin spice cookies.

Wednesday, December 15, 2021

Hump-Day Quickie: Those no-bake cookies it seems all my friends made

 Sometimes it seems like I missed out on culinary experiences that all my friends had growing up (well, the ones who like to cook). My mother never bought me an Easy-Bake Oven, something I never thought about until I was much older (and after seeing these two grown adults attempt to bake in one I'm glad I never got an Easy-Bake when I was in Hasbro's target age demographic). And, more relevant to today, it seems half of my friends' first recipe they made (mostly) by themselves was this:

No Bake Cookies
2 c sugar
½ c butter
½ c milk
¼ c cocoa powder
3 c instant oatmeal (or 1½ c each oatmeal and shredded coconut)
1 tsp vanilla

Have several sheets of greased foil or waxed paper ready.
Boil the sugar, milk, butter, and cocoa powder for 1 minute. It should reach the firm-ball stage. Remove from heat and add the oatmeal, coconut if desired, and the vanilla. Drop by the tablespoon onto the foil and let set until firm.

Source: Jerita Wadley, Simply the Best: Recipes from the First Methodist Family with handwritten revisions

If my mother ever made these I don't remember it, though an informal survey of my friends suggests that this recipe was (and probably still is) a popular go-to among parents who wanted a low-effort, single-pot treat for the wee ones. As tends to be the natural progression of things, a lot of my friends in turn made these as their first recipe, first helping to stir the pot and then doing it all by themselves.

When we were all still too young to drive, a lot of my friends would bring down a saucepan and a canister of oatmeal and make this recipe which they had memorized since their parents first allowed them to use the stovetop. I had no such nostalgia for these, and my opinion was somewhere between "eh they're not bad" and what Laura Shapiro said when she wrote that "a no-bake isn’t an actual cookie by any definition except the lamest. It’s a placeholder, an apologetic reminder that somewhere in this happy land there are cookies, but not here."

If you think Laura Shapiro is being too hard on an innocent cookie recipe, some context may help. You may remember our previous discussion of the First Lady Cookie Bakeoff, where a now-defunct magazine pitted the wives of the two front-running presidential candidates against each other in a cookie recipe contest. One year, Cindy (Mrs. John) McCain sent in this recipe, apparently taken right from the Quaker Oats website with the brand names hastily deleted from the ingredient list. Laura Shapiro was not savaging a back-of-the-box cookie recipe for existing among someone's frequently-used clippings or appearing on a table in someone's house, a potluck or a bake sale. Instead, she was noting that it was spectacularly out of place for nationally-published recipe contest. Though she does ask what a lot of us were thinking: "As for the staffer who decided that a no-bake was an appropriate choice for a baking contest, was this an act of chutzpah, domestic naiveté, or a mysterious passion for culinary oxymorons? You decide."

This recipe may have started on the back of a Quaker Oats can, but it has certainly gotten deep into our culinary psyche. It shows up in nearly every fundraiser cookbook from the last twenty years. I say this because as soon as I started making these, I was inundated with helpful corrective commentary from everyone in the house. Actually, I got recipe changes before I even got anything in the pot in the form of handwritten recipe annotations. The peanut butter was taken right out of the recipe and replaced with dairy butter. (Always follow the handwriting in a compilation book.)

Great offense was expressed at pouring the mixture into a pan instead of dropping it by the spoonful like chocolate-oatmeal pralines. I was informed that "when I was growing up, Mom did something with cold water whenever she made these." (Apparently boiling times can't be trusted; use cold-water candy tests instead.) And only after extensive discussion was I allowed to follow a suggestion from The Nostalgic Cook (whose Osgood Pie was easily the most delicious Pieathlon we've had to date). She removes the peanut butter, as does the person whose editorial pencil passed over this copy of the recipe.  She also adds something else:


Yes, we are using half oatmeal and half coconut. You can't really see a difference after the chocolate has subsumed them.


One thing I do like about not baking cookies: you don't need to come up with enough pans to hold them all. You can just unroll several feet of aluminum foil right onto your countertop. Here we can see the happy finished result, with a few coconut shreds sticking up at an oddly jaunty angle:


I'll be honest, I think the peanut butter is what held this recipe back. Omitting the peanut butter improved the cookies so much I am surprised the official recipe still uses it. Making the cookies peanut-free eliminated that peculiar mushiness that I never really liked. Anyway, these never had enough peanut butter to hit the right flavor, just enough to interrupt the chocolate. Without it, these are now a really nice way to bring more chocolate into your life. And if you like coconut even just a little bit, you will be very glad you added it to these too.

Sunday, December 5, 2021

Lemon-Beer Pie because why not?

Now that grocery stores across the nation are mercilessly playing aggressively festive music on the PA and decking the displays with several plastic refineries' worth of artificial pine, 'tis the season for beer!

Dinner is Served 1972

I've seen this cookbook page make a few rounds on various articles about weird recipes of yore, but no one has made it that I know of. We had a close call a while ago when it shared a cookbook page with the peanut-and-beer pie Yinzerella made for the Pieathlon. The pie lodged itself in my mind. I had to know.

Lemon-Beer Sponge Pie
1 unbaked 9-inch pie shell (the recipe doesn't specify a deep-dish pie, but you should)
4 eggs, separated
¾ c sugar
¼ c flour
3 tbsp butter or margarine, softened
2 tsp grated lemon peel
1 (12-oz) can or bottle of beer
2 tbsp lemon juice

Bake the empty pie shell at 450° for 10 minutes. Then reduce oven to 350°.
Put the lemon peel and half of the sugar in a separate bowl, rubbing it between your fingers until the peel releases its oils and makes the sugar yellow with a strong lemon smell. Beat this with the flour, butter, and yolks. Mix in the beer and lemon juice.
Beat egg whites until foamy. Gradually add half the sugar, beating until stiff peaks form. Fold into the rest of the ingredients.
Bake for 50 minutes or until set. Cool to room temperature before serving.

All-Time Favorite Recipes from Culinary Arts Institute, 1981 via Dinner is Served 1972

That recipe note almost seems like an apology: "The beer flavor is subtle." Did some beer company come to the Culinary Arts Institute, commission a book called Sixty Sensational Recipes featuring Orwigsburg Ale, and demand a chapter of desserts? Did this pie happen after the Culinary Arts Institute's beleaguered home economists spent several tear-salted nights in the test kitchen trying to come up with a non-revolting recipe for pink beer cookies?

I sent the recipe to a lot of friends and got a surprisingly mixed response. Herewith is a sample:

Before we got to the beer-related fun, a pie crust had to be made. Here I had my first doubts about the recipe because the instructions got a bit weird: we are instructed to partially bake a pie crust and then immediately get the oven a hundred degrees colder for the pie itself. That seemed like a spectacular waste of energy and also like we'd be hanging out in front of an open oven for a long time waiting for the temperature to come down. In reality, the oven only needed a minute or so to cool down from crust temperature to pie temperature. Nevertheless, my suspicion that no one tested this recipe would persist for the rest of the endeavor.

At least it was a bit chilly out, so dumping all that excess oven heat into the kitchen just added coziness instead of insulting the air conditioner. Also, these days it seems every pie crust I make has a little rip right on the edge of the pan. 


Next, we cut the butter up into little slices and left them in a mixing bowl to soften. Then, eggs had to be separated. As a result, a lot of bowls were populating the countertop at this early stage. Lastly, we got to one of the title ingredients: the lemon. I don't have a zester or a paring knife, but a coffee grinder (that rarely sees coffee) resides in the kitchen.


In just a short time, the lemon peels had dyed the sugar yellow. A wonderful lemony smell happily skipped to my nose when I popped off the grinder lid.


I found a really nice two-part lemon juicer in the back of one of the cabinets, and it did an absolute bang-up job on the lemon. I only needed one lemon to get the requisite two spoons of juice for this recipe. The juicer left both lemon halves nearly dry. I would never have expected that kind of performance from something looks like cheap plastic.


At this point, the recipe looks like a perfectly normal dessert. All we have in our bowl is butter, sugar, and flour. The recipe just has us dumping everything into the bowl all at once, but I feared little lumps of butter and flour floating in an alcoholic egg yolk ooze.  Maybe it would have mixed fine, but I think I would soon have wanted a blender. Again, did anyone actually try to make this recipe using their own instructions before sending it to the typesetters and printers?

I should have stirred the sugar and flour together to dispel any little glutinous wheat clumps, but I forgot. So I just finger-mixed it a bit before using a spoon to knock the butter into its two white powdery friends and stir. 
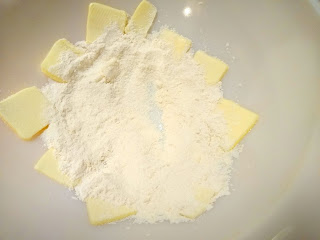
 

It looked unpromisingly lumpy at this early stage. But as we all know, recipes often don't look right at the beginning yet turn out perfectly fine.

I thought maybe these need just a bit more liquid to properly mix, so I dumped in the yolks. I figured they should go in first so that the thick sugary flour stuff could break up any egg bits that might want to evade the spoon instead of mixing. After a good hard spoon-beating, it looked like a big blob of mustard. I didn't think the yolks would add such a bright yellow after diluting them so much with the other ingredients.


At this point, I want to note how puny that little splash of lemon juice looked on top of everything that was already in the bowl. 


At this point, it should have started to taste like the lemon pie the recipe promised. However, it was rather bland. Two tablespoons are not enough lemon juice. Then I remembered the lemon peel and sugar that still waited, forgotten, in the coffee grinder.


The resulting pie-in-progress was delightfully tart. If you're following along at home, don't omit the lemon rind- it adds a good deal of the citrusy flavor. Without it, the pie will definitely taste like something's missing. So far, everything seemed to be coming out wonderfully (even if this pie demanded a lot of bowls).


All right, it is now time to bring out our star ingredient. Today, we are making a lemon pie full of this:


To give the recipe a fair chance, I got a beer I actually like. As I dumped it in, I already was thinking about future recipe revisions. If this recipe generated a successful pie, I was going to revisit it with hard cider instead. Lemon and apple seems like a much better pair to dump a lot of sugar on than lemon and beer. 

But enough stalling- are you ready to see me ruin a pie?


The more I look at this picture, the more it seems perfect for this pandemic. What could be more appropriate than dumping an entire bottle of beer into a pie on a countertop covered with multiple packs of face masks and marshmallows? 

Let's get a good look at the foam that came up in the pie pan and refused to dissipate. It looks oddly milky for a pie whose only dairy is three spoons of butter. Keep in mind we haven't mixed anything yet. The beer is just sitting on top looking a bit out of place.


When we stirred it in, the foam persisted. But where we previously had a happily lemon-flavored and cheerfully-yellow mixture, we now had a watery beige twelve-ounce puddle. If you pushed the foam aside with a spoon, you could see the hopelessly runny fluid below. It was the color of the computers we had in the nineties.


You know what, let's put this beer mess aside for a moment and beat some egg whites with sugar. Beating egg whites is such a nice, normal step in desserts. Nothing looks weird here, we're just making a meringue like we so often do in normal, beer-free things. Just ignore the bottle cap and beer opener. 


As aforementioned, I was skeptical that this recipe had been thoroughly tested before publishing. Having gotten all of the sugar into the egg whites, we are told to beat until we get stiff peaks. As a refresher, this is what a stiff peak looks like:

This is from when we made kisses.

But no matter how long I beat and bashed the egg whites, this floppy thing was the closest I got to any a peak. I think it was all the sugar the recipe tells us to put in. It seems like if you add too much sugar, your egg white peaks just can't support themselves anymore. I followed the recipe directions and this is the best peak I got.


 After a long time hoping the electric mixer could do even just a little bit more peak raising, I gave up and decided to mix our limp shaving cream into our beige suds. They actually combined very well. To the recipe writers' credit, this looks like every other sponge pudding I've made. You have this foamy stuff on top that bakes into this cake-ish top layer, and some very runny stuff underneath that sets into a custard. 


However, here I present my biggest evidence that the Culinary Arts Institute never tested this pie--- or if anyone did, their correction notes got lost. A pie recipe generally fills up one pie pan. If it makes way too much filling, there will almost always be a note like "Use a deep dish pie pan" or "This makes enough for two pies." However, when I tried to dump the filling into the crust, it threatened to overtop the sides of the pan and flood the counter with a sticky, beery mess. I didn't even get all of it poured in, but I still had to hastily grab a measuring cup with which to scoop a lot of pie back out. Maybe I was just a lot better at whipping egg whites than the Culinary Arts Institute and therefore had a much more voluminous lemon-beer pie filling, but I find it hard to believe that I am better all those people in the corporate test kitchen. Nevertheless, how could anyone testing out this recipe fail to notice that there was too much pie for one pan? Did they never try to pour their pie filling into a crust?


I thought about digging up some custard cups or something else to bake all this extra pie in. After all, I hate wasting food even if it is only technically edible. But then I thought to myself: Do I really want one and a half lemon-beer pies? I then dumped all the extra down the sink.

As the pie baked, it smelled like neither lemon nor beer. It smelled like bread in the oven-- and I mean really good  bread. Perhaps the beer flavor is subtle because most of the beer taste bakes out? I gave the pie an extra ten minutes in the oven just to be very sure that it actually set. Or at least, if it didn't set I could blame the recipe for faulty baking times. However, upon removing it from the oven I saw a weird boiling liquid around the bottom. Some further examination of the pie pan showed that the entire underside of the pie had this weird brown residue that had seeped through the crust.


However, the top of the pie didn't look so bad. At this point, we left the pie overnight. Maybe the recipe tells us to serve at room temperature because the pie will reabsorb all these leaking fluids as it cools.


It smelled like a pie pan of beer. At the rate the pie emitted beer fumes, I thought it would surely have no beer flavor left by the time it cooled. But when I cut myself a cautiously narrow slice the next day, it tasted like pie pan of Yuengling with lemon. If you like lemon in your beer, this could be the pie for you. But to the recipe writers' credit, we got the multilayered, cake-over-custard concoction they promised us.


One other person who tried a slice said "Hmm." Then he paused thoughtfully, and said "It's not bad. You can hardly taste the beer. It could use some more lemon though."

We lived with this pie for three days. It grew on us. At first I kept eating it to see if it really was as weird as I thought it was a few minutes ago. I wasn't the only person voluntarily partaking of the pie- it steadily diminished in my absence. It was weird yet oddly good--- if you like the beer you dumped in it. However, do not think you can serve this to people without first telling them what's in it. No one's going to beg you to divulge the secret ingredient that gives your pie that extra special flavor. It tastes like lemon and beer.

And so, to conclude this recipe, I have to share the perfect to music to put on your record changer when making and serving this pie:

Never has polking looked so action-packed.

Thursday, November 25, 2021

Happy Thanksgiving from A Book of Cookrye!

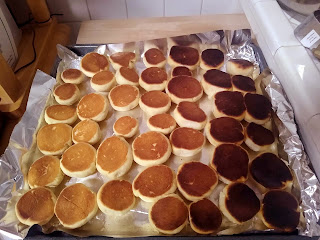
 Well it seems like we've collectively decided that the pandemic is over-ish. It also seems a lot of my friends and acquaintances are having merry gatherings with their also-vaccinated nearest and dearest, and we at A Book of Cookrye are no exception. This year, we were asked to make the rolls to go with dinner. Which we did. The entire batch was perfect on top. But if you turned them over, you could see a perfect demonstration of how unevenly the oven cooks.

That is not a shadow over the pan.


If you're not the person saying "I spent all night waiting for these to rise!" you might think it's really neat to see such a perfect gradient from lightly browned to a perfect charcoal black.

I thought about severing the tops of the burnt ones and turning them into croutons or something, but for once I just threw them out. This caused much relief in a household that has seen some increasingly suspicious attempts to repurpose culinary failures.

I think it's a pretty appropriate way to launch the first (not-)post-pandemic holiday season! Remember friends, get vaxxed if you haven't, and wear masks when you make pit stops during any long drive!