Friday, June 17, 2022

Chicken-Artichoke Soup: or, It's not a casserole if you can pour it

I had to make this because it's written on a giant chicken.


Chicken-Artichoke Soup
16 oz. sliced mushrooms
Small amount of cooking oil
2 medium cans quartered artichokes, drained
5 boneless chicken thighs, chopped
2 or 3 medium potatoes
16 oz sour cream
1 tsp Worcestershire sauce
Seasonings to taste:
   -Salt
   -Pepper
   -Paprika
   -Chili powder

Boil or microwave* the potatoes. Then cut into small cubes and set aside. (You don't need to remove the skins unless you don't like them.)
In a large pot, cook the mushrooms in a little cooking oil, adding pepper to taste. Cover the pot when about halfway done to retain juices. Then, add the chicken and cook done.
Stir in the sour cream and the parsley. Bring to a simmer. Then add remaining seasonings to taste. Simmer for a few minutes.
Buttered rice goes really well with this.

*While microwaving potatoes does dry them out a bit, that won't matter after they've simmered for a while. Therefore, I recommend cooking them the quick way.

Adapted from an anonymous recipe card on Mid-Century Menu

First, we needed to retype the recipe. Some people can cook with the recipe on a laptop in the kitchen, but I have an unfortunate history of irreparable damage caused by splashed gravy. Oddly enough, we do not have a working printer in the house (though we have three dead ones that just sort of stayed parked where they printed their last) but we have multiple typewriters.

This is on the back of a receipt because I only use index cards if I know I'm keeping the recipe.

The recipe starts with cooking the mushrooms in enough butter (sorry, oleo) to make a batch of cookies. But rather than make something with a thoroughly unnecessary amount of grease, I used a much smaller splash of cooking oil instead. You will also notice that I am forgoing all this business of separately cooking everything and then adding it to the pan. Just because we have a machine to remove the drudgery of handwashing dishes does not mean I want a mountain of them piling up in the sink. Also, the skillet is the least-used of all the pots and frying pans. It's also a really nice one, and this seemed like as good a time as any to actually get it out of its usual perch and use it. 

At this point we made a short revision to the recipe: adding chicken to (hopefully) turn it into a one-pan dinner.

That was quick enough! And since we didn't use gobs and gobs of butter, we don't have to drain away all the flavorful mushroom juices in the pan. Ever since Fanny Cradock taught me that I actually like mushrooms when they're not boiled until quite dead, I think less of any recipe that would have me cook the mushrooms and then drain them. 

But to the ruin our merrily undrained pan, resplendent in its mushroom juices, we added a mistake. Unfortunately, one person in this house really likes marinated artichokes, so I got those instead of the artichoke-flavored artichokes. They would end up tasting like leafy balls of concentrated salad dressing.


Blissfully unaware that I had ruined dinner (or at least made it a lot harder to voluntarily go back for seconds), I blithely proceeded with the recipe, adding an entire carton of sour cream as is written on the card.


After turning what had looked like a lovely pan of chicken and mushrooms into an extra-large batch of not-quite-white glop, I realized I forgot to add that last ingredient: parsley! The parsley is a sign that this is a gourmet recipe. 

I think parsley is very underused in cooking. A lot of people seem to think parsley only exists as a garnish for Italian(ish) food, and that you're not supposed to eat it even though it's right next to your lasagna. They don't know that parsley is actually a lovely and flavorful seasoning. Hence, we are adding it to the casserole, in perhaps a more generous amount than the recipe writer intended.


At this point, we were ready to top the casserole with breadcrumbs and bake it! Most people would have breadcrumbs on hand since they are one of the cheaper items on the baking aisle. But I forgot to get any. So, to attempt to make do with what's on hand, I put the heels of the house's ever-present sandwich bread on the bare oven racks to (hopefully) dry out enough to crumble while the oven heated up.

A sumptuous supper awaits!

I really should have put a few more bread slices in the oven than just the heels. It took a lot of careful scattering, but I got this sad ration of crumbs to actually cover the entire casserole. I shook some Parmesan over everything to make the top of this casserole less... halfhearted-looking. 


We baked the casserole until bubbly, as people fondly love to say, and it came out completely unchanged (though it was nicely warmed through). As you can see, when you spooned out some of this, it looked the same as before it went into the oven.


Aside from my ill-advised choice of marinated artichokes, this tasted like something that someone would fondly remember Mom making when they were growing up, starting their reminiscing with "it wasn't fancy, but it was good!" And it would have been very good in a comforting way had I just used the plain canned artichokes the recipe calls for. But no, I thought I should fancy it up with marinated artichokes, which made it taste like Italian salad dressing. Sometimes you should just stick to the recipe and not assume you know better than someone who made it enough times to justify writing it down.

But with that said, no one really objected to making this recipe again. The next time, I decided to round the recipe out by adding some potatoes to it. Because I didn't want to wait a long time for the potatoes to cook in the soup pot, I just put them in the microwave first. I also (and this is important) did not use marinated artichokes. I used plain canned artichokes instead. They taste like artichokes instead of salad dressing. Marinated artichokes are a nice (if somewhat spendy) addition to a lot of foods, but they're just not right for this.


We then learned that we should have done this in the soup pot. The skillet was not prepared to contain this much chicken-artichoke-spud soup.


When we served it out, it looked just like the last time despite never seeing the inside of the oven. I guess baking this will warm up the kitchen if it's cold out, but it does nothing else. The only difference between the stovetop-only version of this recipe and the baked casserole is the presence or absence of breadcrumbs. If we happen to have stale bread I might turn it into croutons for this- they'd go well with the soup.


By request of others, I have already committed this recipe to a typewritten card. It's quick, easy, and really good. It's simple, and it's not an experience of gourmet ecstasy, but it hits the spot.

Thursday, June 16, 2022

Spinach Ramekins: or, Making vegetables delicious without a pound of cheese

Everyone I told about this recipe had the same question: "What is a ramekin?"

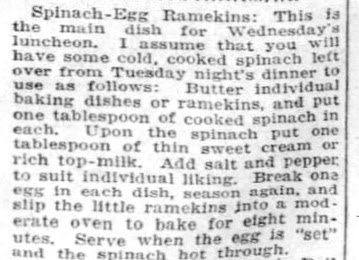
Spinach-Egg Ramekins: This is the main dish for Wednesday's luncheon. I assume that you will have some cold, cooked spinach left over from Tuesday night's dinner to use as follows: Butter individual baking dishes or ramekins, and put one tablespoon of cooked spinach in each. Upon the spinach put one tablespoon of thin sweet cream or rich top-milk. Add salt and pepper to suit individual liking. Break one egg in each dish, season again, and slip the little ramekins into a moderate oven to bake for eight minutes. Serve when the egg is "set" and the spinach is hot through.
"Efficient Housekeeping" By Laura A. Kirkman, Fort Worth (Texas) Star-Telegram morning edition p. 7, July 6 1925

Spinach-Egg Ramekins
   Multiply the ingredient amounts by how many you are making.
1-2 tbsp leftover cooked spinach (or frozen spinach, thawed and drained)
1 tbsp half-and-half or milk
1 egg
Salt, pepper, and other seasonings to taste

Heat oven to 350°. Grease individual ramekins or custard cups. If you don't have custard cups, you can use a cupcake pan with paper liners.
Put one to two tablespoons of spinach in the bottom of each baking dish, seasoning as desired. Pour one tablespoon of milk over each of them, and then add salt and pepper to taste. Crack an egg into each custard cup.* Season again as desired.
Bake 8 minutes, or until the egg is set. Serve hot.

*If using cupcake pans, you will want to crack each egg into a small bowl and carefully pour it in, rather than just cracking the egg right over the spinach. That way, you can more easily prevent some of the egg spilling down the back of the paper liner and onto the metal pan, which would be irksome to clean after baking.

Source: "Efficient Housekeeping" By Laura A. Kirkman, Fort Worth (Texas) Star-Telegram morning edition p. 7, July 6 1925

I kind of love how presumptuous Laura A. Kirkman, author of the syndicated column "Efficient Housekeeping" and giver of today's recipe, is. She has not only decided (without asking) that I, the modern housewife of 1925, devotedly follow her menus ("Sorry, my dearest husband, 'Efficient Housekeeping' didn't schedule your favorite dinner until next week!"), but she has also planned my leftovers! How am I supposed to make today's luncheon if my husband ate all the leftover spinach last night, Laura Kirkman? And what if my loving family polished off the entire spinach tureen (you just know it was served in a tureen) when I served it for supper, ruining the ramekin-based plans for today? 

We may not be following the "Efficient Housekeeping" schedule in this house, but we did purchase frozen spinach. We also have a lone custard cup that now lives with the bowls after all its siblings presumably cracked and went on to the municipal hereafter. 

Even in this tiny thing (the smallest oven-safe object I could find without gambling on whether a porcelain teacup will survive the oven), one tablespoon is not a lot of spinach.  I'm going to assume that Laura Kirkman means "one tablespoon ish but use your best judgement," not a home-economics class style perfectly level measurement using proper measuring equipment. We ended up using about 1½ tablespoons, or "one heaping tablespoon" as one might prefer to say.

In an attempt to put the "efficient" in "Efficient Housekeeping," we chose not to obsessively fret over deploying the perfect seasonings. We instead shook some seasoned salt over the spinach cup and thus finished seasoning this recipe in five seconds. 

I looked up Laura A Kirkman, and she appears to have vanished into the newspaper archives of yesteryear. She doesn't even have a two-sentence Wikipedia article with a flag on top inviting you to help Wikipedia by expanding it from a stub. Her (apparently) only foray into something more permanent than a newspaper column is a recipe book published in 1929 called Bridge Refreshments. It has my new favorite opening sentence of any cookbook: "In conducting a daily cooking column for a chain of newspapers for ten years, the writer of this book came to the conclusion that one great need of the housewife of today is an answer to the question: What Shall I Serve For Bridge Refreshments?" 

Any housewife of 1929 buying the new cookbook from the author of "Efficient Housekeeping" would no doubt have more pressing concerns before the year was out.

Anyone needing new ideas on what to serve during bridge games can read this book for free here!

Getting back to our lovely spinach, one might criticize Laura Kirkman for underseasoning everything, but keep in mind that we are supposed to be using leftover spinach which we presumably seasoned the first time we cooked it. Perhaps we even used bacon fat in our spinach recipe. Having seasoned our clump of thawed spinach like we would have for supper, we could proceed to pour a spoon of milk into the cup, making this look like small portion of creamed greens.

And so, we happily arrived at the big moment when this recipe finally becomes all it was meant to be: it was at last time to crack an egg on top! One could argue that today's spinach creation has a direct line to the many, many recipes of ancient Rome in which you put everything in a baking dish and break eggs on top to bind it all together. Or perhaps every civilization has independently come up with egg-topped baked things, just like every culture on Earth has some form of individual-sized meals encased in bread.

I considered sprinkling cheese on top of this before baking it, but I wanted to try this recipe as written. After all, what is the point of making new recipes if you're going to change out all the steps and ingredients you're not already used to? Besides, like pouring melted butter over lobster, burying this under cheese feels like cheating. Anything will taste good if you put enough cheese on top. I wanted to know if baked eggs over spinach are good on their own. As my pre-pandemic figure slips ever farther away from me, I am always looking for more ways to serve vegetables that are good for you without being punitive to eat.

One might think I was extremely extravagant if I heated up the entire oven just for one little cup of egged spinach, and I would agree. But since one can easily slide a small glass cup between baking pans, I baked this when we already had a few other things in the oven. The spinach ramekin easily slid between all the other pans on the oven rack. 

I didn't start making our little spinach ramekin until after I had gotten everything else in the oven and cleaned up every countertop splatter that I had made that evening. I thought that with such a short cooking time, surely the spinach ramekin would be ready long before everything else in the oven was. But at the end of its specified 8-minute cooking time, the egg white was still as transparent as when I cracked it onto the spinach.

Everything else I was baking was done before this was, causing me to feel an annoying guilt twinge every time I looked into the vast empty oven containing one tiny glass cup. But at least we didn't expend all the energy required to heat the oven up solely on the spinach's account. We merely delayed turning off the oven for a few minutes.

As someone who didn't get my food tastes from letting expensive people tell me what to like, I never got the taste for eating runny eggs unless they are in cake batter. I will never forget the look of withering scorn I got on some camping trip (this was before I vowed to never be more than two minutes on foot from a flushing toilet and a hot shower). In the same ignorance that led me to send raw steaks back to the kitchen in restaurants before I decided I don't like steaks anyway, I told the person poaching eggs one mosquito-filled morning that I wanted mine cooked until quite firm. Where I'm going here is that I baked a perfect soft-set egg and it was wasted on me.

I have a theory that semi-set eggs superseded hard-boiled ones because they are so much more photogenic.

If you like poached eggs that are almost but not quite set in the middle, this recipe is perfect for you. I also can't help wondering if the recipe's 8-minute cooking time could have been correct had I put the custard cup in a pan of boiling water instead of inserting it into the oven undressed. 

But this recipe gives you exactly what is promised.It's kind of like a spinach quiche with more visual flair and without the bother of making a crust for it. I was afraid that it would be nothing better than a clump of soggy spinach under a cooked egg, but it seems the egg and the milked spinach commingled just enough to unite into a very nice baked whole. I might add a bit of Tabasco sauce or a shake of cayenne to the next round of these, but they're still very good without. I don't think this is worth firing up the oven during the hot weather. But if you were already baking, these are very nice to slip onto the rack next to everything else.

Wednesday, June 15, 2022

Hump-Day Quickie: Ice Cream Pie!

Today on A Book of Cookrye, we present one of the easiest recipes I've ever done! 

I didn't want to permit the carton of cream we bought in the name of lemon cream cookies to go to waste. You may remember that the recipe uses only one spoonful of the stuff, leaving us with an entire carton (minus one tablespoon) of cream threatening to expire. We also had some cookies that had gone stale but were still perfectly good(ish), just waiting to get pulverized and then elevated to a higher purpose:

Ice Cream Pie
1 pint cream
¾ c powdered sugar
1 tsp vanilla
⅛ tsp salt
1 graham cracker or cookie crumb pie crust

Mix first four ingredients. Taste, and add a bit more vanilla or sugar if desired. Then whip until stiff peaks form. Pour and spread into the pie crust, and freeze overnight. After the pie is frozen, cover it tightly.
Obviously you can add things like fruit juice, cocoa powder, or anything else you like. If you want to add fruit, chop it finely or it will turn into hard ice cubes in the freezer.

That's right, if you just put whipped cream in the freezer, it turns into ice cream! And if you have leftover cookies that went tragically stale, you can turn them into a cookie crumb crust and then unite everything into a pie!

Getting all the ingredients measured and then put into the mixing bowl is the absolute hardest part of making one of these pies.

From there, you only have to run the mixer for a little bit (be sure to stop the beaters as soon as the cream is whipped, or you will get little curds of butter). You now have the ice cream ready to go into the pie!

After this, you simply put it into the pie crust and leave it in the freezer overnight. I would like to point out that if you're not baking the pie crust, you don't even need to turn on the oven or a stove burner to make this. So, as the heat worsens, the lower-effort graham cracker or cookie crumb crust is also the better choice to lighten the load on your air conditioner (or the tireless fan in the window). Also, from previous experience, a "proper" baked pie crust is really hard to hack through with a knife after you freeze it. So if you use a crumb crust, you'll save time while making this and also be able to actually cut the pie rather than chiseling it apart.

After just a night in the freezer, extra ingredients and everything that would have expired on us has become a beautiful ice cream pie!

Obviously you can fancy this up in a million different ways (here is the time we did this with strawberries). But the point is that if you want this done very simply, you can!

Wednesday, June 8, 2022

Hump-Day Quickie: The easiest way I know to prevent a dry baked chicken

This one comes from one of my online friends:


Baked Upside Down Chicken

Season, stuff, and otherwise prepare the chicken as you normally would. Then, place it backside-up and breastside-down in the pan. Bake as you were already going to. After the chicken is cooked, be sure to let it rest 10-15 minutes before carving and serving.

I think we've all been baking our chickens wrongside-up all this time! 

We wanted to bake a chicken but did not have the mushrooms to give it the Fanny Cradock treatment. I don't know about grocery stores outside of my current region of occupation, but around here the big cuts of meat have been far cheaper than the pre-sliced ones that get sold in shrink-wrapped trays. (I will also note that briskets, rib-racks, and any other cut of meat commonly used for showoff grilling is as expensive as ever.) 

The other week, beef chuck roasts were cheaper than hamburger. The store practically had to give away the uncut extra-long pork tenderloins that can barely fit in the average home freezer. I remember pot roast night being, if not an extravagance, at least a bit of a splurge. But these days, the "fancy" and impressively big cuts of meat are the cheap ones you serve every day. I can't believe it's cheaper to serve slow-roasted chuck than meatloaf.

With everything getting more expensive, it's hardly a wild guess that a lot of people are trying to cook for themselves what they used to either purchase ready-made or eat at restaurants. And also, we all need something to do! Some people have long wanted to learn more ambitious cooking, others said "Why not?" after getting enough downtime that for once they were rested enough to do things. 

I think the peculiarities in meat pricing make sense after a few moments' thought. For every person who went from making baking-powder biscuits in the Before Times to creating artisan sourdough in the Facemask Era, there are a lot of people taking their first steps beyond browning the beef for their Hamburger Helper. Prepackaged boneless skinless chicken breasts and pre-sliced pork chops seem a lot less daunting to new cooks than a whole chicken or a meat slab the size of a toaster. The big roasts seem like more ambitious kitchen projects, the little ones seem like they just need to be seasoned and put in a pan. So, I think that demand (and therefore the prices) for the big roasts just hasn't gone up as much as it has for the easy-looking pork chops. Of course, I should also note that it takes more time and effort to cut those boneless skinless chicken breasts and neatly sliced pork chops than to get a whole chicken or tenderloin packaged and out the factory door.

With that in mind, whole chickens were astonishingly cheap the last time we went to the grocery store. So, I decided to try what my friend did by accident. All I did was get the chicken nicely seasoned (I rubbed the seasoning under the skin instead of on top of it so that it would go right into the meat), put some salted and peppered potatoes around it, and let our single-pan dinner bake unattended in the oven. One cannot deny that a prostrate baked chicken looks odd no matter how perfect and crispy the skin is. 


In full disclosure, I should admit that when we flipped the chicken over, it looked like this.

No one will know after you've carved it.

But you could see the juices bubbling under the skin when we took it out. After flipping it back over so it could rest in the same position as it baked (Delia Smith lets her meat rest and therefore so do I), the meat was so moist it was practically wet. Chicken juices actually exuded out of the meat as we cut it. As Fanny Cradock might have said, the chicken was marvelously lubricated. 

So if you want to forestall dry, underflavored chicken breasts but don't have any mushrooms to shove under the skin, just flip that bird over and bake the chicken prone!

Sunday, May 22, 2022

Lemon Cream Cookies: or, If you ate liver you earned these

I couldn't stop thinking about the grimmest newspaper recipes I've ever seen clipped.

I found this pressed into the pages in my college library's copy of The Woman's Club of Fort Worth Cook Book. This book lives in protective custody in the special collections, but they gladly let any library patron look through it. However, you can only read the book on premises and under their watchful eyes. The librarian saw me copying down recipes to try and helpfully said "There's a scanner over there." I just had to also scan this joyless slip of newspaper that someone had carefully pressed between the book pages like a dried flower. I wondered what unfortunate dieting person would cut this out and press it into a book. Also, did this clipping come from a densely packed page of dieting recipes? An article about how to eat dinner like you have two dollars for groceries when you only have one?

Anyway, a while ago I tried to get a free trial to Newspapers.com. They wouldn't let me sign up without giving them a credit card number, and I knew I would forget to cancel before it was too late to avoid paying. But every now and then, I get an email about a discount or other promotion. And so, when they announced a free trial that didn't require me to hand over a card number, I had to see what these recipes came from. I searched the Fort Worth newspapers (since the page turned up in the Fort Worth Woman's Club cookbook) for any mention of both "buttered turnips" and "liver and bacon." This turned up almost instantly.

I finally found it!


Lemon Cream Cookies
⅔ c butter
2 c sugar
2 eggs
4 tbsp cream
2 tbsp grated lemon rind
1 tsp lemon extract
¼ tsp salt
3⅓ c flour
2 tsp baking powder

Heat oven to 350°. Grease a baking sheet.
Cream the butter, sugar, lemon rind, salt, and baking powder. Beat until light. Add eggs one at a time, beating thoroughly after each. Add cream and lemon extract, beat well. Mix in the flour.
Drop the dough by the spoonful onto greased baking sheets and bake 12 minutes. If you want them a little more neatly shaped, form the dough into balls instead- but they'll come out fine either way.

Source: "Helping the Homemaker" by Marian Manners, Fort Worth Star-Telegram morning edition (Fort Worth, TX), May 9 1934, page 11

This clipping comes to us from the women's page of the Fort Worth newspaper. Since it was pressed between the pages of The Woman's Club of Fort Worth Cook Book and it is now in a library in the Fort Worth area, it appears the book I found it in has spent its entire existence in the same city. 

Based on the date headings on the news page, the newspaper had separate morning and evening editions in those days. This clipping comes from the morning of May 9, 1934. The book I found it in was published in 1928. I kind of like how the later newspaper date shows us that whoever owned the book in which this clipping lay dormant still used the book six years after it was printed. You don't stash recipe clippings in cookbooks you never use. (You will also notice that whoever saved this brittle newspaper scrap left out the only good recipe.) The rest of the day's suggested menus, while perhaps not thrilling to someone living in this millennium, are not as grim and punitive as the two clipped recipes suggest.

The rest of that day's women's page is a time capsule of 1930s ladyhood (or at least, what people thought 1930s ladyhood should look like). There is the daily inspirational article, which on this particular day is about how women hold the country together while the men go to work ("all riches come to naught if emotional comfort is lacking"). We also have the daily romance novel chapter, a dress pattern of the day (which you can order from the newspaper's sewing pattern department), childrearing advice, fashion updates, puff pieces about the rich and famous, and other things of ladylike interest. A laundry soap advertises that with their product you can remove dirt and stains without "scrubbing your clothes thin in a few months' time," an interesting reminder that many people still washed their clothes with a tub and washboard long after the pioneer days were over. A short article about the importance of exercise opens with "When joints are stiff and the sprint for street car or bus is ambling, something has to be done." Apparently even Texas used to have such good transit that you didn't need a car.

But moving back to "Helping the Homemaker." If liver and boiled turnips are supposed to help the homemaker, I wondered how many homemakers appreciated the aid-- even if they also clipped the lemon cookies printed with the other two. To give "Helping the Homemaker" a fair shake, I looked it up by that name. It ran in the Fort Worth Star-Telegram in the early to mid-1930s. Most of the recipes are better than the ones we saw lovingly pressed into the cookbook. The food choices skew towards easy yet interesting (well, interesting for the time) recipes that you, the lady news reader of 1934, can make for dinner on short notice tonight. If the recipes weren't written by women who had families at home, the writers at least consulted them before publishing. The person who clipped the liver and turnips, despite having the good taste to write down my favorite bread recipe, cut out the worst edition of the column.

Some interesting things to note: "Helping the Homemaker" occasionally detours away from meals and gives recipes for preserving the season's produce (since home freezers didn't exist for most people). Also, a lot of the recipes in various "Helping the Homemaker" columns call for bacon grease but not for bacon. I guess bacon often graced the table, and every sensible housewife kept a jar next to the stove to thriftily save the grease. (We have learned that bacon grease is an easy way to add a lot of flavor to whatever you're cooking- especially if you already have it on hand.) Moving away from the jar of bacon grease that apparently lived on every stove, "Helping the Homemaker" uses nearly every ingredient that could be purchased for a reasonable price in the 1930s. A lot of recipes use dates- which in this century are one of the more expensive dried fruits in the store. Ham also makes many appearances in "Helping the Homemaker," whether it's listed among the ingredients as leftover ham, raw ham, chopped ham, cured ham, sliced ham or a whole ham. 

On a lot of days, the featured recipe tells you to chop up the main ingredient (whether it's meat, boiled eggs, or vegetables), stir it into hot gravy, and serve it on toast. It looks like a very routine way for the housewife in the 1930s to make last night's dinner stretch into today's lunch. I can't help wondering whether people never really liked creamed-whatever on toast but merely tolerated it in the name of economizing, or if it went out of style after enough years of people calling it "shit on a shingle" (or "stuff on a shingle" if children are present). 

Lastly, "Helping the Homemaker" columns never have any loving introductions or mouth-watering descriptions of the day's recipes as one would include today. Each short installment of "Helping the Homemaker" has two or three recipes with very terse instructions, and maybe a suggested menu (sometimes for dinner and sometimes for the whole day) - and that's it.

Next, I had to ask. Who was helping homemakers? The column sometimes was credited to someone named Louise Bennett Weaver, but sometimes had no name at all. I first dismissed this as an odd but arbitrary choice, but then I found newspaper issues that had both an anonymous and a Louise Bennett Weaver homemaker-helping column on the same page. Sometimes the two were right next to each other.

Fort Worth Star-Telegram morning edition, October 28, 1933

Where were the non-Louise Helping the Homemakers coming from? Coming at this search another way, I decided to stop restricting myself to the Fort Worth area. I searched every newspaper in the country for "liver and bacon" and "buttered turnips." The same recipe column appeared in various newspapers across the country, all within a few days of each other. So, "Helping the Homemaker" was a syndicated column and not the work of the Fort Worth newspaper staff. A few newspapers credited it to someone named "Marian Manners." Aha! We finally had a name to look up!

It turns out "Marian Manners" was the Betty Crocker of the Los Angeles Times. By that I mean she was the fictitious face of their cooking staff writers. And so, this brittle, ancient newspaper clipping of unexplained and depressing recipes that has mystified me for so long turns out to be a syndicated column from a test kitchen in Los Angeles.

With all that said, I wanted to try the lemon cookie recipe that a scissor-wielding home cook deprived herself of in 1934. It starts with grating off a lot of lemon rind. 


Meanwhile in the mixing bowl, we commence with the butter and the sugar. I find it interesting that this recipe calls for butter measured out in thirds of a cup. These days, most of us get our butter by the stick- each of which measures a half cup. It seems that recipes these days have adapted to using butter either by the stick or by the tablespoon (since they print tablespoon-sized measuring lines on the wrappers). A third-cup of butter leaves odd-sized lumps in the refrigerator. 

We are directed to cream the butter and sugar, then just add everything else in. I'm going to assume that they wrote this recipe for people who knew better than to just dump everything in all at once. If I am right, they left out the really obvious directions that any competent cook in 1934 would know. It's not until much later in history that everyone starts publishing recipes with detailed instructions. At this point, a lot of recipe writers (especially newspapers trying to cram as much as possible into the limited page space) only gave finely detailed directions if you were supposed to do things differently from what most people were used to.

With that in mind, we added in the lemon rind and gave it a good beating with the butter and sugar. In theory, the sugar crystals would sand the lemon rind and bring out a lot of the lovely flavor.

 As we add the egg, you should know that this lemony butter-sugar tasted absolutely wonderful. 

I checked and double checked the recipe, and we are supposed to use lemon rind but not any lemon juice. The recipe uses lemon extract instead. Well it's 1934, Old Man Depression keeps knocking on our door, and I guess we should be glad we can grate off the rind and economically save the rest of the lemons for another use. Because we failed to read the recipe, we did not purchase lemon extract. But this random mini-bottle of lemon vodka has been hanging around in the refrigerator for so long that no one knows how it got there. 


Because we are economizing like they had to in the 1930s, I squeezed out the lemon juice and froze it for a later time. I also grated off the rind of the other lemon we bought and crammed it into the little vodka bottle to turn into lovely lemon extract. Shoving all those happy yellow shreds of lemon rind through a tiny bottle opening was a bit trickier than I expected.

And now, we get to the second title ingredient in today's recipe! When I first saw the recipe name, I thought "lemon cream cookies" meant lemon sandwich cookies with some sort of creamy filling. But no, the "cream" in "lemon cream cookies" simply means we're supposed to add a splash of the stuff to the dough. I thought about substituting in milk (since the recipe doesn't use very much cream anyway), but then I decided that they deliberately chose not to write a recipe for "lemon milk cookies." 


We should also note that in those days, milk was not yet homogenized before selling it. The cream still separated into layer on top of it. If you had milk on hand, you didn't need to go out for cream to make these cookies. You just had to carefully pour the cream off the top of the milk already in your icebox. These days, since cream is a separate item you must deliberately purchase, you don't see as many recipes that just use a spoonful or a splash of it. In our age of homogenized milk, recipes tell you to use most (if not all) of the carton of cream if you're buying it at all.

I know it sounds silly to say this, but adding the cream made the mixture look, well, creamy. 

The cookie dough seemed a little stiff for drop cookies- like it might not actually spread. I didn't want a lot of oven-hardened lemon clumps, so I shaped most of the cookies into flattened balls. The dough really wanted to stick to my hands, which made this take a lot longer than it should have. But to test the recipe as written and to see what someone following the instructions in "Helping the Homemaker" would have pulled out of the oven on a lovely May day in 1934, I dropped a few unshaped cookies from the spoon just as the newspaper said to. 

When the cookies were done, the shaped and the dropped ones looked a lot more similar than when I had first put them onto the baking sheet. The spoon-dropped ones look a bit more bumpy on top, but they spread out just fine. 


I shaped the remaining dough into balls while waiting for the first batch to bake, and put them into the oven without flattening them. These cookies weren't quite as thin as the ones I flattened before baking, but there wasn't as much of a difference as you may think. There is no need to try to pat each cookie flat. As you can see, they come out just fine without it. 


Just to show how the cookie dough seems to turn into perfectly nice cookies instead of misshapen dough clumps no matter how you shape them, here are all three ways on one plate.

As for how they taste: Oh these are so good! Whoever left this recipe behind on the news page when clipping "Helping the Homemaker" was missing out! Perhaps I should thank her for accidentally leading me to this recipe by setting off my curiosity when I first found that clipping. I have long wanted to know where that grim newspaper snippet of liver and boiled turnips came from. I would not have seen the lemon cream cookie recipe were it not for her newspaper-cutting scissors in 1934.

These cookies are soft in the middle, crisp outside, and as someone else put it "Just the right amount of lemon to taste really good without being too sour." About a day later, I was told "I finally figured out what they remind me of! Froot Loops!" And once that was said, I couldn't un-notice it when I ate one. I guess this goes nicely with all the people around the world and want to know why Americans eat dessert for breakfast. These cookies really do taste a lot like a less synthetic version of some cereals. That, by the way, is no detraction. These cookies got eaten a lot faster than a heavily-loaded plate should disappear. They were unexpectedly good when dipped in the black tea with lavender that I splurged on last time I was at a grocery store with an expansive tea aisle.

My only warning is that this recipe makes a lot of lemon cream cookies. I cut it in half, and I got forty of them. If you're not filling a cookie jar to keep around the house or giving these away, you should at least think about cutting it in half. If you make the full recipe amounts instead of halving it, you will have two platters that look like this:

Saturday, May 21, 2022

Second-Stab Saturday: Chatting away our runny cookies!

Today I wanted to share a very simple change to recipe I really like! It's the fourth-to-last sentence in the directions.

Chatters
½ c peanut butter
½ c butter
½ c brown sugar
½ c white sugar
1 egg
¾ tsp baking soda
½ tsp baking powder
¼ tsp salt
1¼ c flour

Put peanut butter and butter in a bowl. Add sugars, beat thoroughly. Beat in egg. When all is mixed, add the soda, salt, and baking powder. Mix well, then stir in the flour. Roll into small balls, and roll these in sugar. Press criss-cross lines on top with a fork.
Chill thoroughly in the refrigerator before baking.
When ready to bake, heat oven to 375° and grease a cookie sheet. Place the cookies on it, about 3 or 4 inches apart. Bake 10-12 minutes.

Source: "La Mesa" in Confidential Chat, Boston Globe, 1963; via Something from the Oven, Laura Shapiro, 2005

Our favorite peanut butter cookie recipe has been this one from the Boston Globe. But every time we made the recipe, the cookies ran together into one big baked peanut butter slab:


And yes, sometimes we oversoftened the butter and melted it instead, which would definitely worsen the problem. But the cookies ran like this even when I softened the butter by leaving it out for a few hours like a proper cook would. But while I didn't care too much about having to cut them apart with the edge of a spatula while they were still hot, it occurred to me that one extra step might forestall that:

If you put them in the container upside-down, you can just lift them off the lid as easily as plucking them off a plate.

That's right, we are popping the shaped cookie dough blobs in the refrigerator for a few hours so they get good and hard before baking! I usually chilled the dough before shaping it, but it always softened a bit while I was working it in my hands. There only hard part about letting the shaped cookies refrigerate. I had to resist eating too many of these lovely chilled cookie dough bonbons.

It seems these cookies only needed some time in the refrigerator to actually look like cute round cookies instead of a formless yet tasty runny mess! This is also a perfect discovery as we get into the hottest parts of the year. You can make the cookies in the sweltering day, and then just leave them in the refrigerator until later at night when you bake them.

Granted, the fork lines reduce to subtle suggestions of a grid pattern on top, but I do not care. These are officially my favorite peanut butter cookie recipe. They're crisp on the outside, very soft in the middle, and taste delicious.

Saturday, April 9, 2022

Second-Stab Saturday: Elizabeth's Rolls made easier!

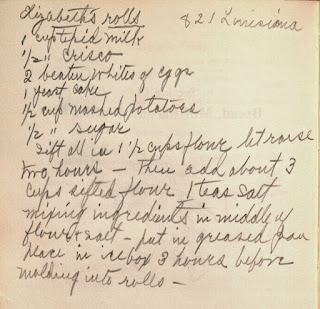
 Today on A Book of Cookrye, we are revisiting a recipe I have made many times. The other night, I realized I've filled in the missing instructions made it a lot harder than I needed it to be. Here we have the original recipe:

Incidentally, assuming "821 Louisiana" is Elizabeth's address and that she lived in Fort Worth (since the recipe was written in the Woman's Club of Fort Worth Cook Book), her house site is now under the interstate.

When someone writes a recipe down in a cookbook, they mean to keep it. Recipes written on index cards or paper sheets can be thrown out as wanted. But if you're writing a recipe in a cookbook, you have decided that this recipe is not getting kicked out of the kitchen. Furthermore, this recipe isn't written in the back of the book. It is written right at the beginning of the bread chapter (you can kind of see it on the back of the page). Therefore, whoever wrote this down didn't even want to flip through the blank pages at the back of the book. They put it right where anyone looking for a bread recipe would find it.

Elizabeth's Rolls
1 c milk
½ c shortening
½ c sugar
½ c mashed potatoes*
2 egg whites
1 cake or envelope yeast
about 4½ c flour, divided
1 tsp salt

Scald the milk†, then stir in the shortening to melt it. Stir in the sugar. Then whisk in the mashed potatoes and about 1½ cups of flour, beating until smooth. Whisk in the yeast and the egg whites. Set in a warm place and let rise for about two hours. (Be sure it has a lot of room to expand.)
In a large bowl, mix the salt and remaining flour. Press it against the sides of the bowl, making a big hole in the middle. Pour the mixture into it. Stir from the center outwards, gradually incorporating more flour until all is mixed. Knead, then set in a greased pan or bowl. Refrigerate for at least 3 hours. (Overnight or a few days is fine.)
When ready to bake, set the dough in a warm place to rise. When it has doubled in size, shape it into rolls. You can either roll the dough into a sheet (somewhere between ¼" and ½" thick) and cut it like biscuits, or you can shape the dough into balls. The dough may be sticky- if you're using a rolling pin and a biscuit cutter, have plenty of flour ready for dusting the counter and the top of the dough.
Let rise, then bake at 400° until nice and golden on top, about 15-20 minutes.

*If you don't have any left over, microwaving some instant potatoes will work just fine. If you mashed your potatoes with the skins on or if they stay a little chunky when you mix them with the rest of the ingredients, putting the batter mixture into a blender will reduce the skins to really pretty-looking flecks and eliminate any potato lumps.
†I prefer scalding milk in the microwave instead of the stove. It never scorches like it does in a pot, and it's so much faster. Just use a large bowl so the milk has plenty of room to bubble up. Pop the milk in the microwave and cook until it looks like it's starting to simmer, and that's all you needed to do.


Source: Handwritten note, The Woman's Club of Fort Worth Cook Book, 1928

Recently, I thought to myself that it's been a while since I made Elizabeth's rolls, and that we should make them again. Then I realized my interpretation of the recipe was a lot harder than it needed to be. Up until now, I always mixed the flour and mashed potatoes together, then slowly added the liquids until it was mixed into a smooth batter. I had to add the milk very slowly, beating every little spoonful and splash in very hard, otherwise I would get unmixable clumps floating in a gravy. It was a bit like making a stovetop white sauce, except you have to stir a lot harder. It was also the only way I knew of to get this done with absolutely no lumps unless I wanted to clean out a blender in my dishwasher-free kitchen. 

Today I was looking back over the instructions and realized... I could have just thrown everything together and gotten out a whisk. First we start with the milk, shortening, and flour, and get everything mixed in about an eighth of the time it took to do this with a spoon.


Then we just dropped in the smashed spuds and flicked the whisk around some more.


Doing it the long way makes sense when you only have a wooden spoon to work with. But if you have a whisk at hand, it slices right through those little lumps and clumps without even slightly wearying your wrist. Another thing I like about this recipe: it doesn't matter if you accidentally get a bit of egg yolk in your whites. You needn't expend yet another egg in the name of getting 100% yolk-free whites like you would if we were making a meringue. I thought that perhaps we were supposed to beat the whites stiff anyway (the original instructions call for "beaten egg whites"), but then I realized that the yeast livens and aerates this mixture really well anyway-- and then it gets worked, kneaded, and squished.

After this point Elizabeth's original handwritten instructions get a bit clearer, and we can finish the recipe by following the original handwritten notes. But as we removed the dough from the refrigerator after its requisite three hours, we ran into a bit of a problem. As aforementioned, hamburger makes regular appearances on our table. Therefore, we have been using the rendered-off beef fat instead of shortening in many recipes. However, bread dough made with a bovine substitution gets unworkably hard in the refrigerator. You can't roll the dough out with a rolling pin, though smashing it flat might work. We ended up just leaving it out on the counter until it softened up a bit.

In a later batch, we tried simply shaping the dough before giving its requisite three hours of refrigeration, but for whatever reason it refused to rise no matter how many hours I let them wait in a warm, moist environment. Well, they expanded a tiny bit, but you can tell just from looking at the rolls that they were dense and hard.

I've made so many batches of Elizabeth's rolls in the Before Times and they were always so good that I would voluntarily make the recipe again. People would specifically ask me to make this recipe. Therefore, I was not prepared for this recipe to betray me.

I thought the failure to rise might be a result of making little dough balls instead of shaping the rolls with a rolling pin. So I tried to see if perhaps making these with a rolling pin and a biscuit cutter might give me the results I've gotten before. They rose a bit after three hours of rising time, but most of what you're seeing is the result of the bread puffing up the way it always does when you first put it in a hot oven. It didn't rise much before baking, though I guess the yeast put in enough tiny bubbles that they could expand when suddenly heated up.


I was not prepared to have to test the errors out of a recipe I've made more times than I can count. Usually, when I make these, they are slow to rise at first but then suddenly start growing and expanding more than one would ever expect. Elizabeth's rolls are (normally) so good that I once made six dozen of them and gave them away at Christmas. You don't spend all that time waiting for rolls to rise if they're not good enough. 

You don't make this many rolls unless the recipe actually works.

 I was so frustrated. How could one of my most-used bread recipes suddenly stop working? Then I checked the notes and realized I had omitted a step: letting the whole mass of dough rise again after removing it from the refrigerator. Apparently this is more crucial than I thought. Maybe it wakes up the yeast from its refrigerated slumber so it will actually raise the bread. After an embarrassing number of disappointing bread batches, I had finally figured out how to, um, make my bread recipe again. 

When I used a rolling pin and a biscuit cutter, they rose so high they fell over themselves. If one was better at planning ahead, one could use a muffin pan to steady them as they rise. But the point is, they rose gloriously and unstoppably. Everyone eating these instantly knew why I had been determined to make rolls using this recipe.


Just for completeness, I also rolled the dough into balls and baked those. They started out this big:

They soon rose until they almost melded into one big bread slab in the pan.

In case you're wondering about the saucepan, I've learned a new (to me) method for making a yeast-raising habitat out of the oven. I used to set it to a very low temperature and then turn it off after putting the dough in. But I've had much better results by boiling a full pot of water and setting it into the oven. This way, the bread doesn't dry out before you had the chance to bake it. 


Granted, they look a little flat in the picture, but keep in mind that the pan has very high sides. So while the rolls barely peep over the top of the pan, there's a lot of pan under there. As further proof, we can break one open to show the airy happiness inside.


I am very happy to share this bread recipe after having to do too many trials and make too many errors before it actually worked like it ought to. They're delicious. Also, since you are supposed to refrigerate the dough for a few hours before baking, you can do all the mixing and resultant cleanup early. So if you're making these to go with dinner, you won't have a small pile of bread-related measuring cups and stirring spoons needing a wash with all the dinner dishes. 

Anyway, this is by far my favorite roll recipe. I highly recommend you give it a go.